How to Draw a Beautiful Anime Girl Step by Step
This in-depth tutorial explains how to draw a beautiful anime girl in 15 steps. In particular, it looks at drawing the face of such a character from the front view.
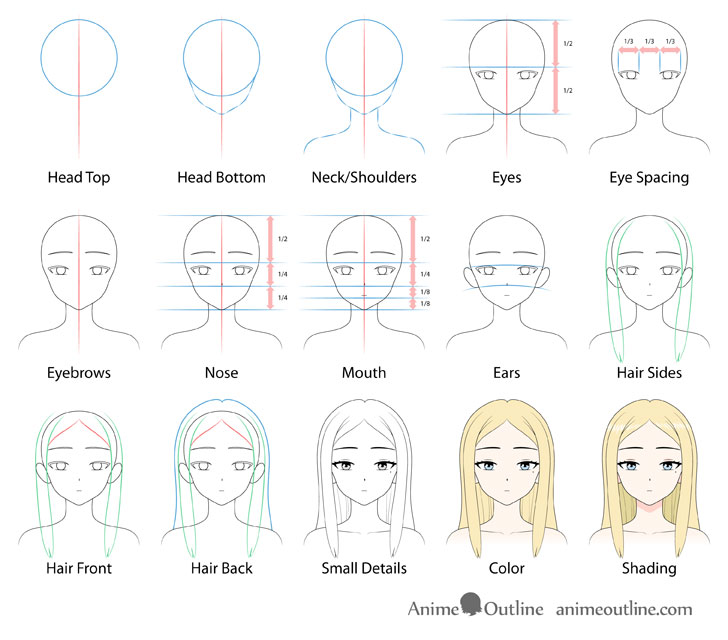
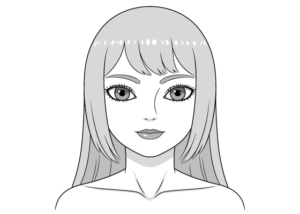
As the title states, the focus of this tutorial is on drawing a beautiful female anime character. In anime and manga, these characters often have roles such as the “pretty girl” at school and may not necessarily be the protagonist. However, drawing an anime girl to look beautiful is actually a bit of a challenge as most of them are drawn to be fairly cute by default. To help, this tutorial provides a thorough guide on how to draw and position the head and facial features for a “pretty girl” character archetype with a bit of a “classy” appearance.
Please note that if you’ve seen other similar tutorials here on AnimeOutline there may be some overlapping information. However, this particular character does have slightly different proportions so be sure to read the guide carefully.
Also, please note that while the proportions in this tutorial can help achieve a “beautiful girl” look, this is just one example and there are many more ways to draw such a character.
Overall, the tutorial combines good drawing practices that can apply to art in general with tips on getting a particular anime/manga style look.
Step 1 – Set up the Structure for the Top of the Girl’s Head
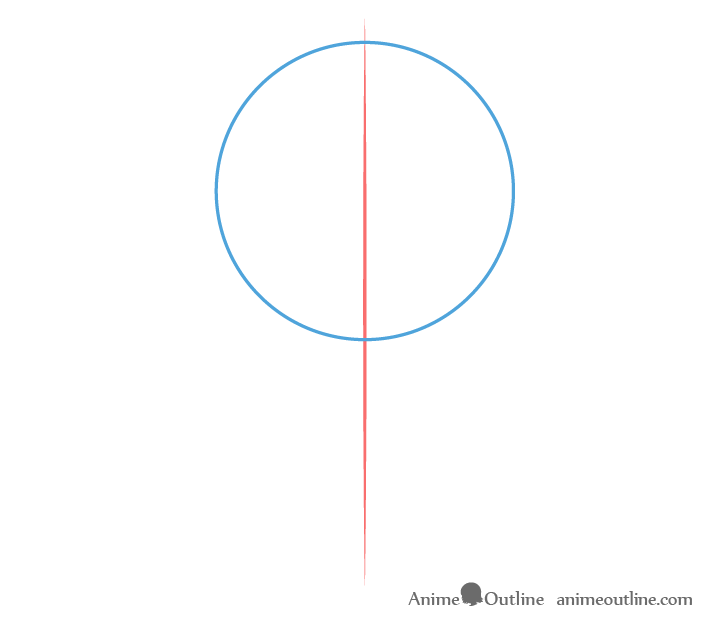
Start by making a vertical line through the middle of your drawing area. In this case it should be tall enough to accommodate the height of the head, neck, and the upper part of the shoulders.
The purpose of this line is to act as a guide that helps ensure that both sides of the head, neck and shoulders are of relatively even width. Later on, it can also help with spacing and positioning the facial features.
At the top of the guide line, draw a circle for the top of the head.
Step 2 – Draw the Jawline and Chin
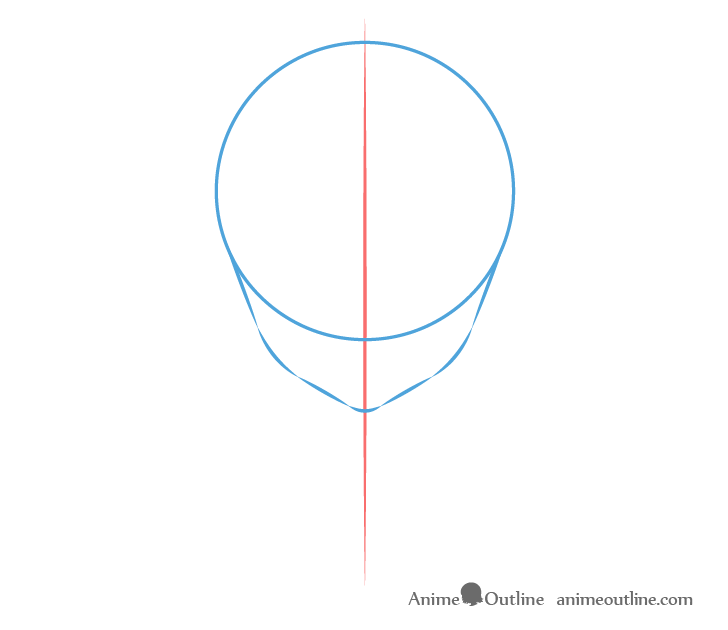
From the lower half of the circle project two lines that are angled towards the center line. These should then transition into curves followed by yet another pair of lines angled even more towards the center. Join the two sides of the face at the bottom with the curve of the chin.
Because the girl is drawn in an anime style and because the intention is to make her look beautiful you want the lower part of the head to be fairly small. This will create a rounder face and rounder faces tend to look cute. Also, be sure to make the curve of the chin quite small as well. This is an important little detail. At the same time, you don’t want to make it so small at to look sharp, as this can created a harsher look. Drawing the girl with smooth curvy lines will help give her a more feminine appearance.
Step 3 – Draw a Slender Neck and Shoulders
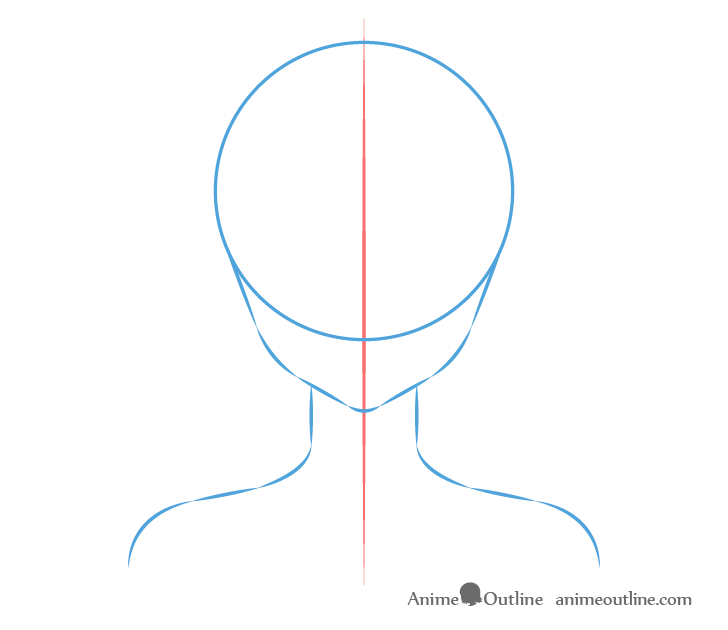
Make the neck fairly thin in relation to the head and fairly long. It should eventually transition into the shoulder muscles which should then transition into the shoulders.
A slender and long neck will help emphasize a beautiful character.
As this tutorial mainly focuses on the face it won’t go into too much detail on drawing these parts of the body. For more information on drawing anime necks and shoulders you can see:
How to Draw Anime Neck & Shoulders
Step 4 – Get the Vertical Position of the Eyes
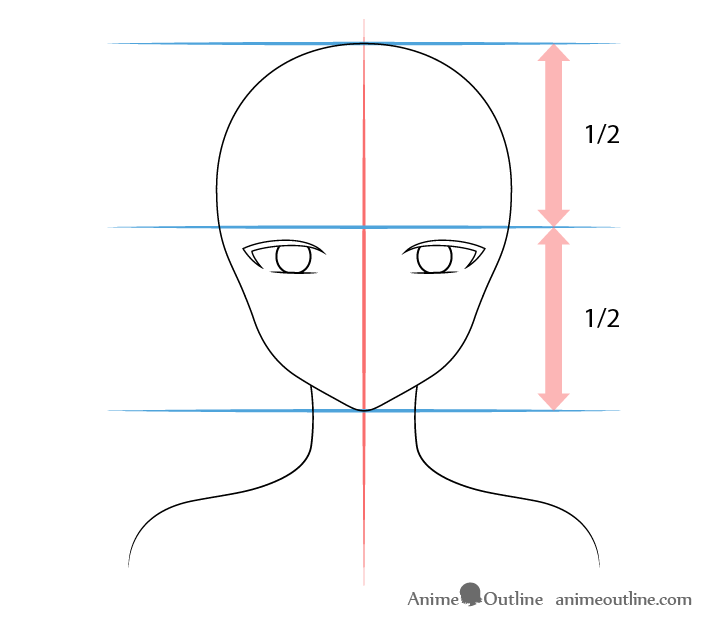
To position the eyes, draw a straight horizontal line through the middle of the head. You will want to place the eyes slightly below this halfway point. Drawing the eyes low down on the head will create a large forehead, which can look cute and thus help contribute to creating a beautiful overall-looking character. However, read the next step before you actually add them.
Step 5 – Space and Outline the Eyes
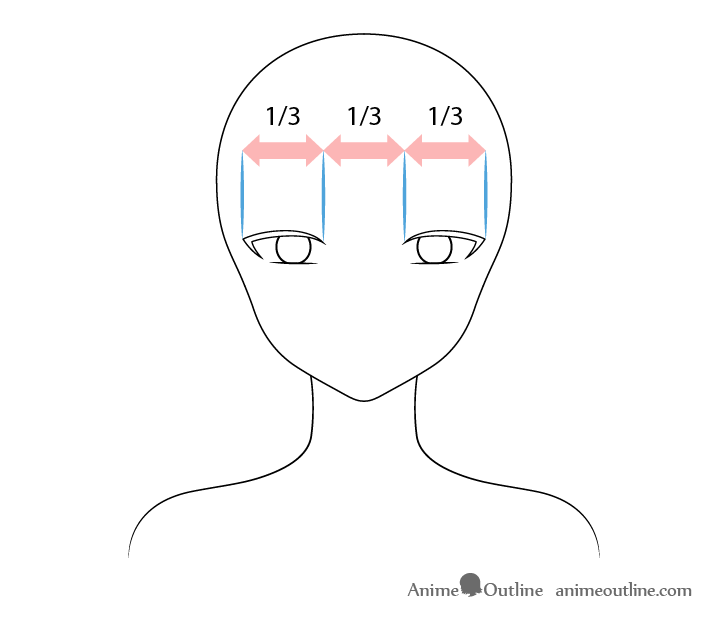
When spacing the eyes, you will want to leave roughly the distance of one more eye in between them. At this stage, simply outline their main shapes without drawing any of the smaller details (save those for later).
Make the eyes fairly narrow with thick upper eyelashes. The thick eyelashes are generally associated with a beautiful look and will help achieve the goal of this tutorial.
For tips on good drawing practices and explanations as to why you want to draw a certain way, see:
Beginner Guide to Drawing Anime & Manga
Step 6 – Position and Draw the Eyebrows
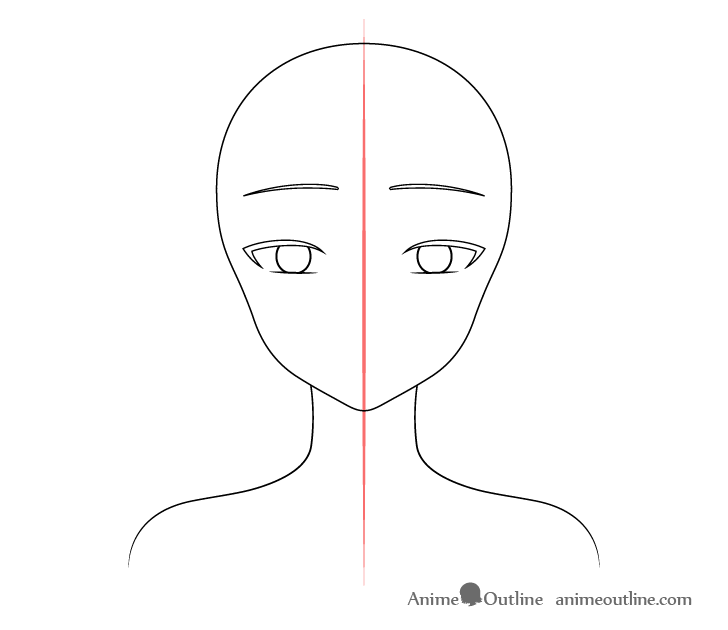
Fairly high up above the eyes draw the eyebrows, with thicker and slightly raised inner ends. This will help give the character a slightly “innocent” look, again adding to her cuteness.
For more examples of various types of anime/manga eyebrows, see:
How to Draw Anime & Manga Eyebrows
Step 7 – Position and Draw the Nose
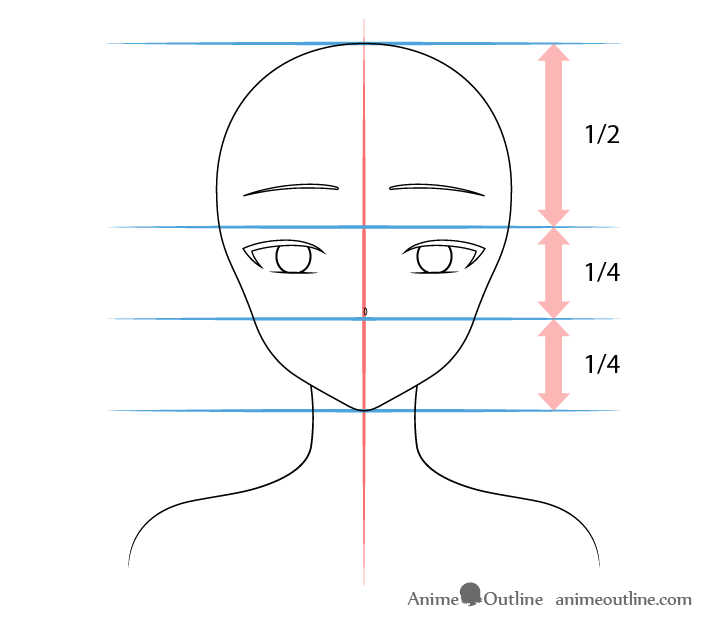
Place the nose slightly above the halfway point between the horizontal middle of the head and the bottom of the chin. Draw its outline as a tiny oval, but make the side closer to the center of the face slightly flatter.
Step 8 – Position and Draw the Mouth
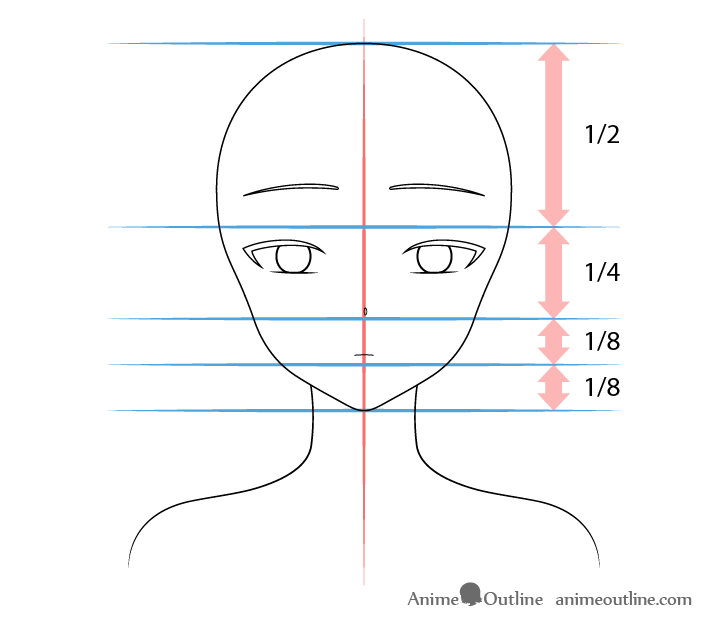
Place the mouth where its bottom lip (not actually drawn) would be about halfway between the bottom of the nose and the bottom of the chin.
Make the mouth fairly small with a very slight downwards curve. It’s very important not to draw too much of a curve, though, or the girl can end up with an unhappy-looking expression.
Drawing the mouth in such a way will give a bit of “condescending” expression. However, this is offset by the “innocent” look created by the eyebrows. The end result is an expression that is cute but has just a slight hint of arrogance. Such a look can be very fitting for a beautiful girl of upper class.
For drawing a cute girl with a different expression and appearance, see:
How to Draw a Cute Girl’s Face in 12 Steps
Step 9 – Position and Draw the Ears
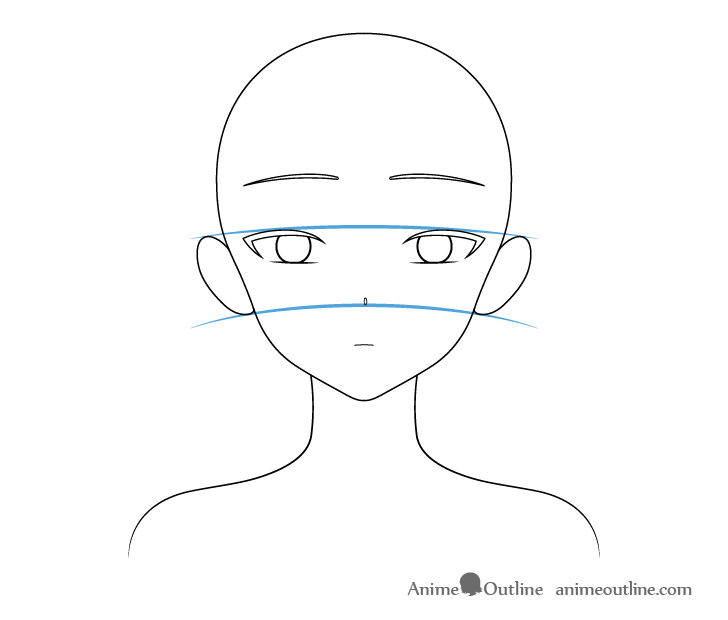
Position the ears with their tops slightly below the top of the eyes and their bottoms slightly below the bottom of the nose. For this particular character, the ears will be drawn slightly smaller and lower down than what is recommended in some other guides here on AnimeOutline.
For the other placement examples, as well as more information on drawing ears, see:
How to Draw Anime and Manga Ears
In this case, the ears will be mostly covered by the hair, so there is no need to draw their inner details.
Step 10 – Draw the Sides of the Hair
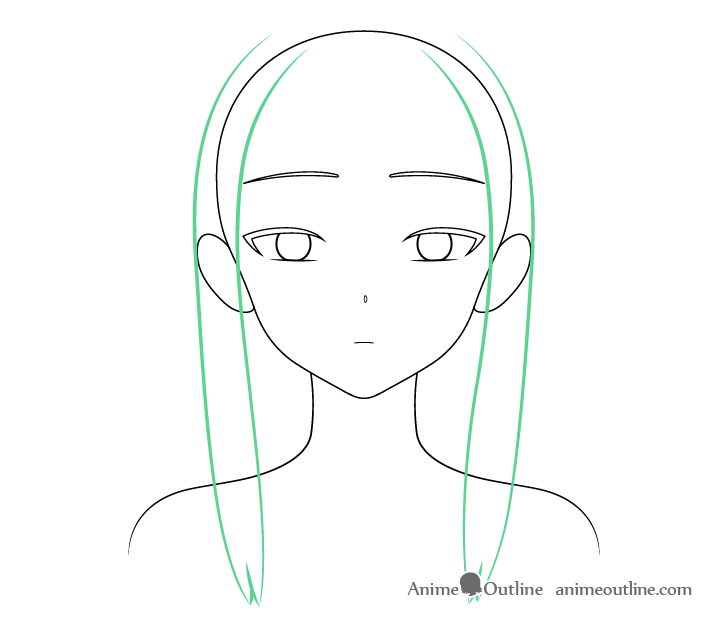
After placing all of the facial features, you can move on to drawing the hair.
To emphasize that the character is beautiful (takes care of herself) she will have a fairly neat hairstyle.
When drawing the hair, you can think of it as being split into the sides, front, and back/top sections. For a more detailed explanation of this, as well as examples of other hair styles see:
How to Draw Anime and Manga Hair – Female
Begin by drawing the “sides” part of the hair. In this case, it will be two fairly long sections that begin from around the top of the head and end with a pair of splits below the shoulders.
Make these slightly curved, as though they are hugging the head/face, and also make each one slightly wider near the bottom.
Step 11 – Draw the Front of the Hair
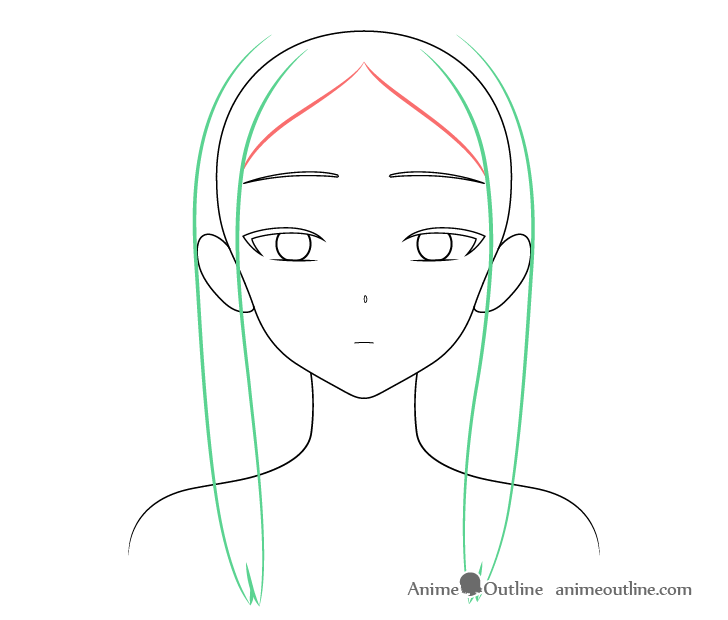
Draw the front portion of the hair (along the forehead), split down the middle and tucked under the sides.
Step 12 – Draw the Top and Bottom of the Hair
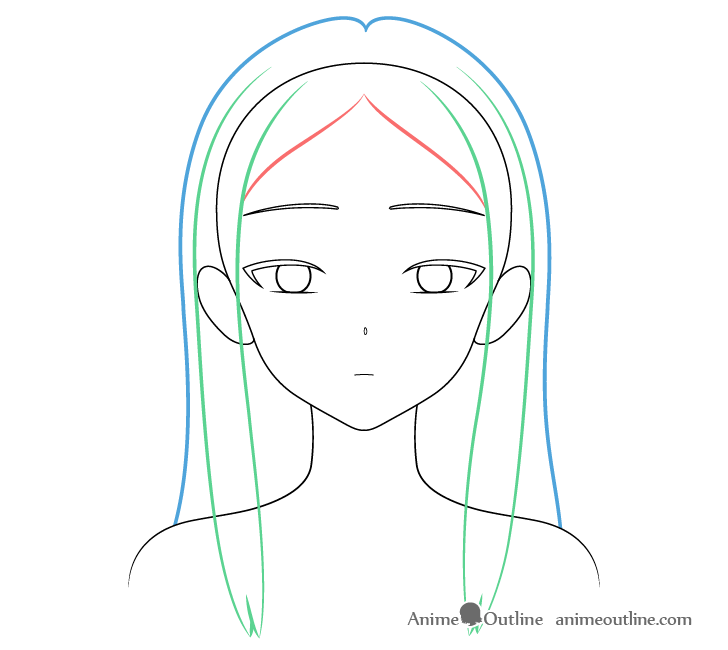
Add the last section of the hair, starting with a split at the top of the head and running all the way down to the shoulders (eventually going behind them). Draw its outline slightly farther away from the head as it goes up from the split, and then gradually closer to it around the upper sides. The outline should then, again, get farther away as it goes down to the ears. Going past the ears, the outline should curve very slightly inwards towards the neck and then away from it near the shoulders.

After you have added this last section, erase the parts of the head and ears that are covered by the hair.
In case you are wondering why you needed to fully draw out the head and ears and not just start with the hair, there are several reasons for this. One is that seeing the exact size of the head makes it easier to place the facial features (as was shown in the previous steps). Another is that by drawing out the shape of the head, you can easily see how much volume you are giving to the hair (this last section in particular).
For a list of common drawing mistakes and ways to avoid them, see:
Common Mistakes When Drawing Anime & Manga
Step 13 – Add the Small Details

After you finish drawing the outlines of the hair and placing all of the facial features add the smaller details.
These are:
- Collarbones
- Details of the face
- Hair folds
- Mole or Beauty Mark
Draw the Collarbones

Going up from below the neck, draw the collarbones. These should be partially hidden by the side sections of the hair.
Draw the Details of the Eyes & Darken the Facial Features
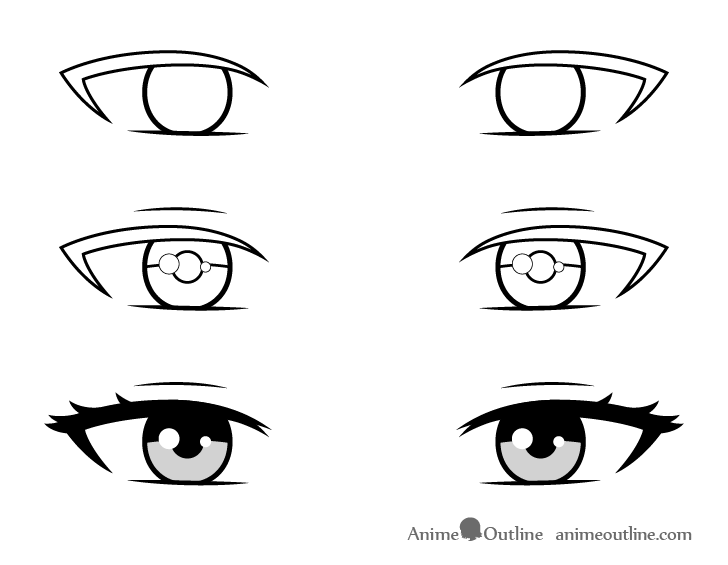
You can see a basic step-by-step drawing of the details of the eyes above. Continuing from their basic outline in step 5, first add the pupils and reflections. Next, add hints of the eyelids and some individual lashes. Fill in the eyelashes, pupils, and upper ends of the irises with black or dark pencil shading.
If you want a black and white drawing, you can make the lower parts of the irises grey. If you wish to color it, then make the eyes blue later on.
For a detailed tutorial on drawing a different pair of female anime eyes, see:
How to Draw Female Anime Eyes Tutorial

Fill in the eyebrows and nose with black or dark pencil shading, similar to the dark parts of the eyes.
Draw the Hair Folds

Add some folds to the hair as shown in the example above. Draw a couple along its forehead section, and several more along the area between the sides and the neck.
Draw the Mole or Beauty Mark
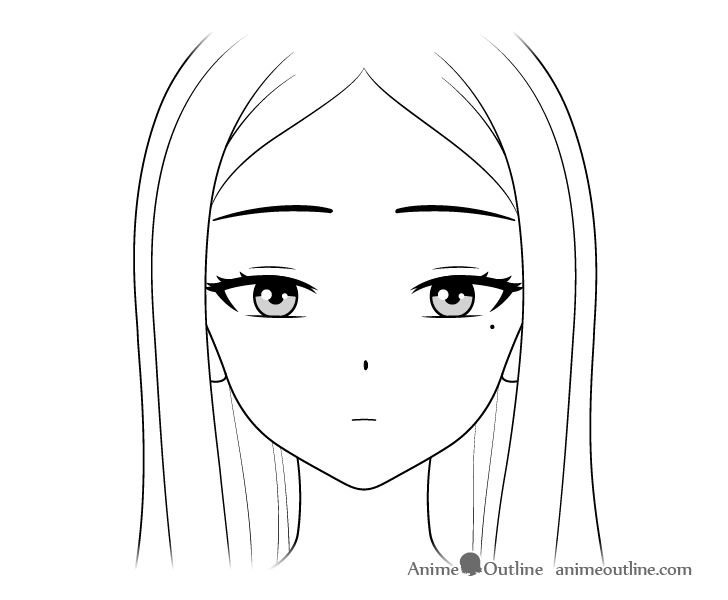
Finally, you can also add a little beauty mark or mole just slightly below the eyes (or in another place). This will again help emphasize that the girl is beautiful, as some famous models have had these. Simply draw the mole as a small dark or black dot.
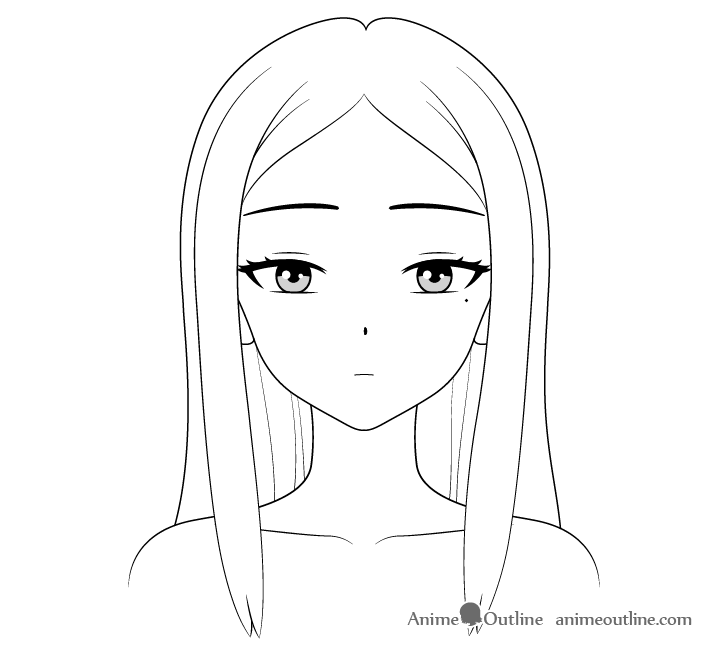
Once you’ve added the mole, you should have a beautiful anime girl drawing that you can color.
Step 14 – Color the Girl to Make Her Look More Beautiful
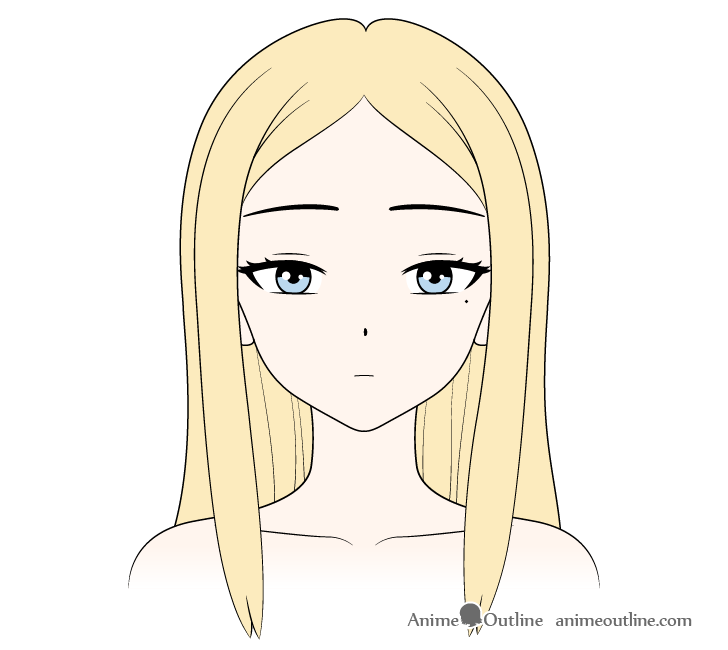
Before you begin coloring the character, it’s important to note that if you are drawing on paper, you may want to first outline the highlights in the hair (see next step). If coloring digitally, it’s easier to add the highlights at the end.
For the color selection, you can go with many potential options. In this example, the girl has fairly light blonde hair and complementary blue eyes. Her skin is a very light orange pink, but again, you can go with a different tone if you prefer.
For an explanation of which colors go well together, see:
Beginner Guide to Picking Colors When Drawing Anime & Manga
Fill in the hair, eyes, and skin with the colors of your choosing and move to the next step.
Step 15 – Add the Shadows & Highlights
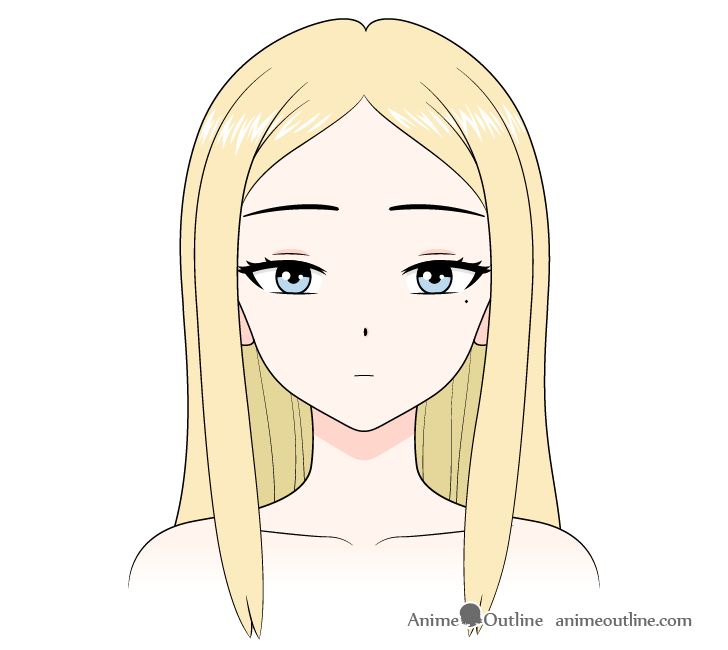
For some very basic shading, you can add shadows in the most common place. Generally you would get shadows like these when the light is coming from above (a very common setup in many scenes of anime and manga). Place them as follows:
- Tiny shadows around the eyelids
- Small shadows below the eyelashes (cast by the eyelashes)
- A very tiny shadow to one side of the nose
- Fully shaded ears
- A large shadow on the neck in the shape o the chin (cast by the head)
- Fully shade the inner part of the hair between the head, neck, and the side hair
As mentioned earlier, you can also add some hair highlights as sort of white zigzag line across the hair. As already suggested, you can either leave these white and then color around them, or add them in over top of the color.
If going with the second option, you can either use a white correction pen (if drawing on paper) or, if drawing digitally, add them on a new layer (depending on the software you use). Alternatively, you can leave the highlights out alltogether.
Conclusion – Creating a Beautiful Anime Girl Drawing Can Be a Challenge
As mentioned at the start of the tutorial, female anime characters tend to be cute by default, so it can be a challenge to draw one that is supposed to be beautiful. However, using the proportions and drawing the facial features as described in this guide can help create such a character.
The large forehead adds to the “cuteness,” while the large but slightly narrower (than common in anime) eyes give her a more mature look. The raised eyebrows create a slightly innocent appearance, while the downwards-curved mouth gives just a tiny bit of a “condescending” look (not necessarily negative) – sort of like a queen, princess, or someone of the upper class.
For drawing a princess character, see:
How to Draw a Princess in 12 Step (Anime or Manga)
For more on drawing different kinds of anime characters and creating various character archetypes, see:
- How to Draw Anime Characters Tutorial
- How to Draw an Anime Elf Girl Step by Step
- How to Draw an Anime Girl in a Mask Step by Step