
How to Shade Anime Hair Step by Step
This tutorial teaches the basics of anime and manga style hair shading with step by step examples of twelve different hairstyles.
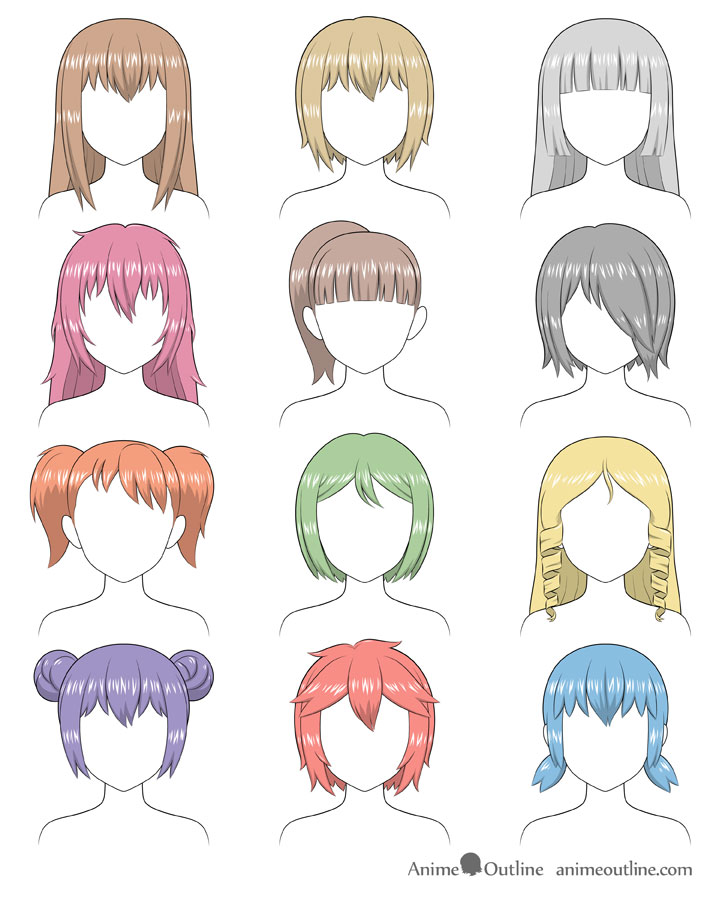
Above you can see a preview of the different hairstyles shown in this tutorial. Even if you are only interested in some of them it may be a good idea to read over the entire tutorial as certain hairstyles have more detailed explanations on shading particular parts of the hair. It’s set up this way to avoid some repetition.
Things to Know About Anime Hair
Before going into the actual drawing examples below are a few things that can help you gain a better understanding of how to shade anime hair and why it’s shaded the way its.
1. How Anime Hair is Draw
Anime hair is generally drawn in large clumps with a lot of it based on real hairstyles.
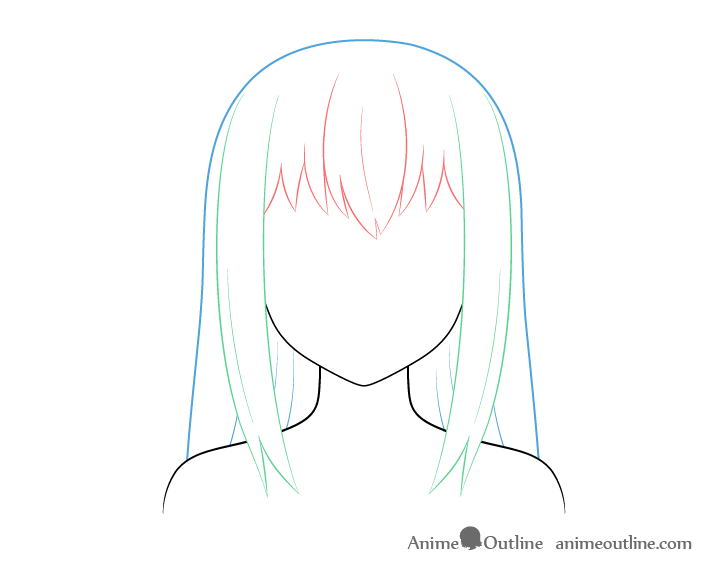
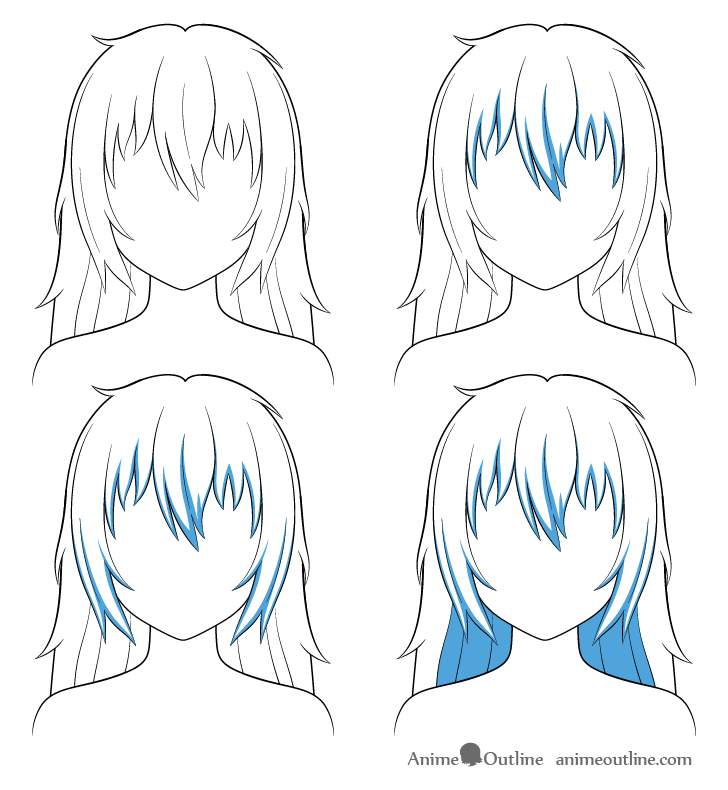
When drawing hair it can be helpful to break it down into the front, sides, and back/top sections as shown in the red, green and blue above. This is also how to hair will be broken down in this tutorial.
For examples like the one above of all of the hairstyle used in this tutorial as well as general instructions on drawing anime hair see:
How to Draw Anime and Manga Hair – Female
For more tutorials on drawing anime hair also see:
2. How Anime Hair is Shaded
Generally anime and manga hair is shaded without gradients and has hard transition between it’s light and dark areas. This makes the shading process much faster but at the same time a little tricky as it can be difficult to figure out where the boundary between light and dark should be placed.
Where the actual shading is placed depends on the lighting conditions the artist wishes to show.
Anime characters (hair included) are generally shaded in two ways:
- Generalized shading where there character or object are well lit from most sides
- Shading with strong one directional light source
This particular tutorial will focus on the more generic shading as it’s very common and can be used in most scenes. Please note however that even in the “well lit” lighting setup the strongest light will generally comes from somewhere above (the sun or indoor lighting). This means that shadows will tend to form towards the bottom parts of the hair.
Don’t however confuse this with a one directional light source form above which would be more like shining a flashlight down on someone in a dark room.
For examples of shading in one directional lighting see:
How to Shade an Anime Face in Different Lighting
Finally also keep in mind that anime/manga style shading does not need to be perfectly accurate or overly realistic. The goal is to have just enough basis in reality so that it looks believable.
Hair Drawing Tips Before You Start
A few quick notes before you get started to help you better prepare for the tutorial.
1. Adding the Shading
When drawing the shadows for this “generic lighting” setup make them just dark enough to stand out from the base hair color. If you make them too dark they will look unnatural and if you make them too light they may not be visible.
For how you actually darken the shaded areas can depend on the drawing method you use (paints, pencils, etc…). For example you can either mix in darker paints or simply press harder on the pencil.
2. Drawing the Highlights (Important)
For this particular tutorial the main difference between shading digitally and shading on paper can be in how you add the highlights.
If you are going to be shading the hair on paper you can use a white correction pen or white paint to draw the highlights. Alternatively you can also simply leave the area white and color around it.
If shading digitally you should add them in last as shown in the step by step breakdowns.
For different types of anime hair highlights see:
Different Ways to Draw Anime Hair Highlights
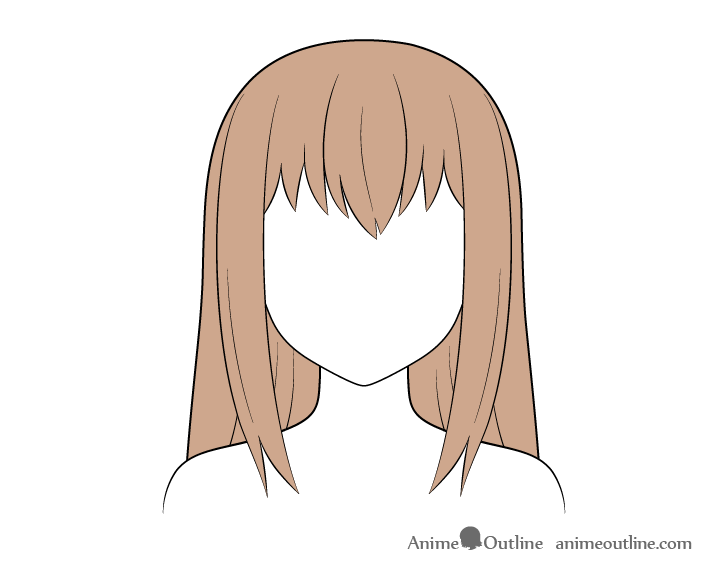
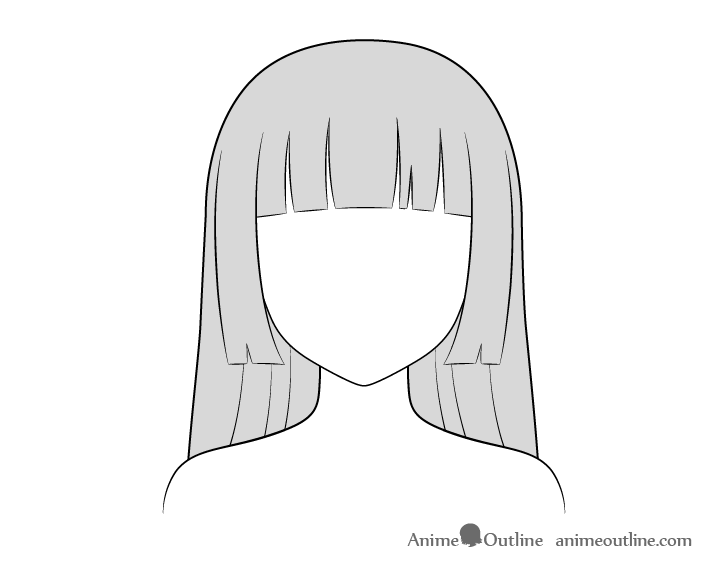
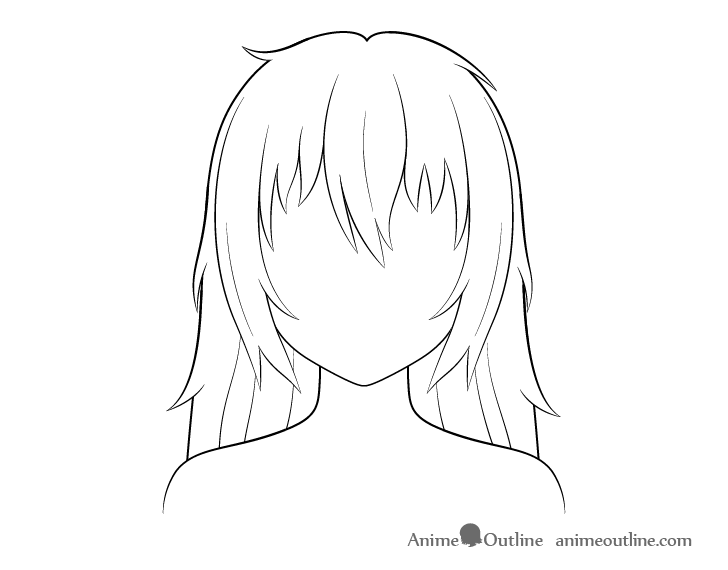
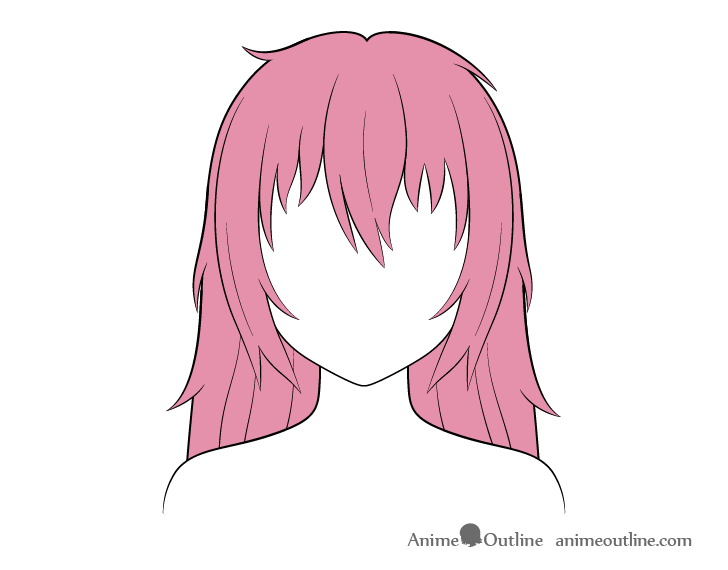
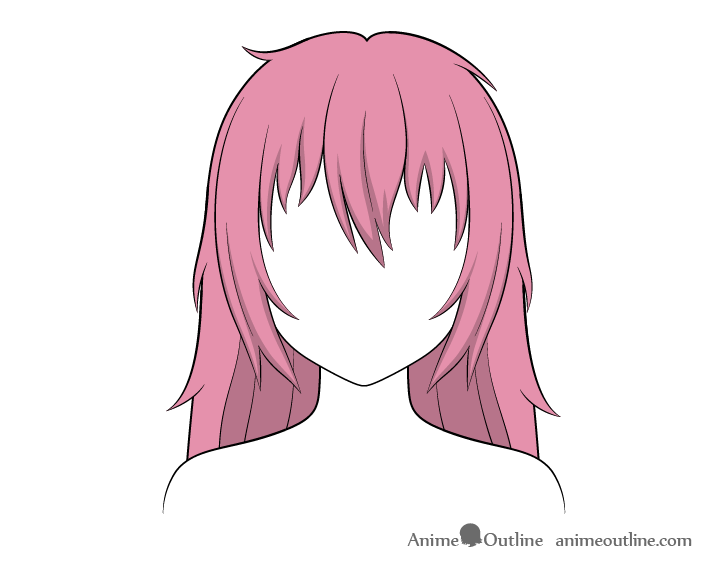
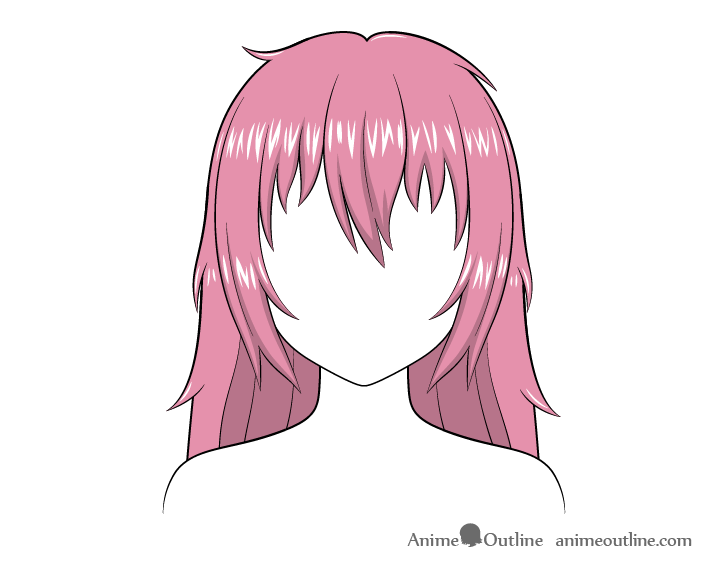
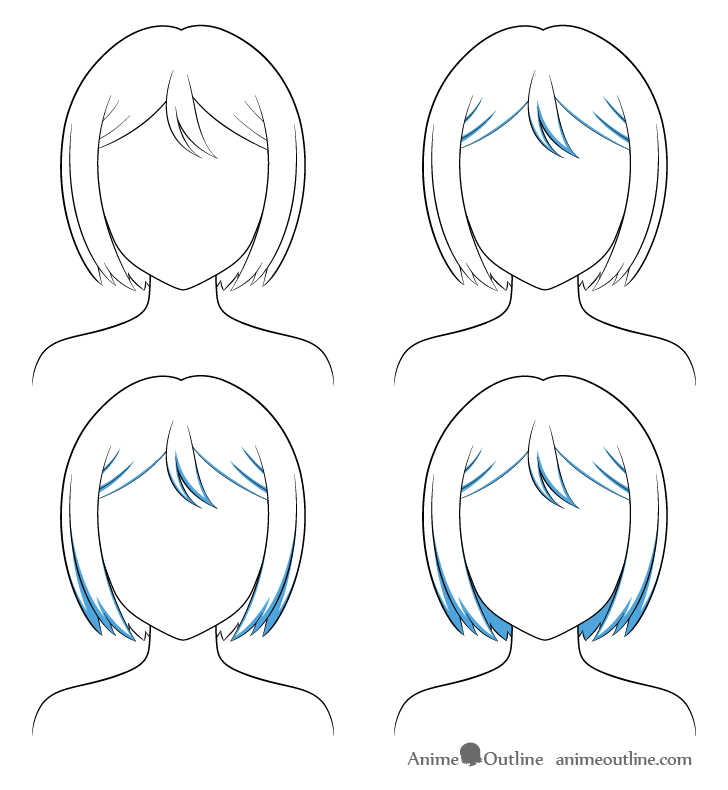
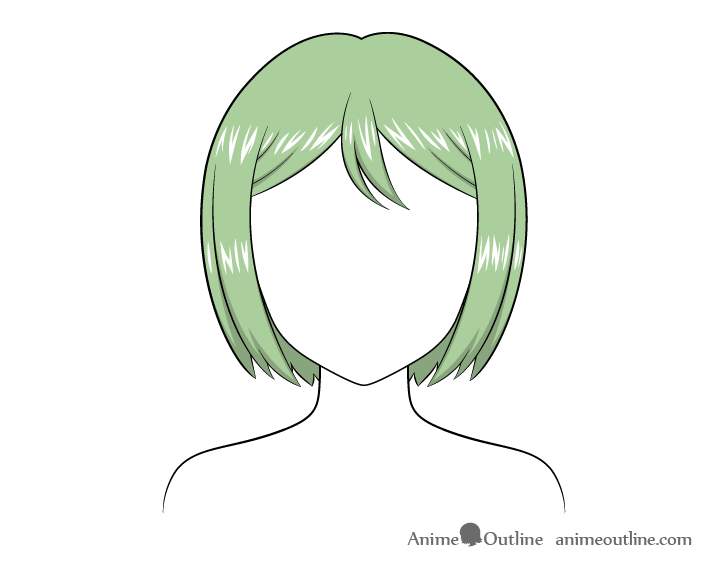
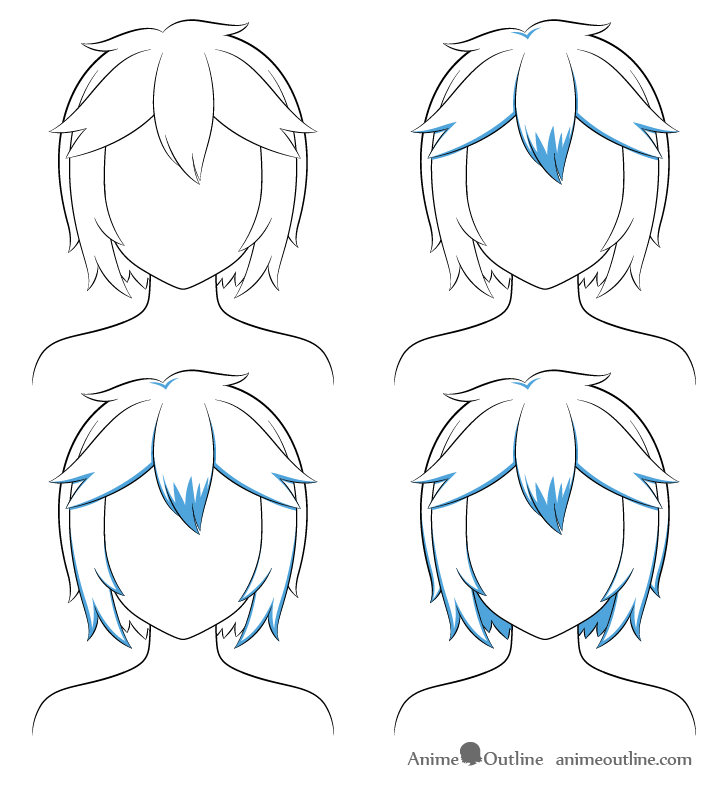
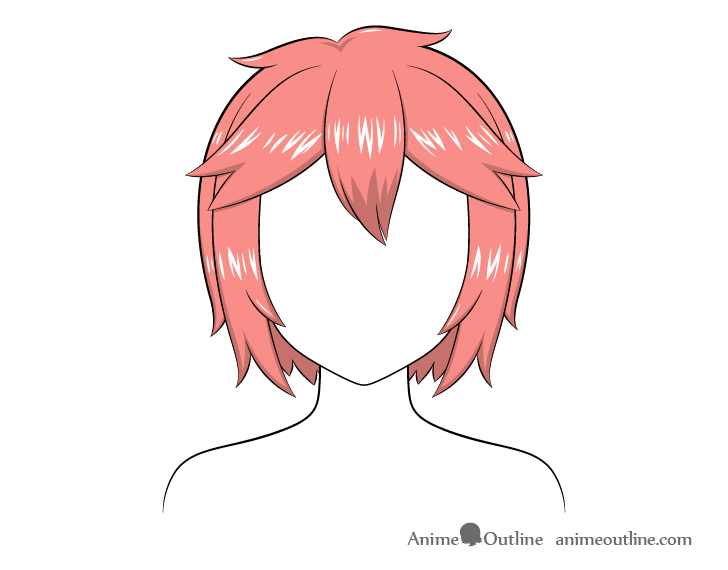
Shading Long Anime Hair Step by Step
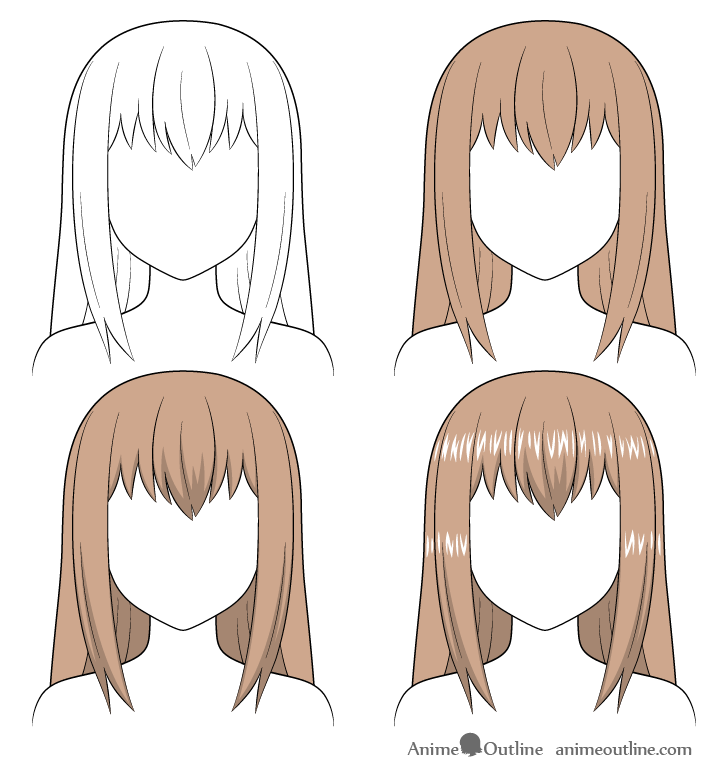
Step 1 – Prepare a Line Drawing of the Hair
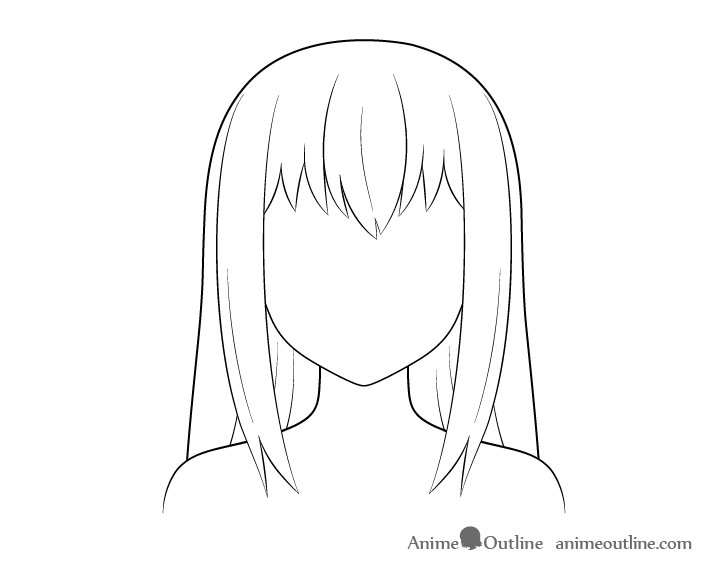
Before shading the hair first prepare a nice and clean line drawing similar to the example above.
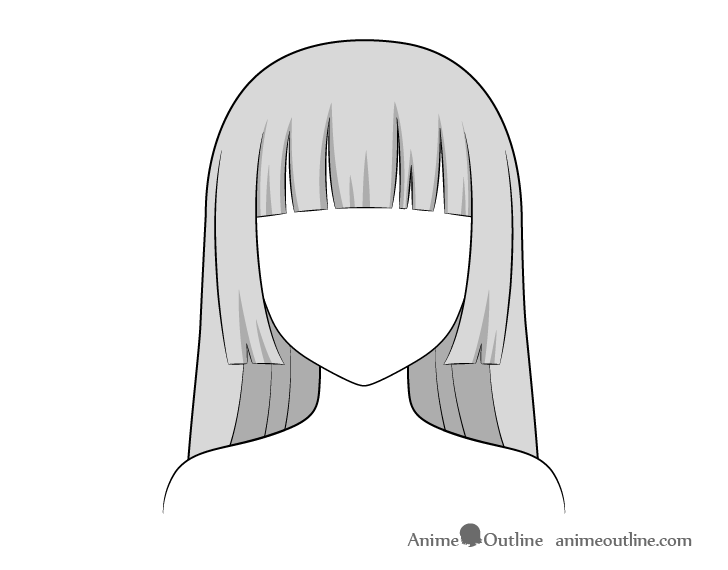
Step 2 – Color the Hair
If you are drawing digitally or are going to add the highlights using a correction pen or white paint as suggested earlier you can fill the entire area of the hair with one solid color. If you don’t have those options available then simply leave the highlights area white and color around it. If you wish you can also lightly outline the highlights with a pencil to help make sure you don’t go over top of them.
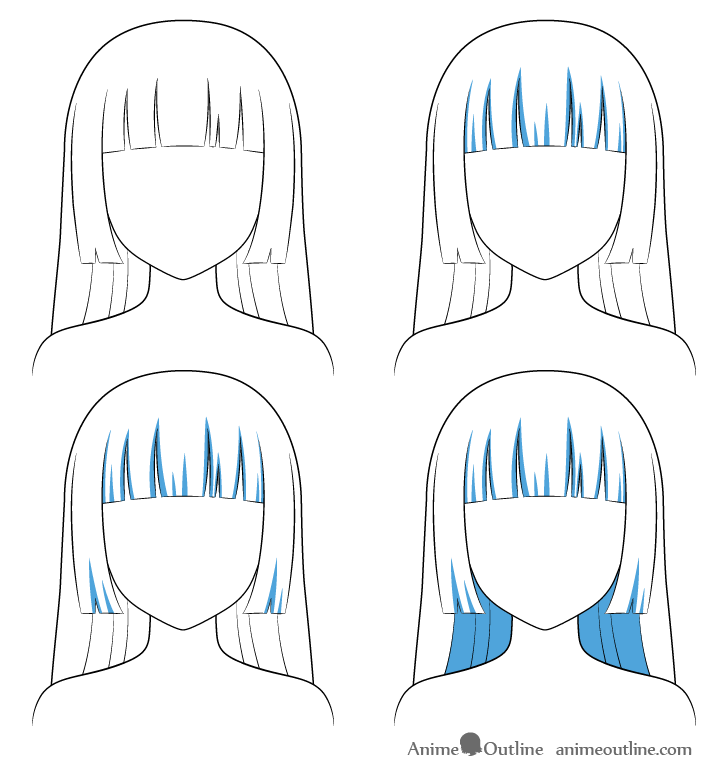
Step 3 – Add the Shading
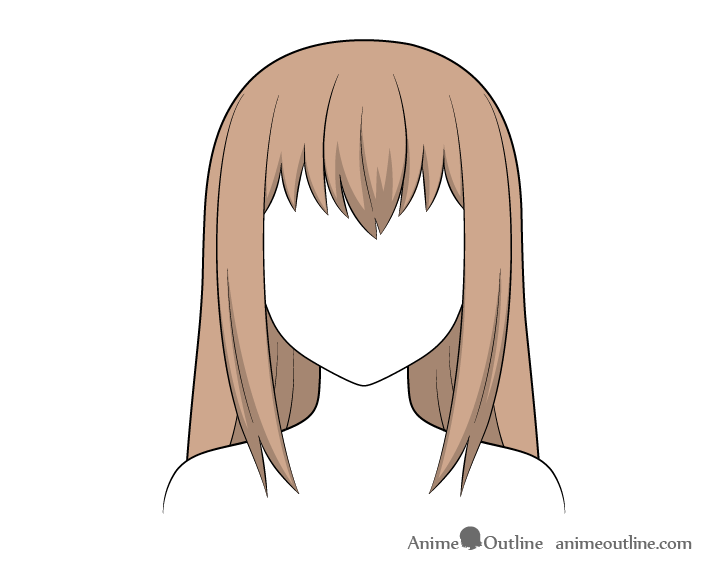
As explained at the start of the tutorial the hair shadows will be added in a generalized way. This means that such shading can apply to most scenes of anime or manga where the character is in a fairly well lit area.
Due to the cone like shapes of the hair clumps and the lighting setup described above the shadows will tend to form along the bottoms parts of the clumps running along their sides.
You can also add a few shaded parts sort of “cutting into” some of the larger clumps to give a hint of hair folds.
Add the shadows in the following areas:
- Along the forehead hair clumps
- Along the side sections of the hair
- The inner part of the back hair (around the neck)
The last shaded area will form due to that area of the hair being fairly closed off from the light on most side as the hair/head make a kind of “tent” around it.
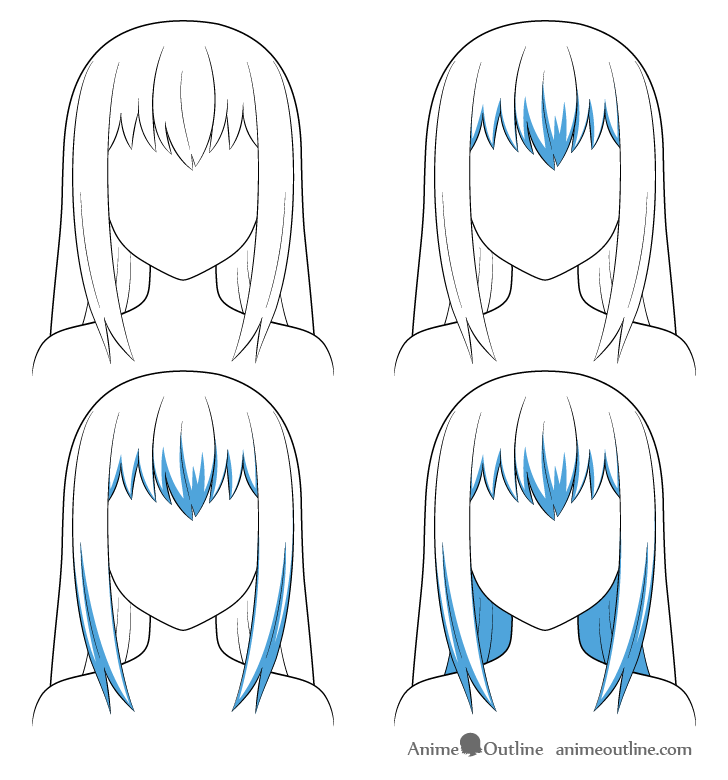
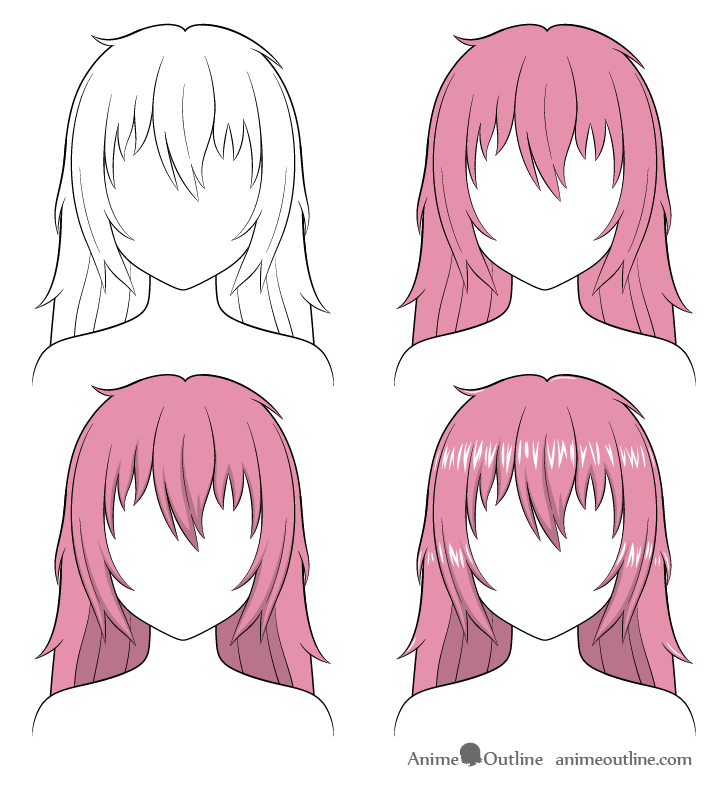
Step 4 – Add the Highlights
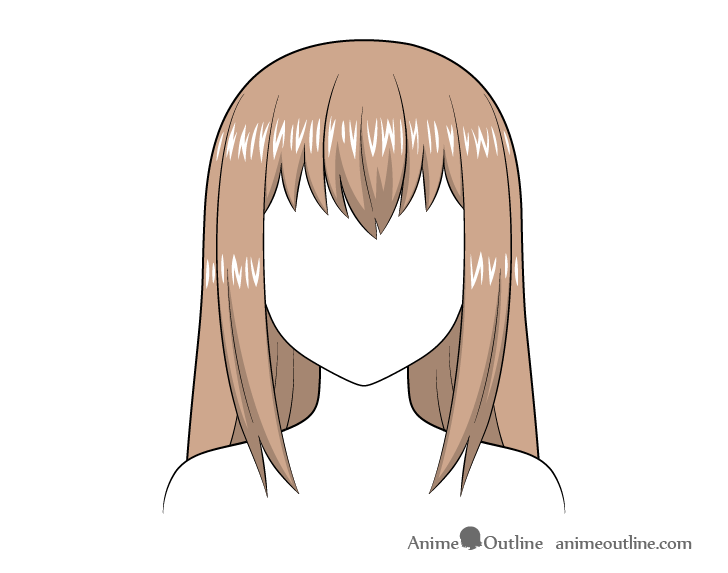
To make the hair look shiny add some highlights. You can draw these as a series of lines with some joined into small zigzags.
Sometimes anime hair will be drawn with only one main highlight area but in this case we will add a highlight for each major part of the hairstyle (also common in anime and manga).
In this case add the highlights running across the top part of the hair (around the forehead area) with a another set of highlights lower down running across the sides and background portions of the hair.
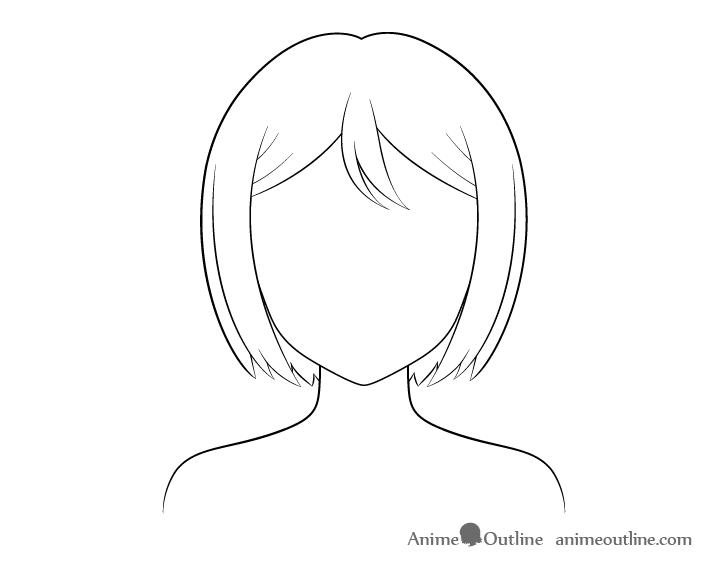
Shading Short Anime Hair Step by Step
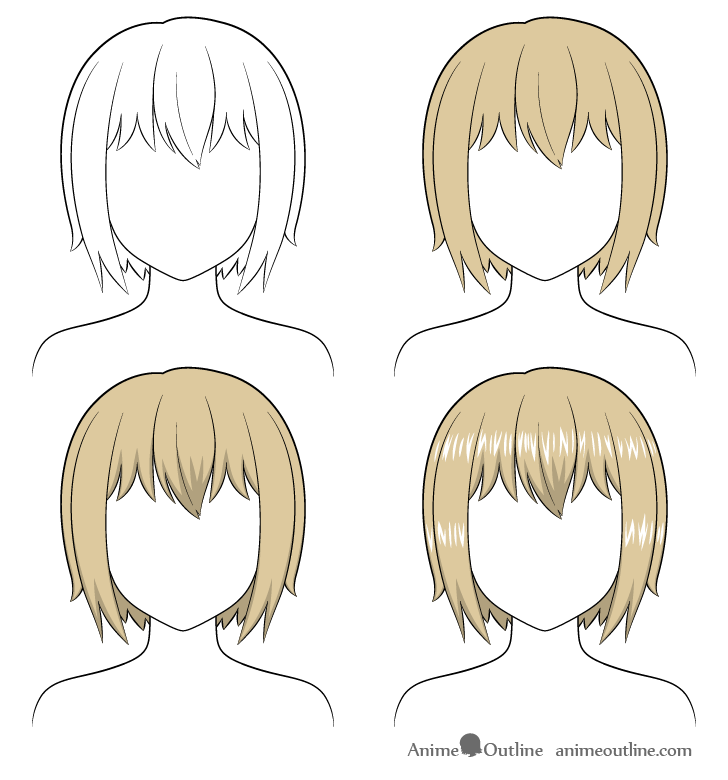
Step 1 – Prepare a Line Drawing of the Hair
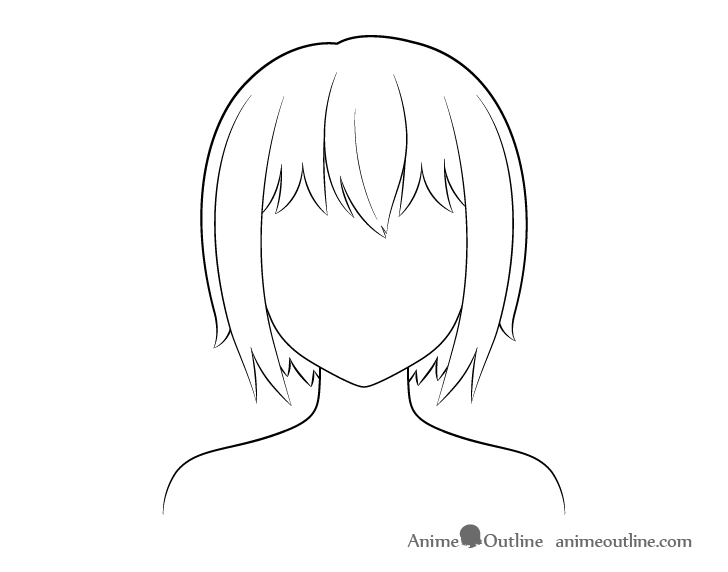
First prepare a nice and clean line drawing of the hairstyle.
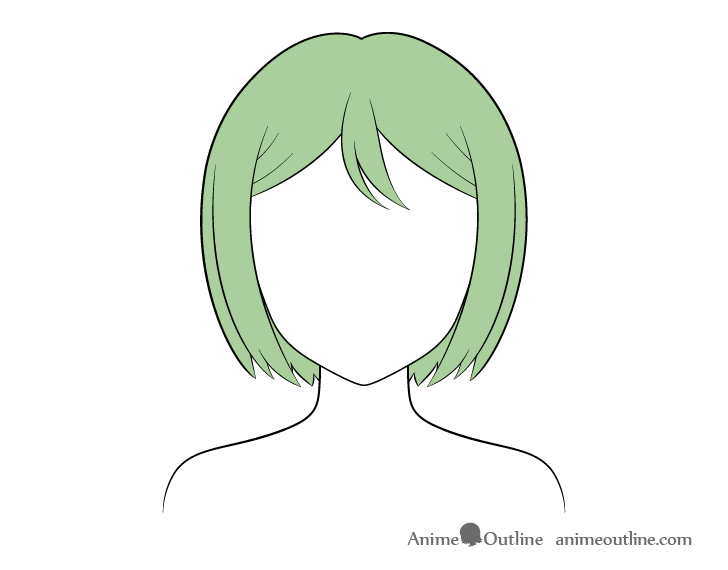
Step 2 – Color the Hair
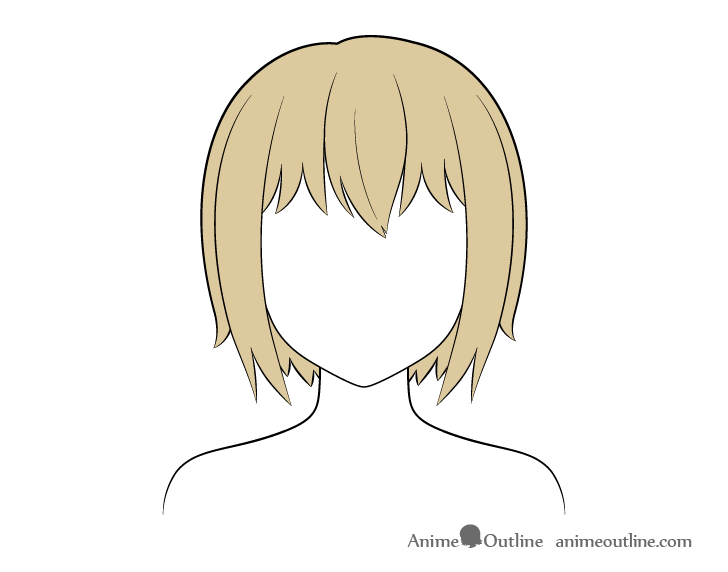
Apply color to all of the hair if you are going to add the highlights over top or leave the highlight area white if you want to simply color around them. You can see the last step for their shapes and placement.
To add the highlights over top of the hair color it’s recommended that you either use a white correction pen or a white paints.
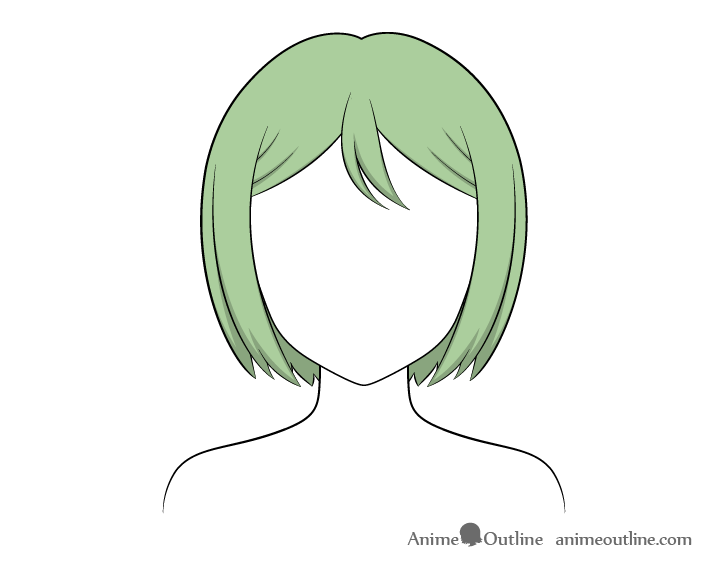
Step 3 – Add the Shading
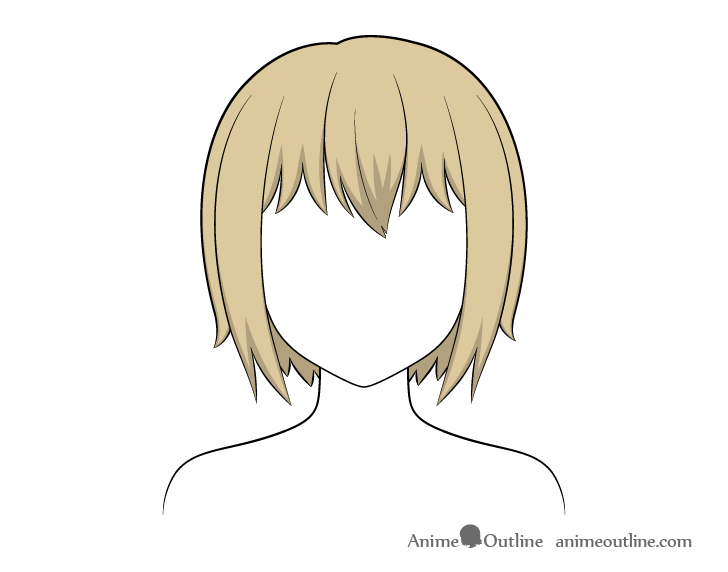
As explained at the start of the tutorial the shadows will be added in fairly generic places that they are likely to form in with.
In this case these will be as following:
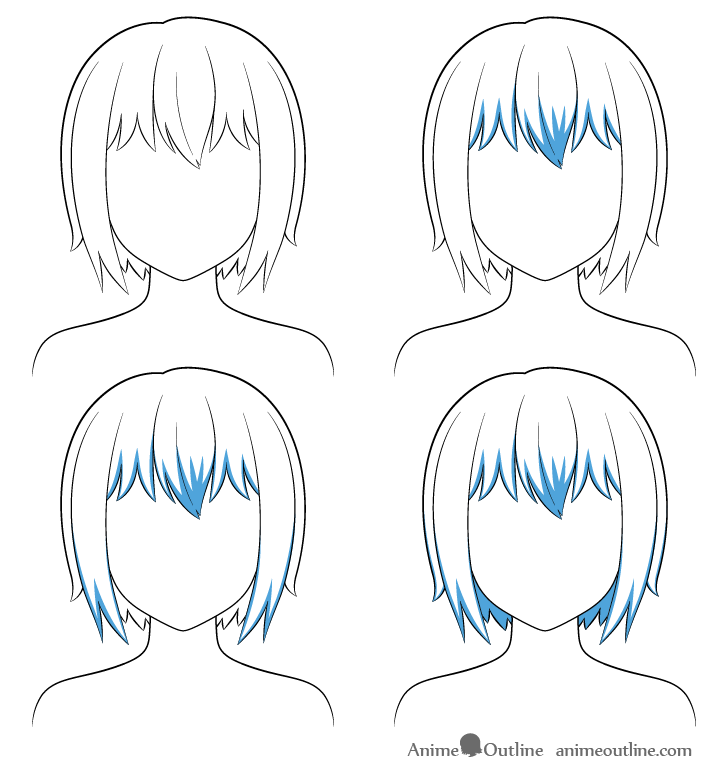
- Along the hair clumps of the forehead area
- Towards the bottom of the side sections
- Along the bottom clumps of the back hair with the inner area between the neck and the sides fully shaded
Step 4 – Add the Highlights
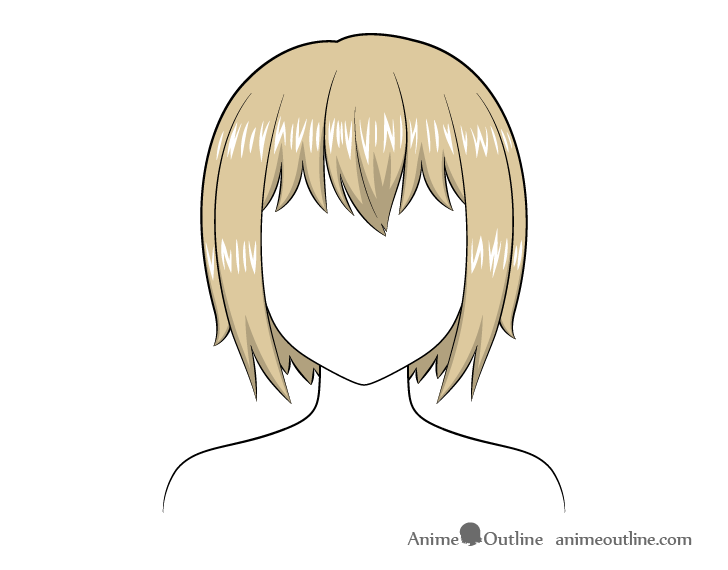
Similar to the previous long hair example add the highlights as sets of curved lines and zigzags.
Draw the main highlight running along the forehead area with two more lower down along the sides/back portions of the hair.
Shading “Hime Cut” Anime Hair Step by Step
Step 1 – Prepare a Line Drawing of the Hair
Prepare a clean line drawing of the hair before you begin the shading.
Step 2 – Color the Hair
Depending on how you are going to add the highlights either fully color in the hair or leave the highlight area white.
As mentioned at the start of the tutorial you can add the highlights over top of the hair color if drawing digitally or by using a white correction pen or paints.
You can also simply leave the highlight area white and color around it. If you wish to do this then see step four for their shape and placement.
Step 3 – Add the Shading
For this particular hairstyle the hair clumps will be trimmed off as compared to the pointy clumps in some of the other styles.
Add the main shadows along the the sides of these trimmed clumps and draw a few smaller shadows randomly “cutting into” some of them.
Place the shadows in the following area:
- Along the forehead hair clumps
- Near the bottoms of the side hair sections
- On the back section of the hair around the neck (large area)
As already mentioned for the long hair shading example the large shadow around the neck will be created by that part of the hair being largely closed off from the light.
For a more detailed version of this hairstyle see the tutorial that is specifically dedicated to it:
How to Draw Anime “Hime Cut” Hairstyle
Step 4 – Add the Highlights

Similar to the previous examples add the highlights as a series of lines and small zigzags.
Place one large highlight going across the forehead area of the hair with two smaller highlights lower down on each of the sides.
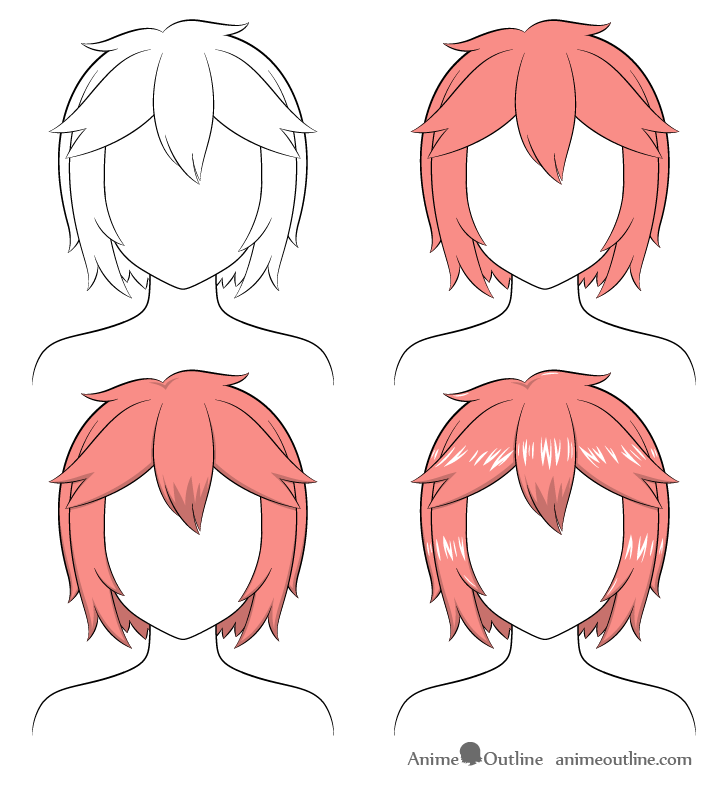
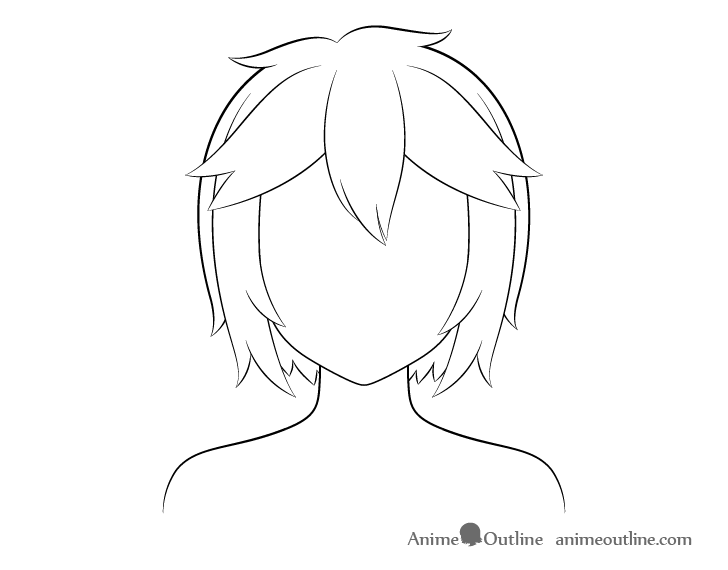
Shading Long Messy Anime Hair Step by Step
Step 1 – Prepare a Line Drawing of the Hair
Prepare a nice and “not so clean in this case” drawing of the “long messy hair” similar to the example above.
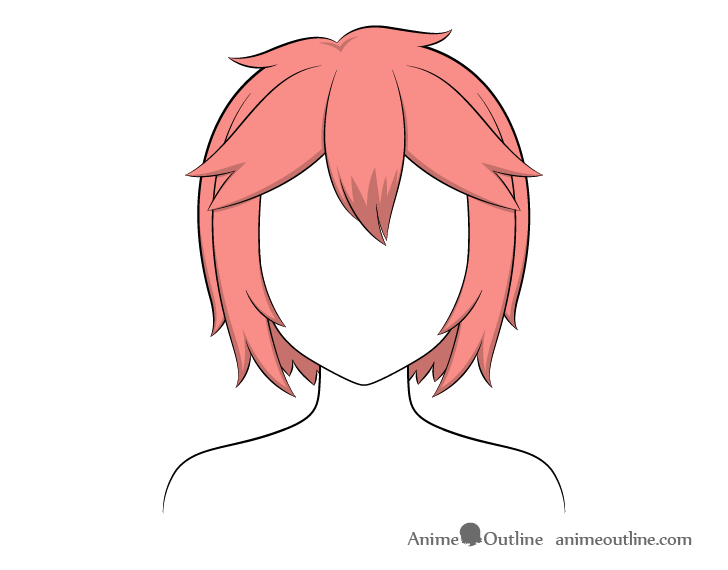
Step 2 – Color the Hair
Depending on how you will add the highlights either fully color in the hair or leave the highlight areas white.
If you are drawing digitally or if you have a white correction pen or white paint you can draw the highlights in over top of the hair color. If not leave the highlights white and color around them.
For the shape and placement of the highlights see step four.
Step 3 – Add the Shading
Draw the shadows running along the sides of the various hair clumps towards the bottom portions of the different section of the hair.
Add them in the following places:
- Along the bottom ends of the forehead hair
- At the bottom half of the side sections of the hair
- On the back section of the hair around the neck area
Yet again as mentioned in some other examples this large shadow around the neck is created due to that part of the hair being fairly closed off from the light.
Step 4 – Add the Highlights
Draw the highlights as a series of lines and small zigzags. Place the largest highlight running along the forehead area with two smaller highlights lower down along the sides.
To emphasize the messiness of the hair you can also add a few tiny highlights along the clumps sticking out from its outer edges.
Shading Ponytail Anime Hair Step by Step
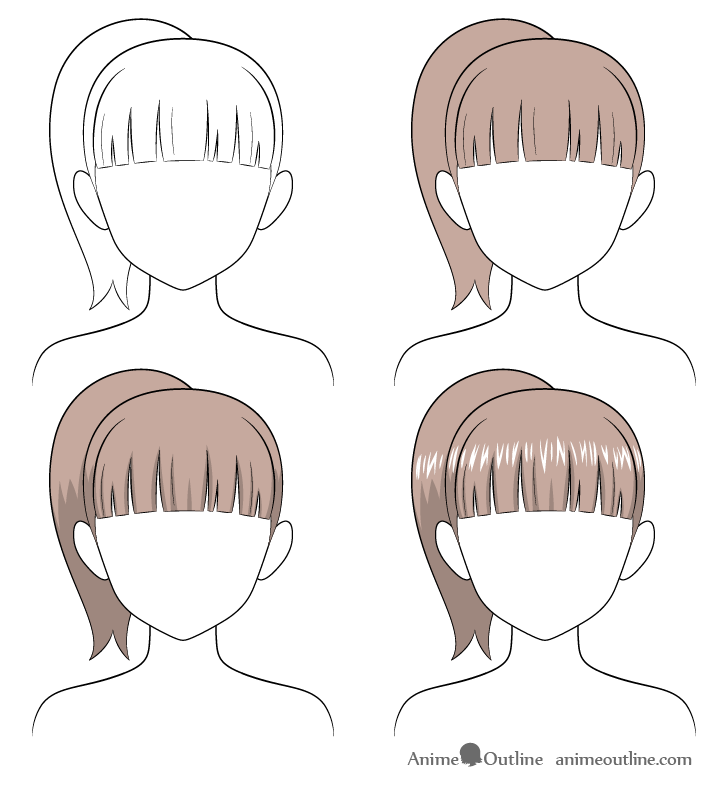
Step 1 – Prepare a Line Drawing of the Hair
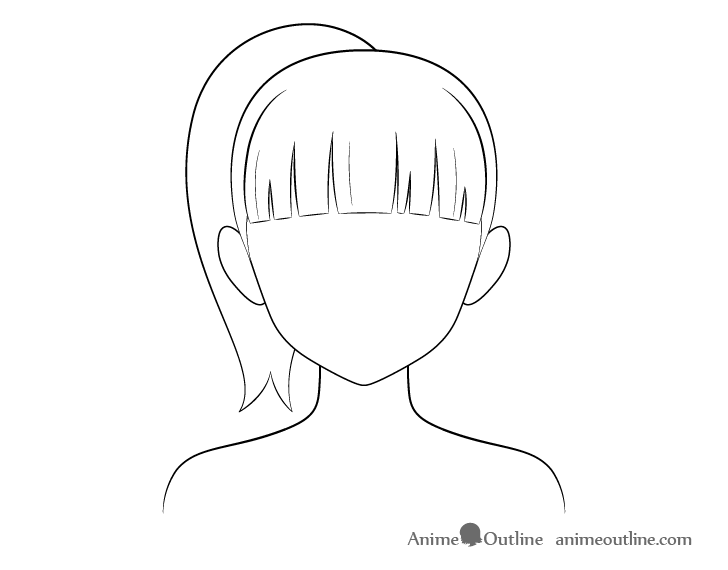
Start by making a clean line drawing of the ponytail hairstyle.
Step 2 – Color the Hair
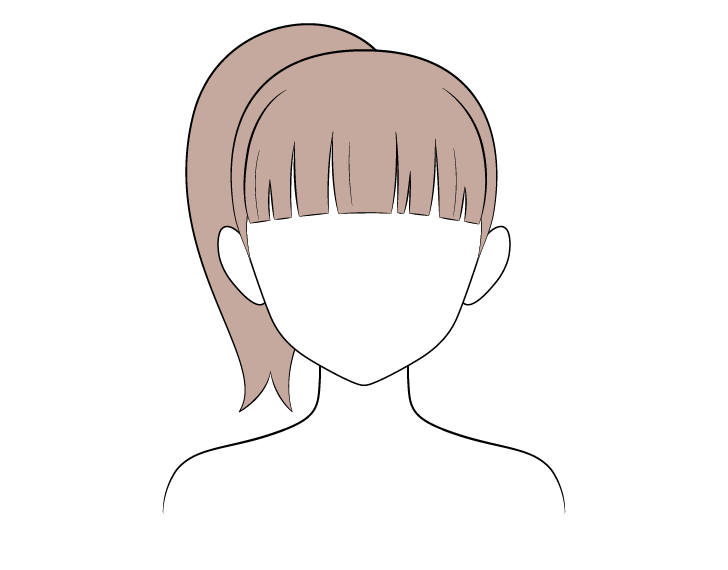
If you are coloring digitally or have an option to draw the highlights over top of the hair (white correction pen or white paints) fill it’s entire area with color.
Alternatively you can leave the highlights white and simply color around them. For this option see step four for their shape and placement.
Step 3 – Add the Shading

In this case the hairstyle will have trimmed hair around the forehead area similar to the “hime cut” example.
You can again shade these hair clumps by adding darker areas along their sides and add a few random shadows “cutting into” these clumps to show some hair folds.
Position the shadows in the following places:
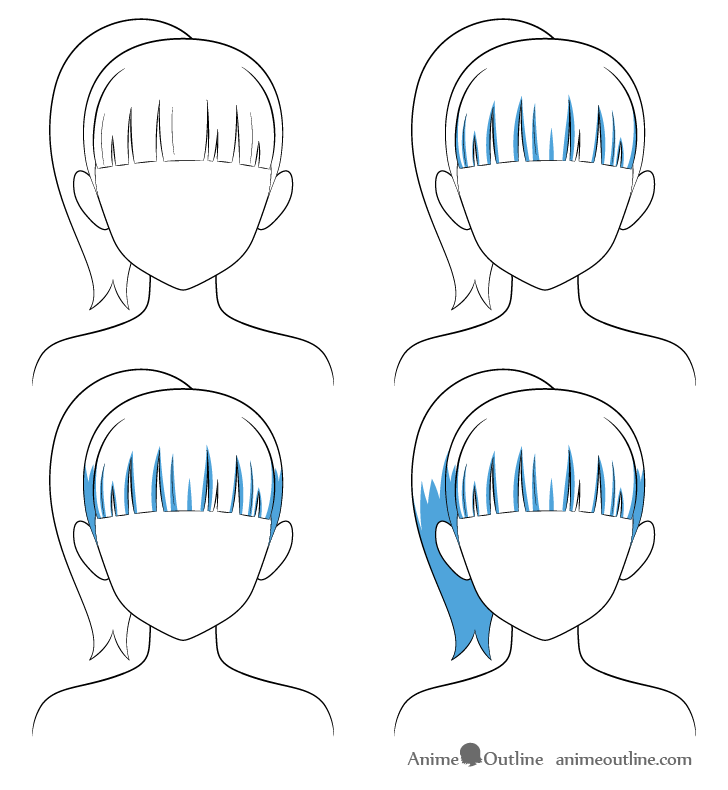
- On the hair clumps around the forehead
- Around the sides of the head
- At the bottom half of the ponytail
You will want to almost fully shade the bottom part of the ponytail as the part where it gets narrower will generally curve away from the light and start casting a shadow on itself.
Step 4 – Add the Highlights
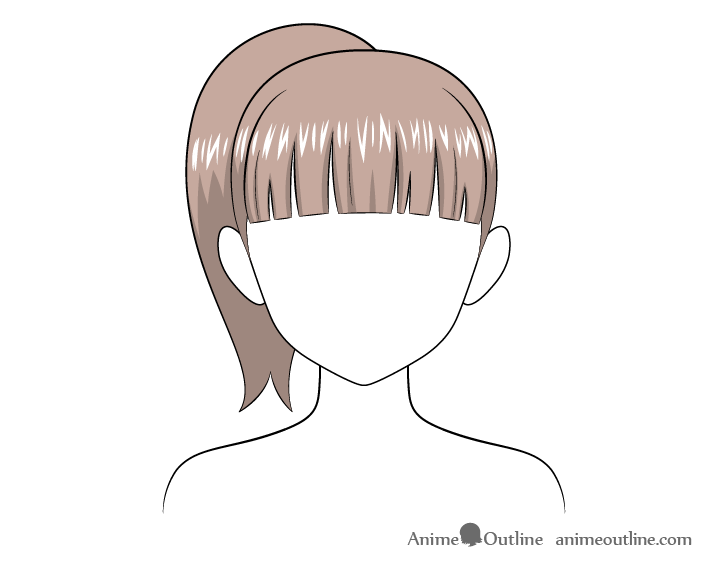
Draw the highlights as a series of small curved lines or zigzags. The main highlight will be going across the forehead with the second going across the ponytail though for this example they will look as pretty much one continuous set.
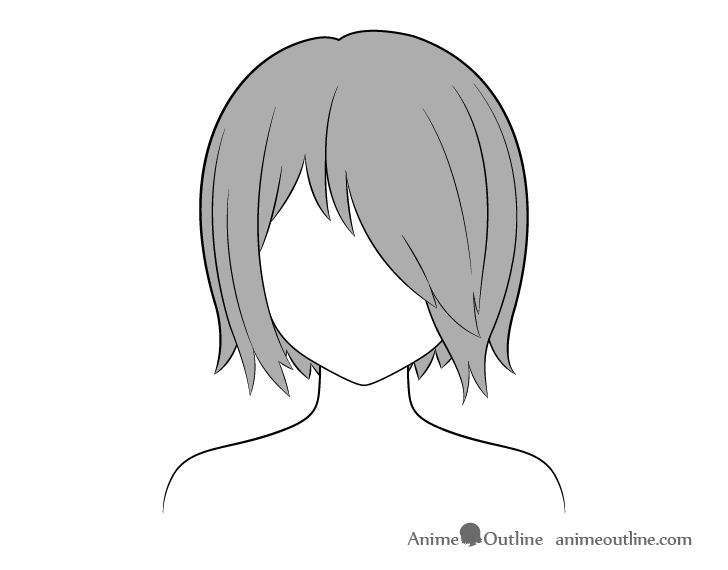
Shading Anime “Hair Over One” Eye Step by Step
Step 1 – Prepare a Line Drawing of the Hair
Have a line drawing of the hair ready before you begin shading.
Step 2 – Color the Hair
If you have the option to adds the highlights over top (drawing digitally or using white correction pen/paints) than you can color/fill in the entire area of the hair.
If you don’t have those options available then simply leave the highlight area white and color around it. To make this easier you can lightly outline them with a pencil.
See step four for the shape and placement of the highlights.
Step 3 – Add the Shading

For this hairstyle and the generic shading used in this tutorial most of the shadows will again be running along the sides and bottom ends of the hair clumps.
Add them as follows:
- Along the forehead and “eye covering area” of the hair
- On the bottom half of the side section (opposite of the covered eye)
- Near the bottom of the back section of the hair with the part around the neck fully shaded
Step 4 – Add the Highlights
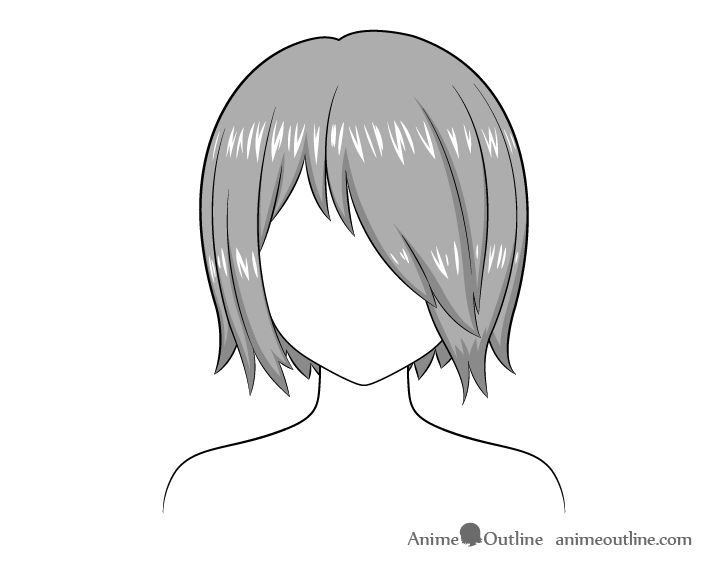
Add the highlights as a series of small curved lines and zigzags. Place the main highlight going across the forehead area of the head. Afterwards add another one lower down on the left side of the drawing going across the side.
Finally draw a sort of “broken up” looking highlight with fewer lines over the part of the hair that is covering one of the eyes.
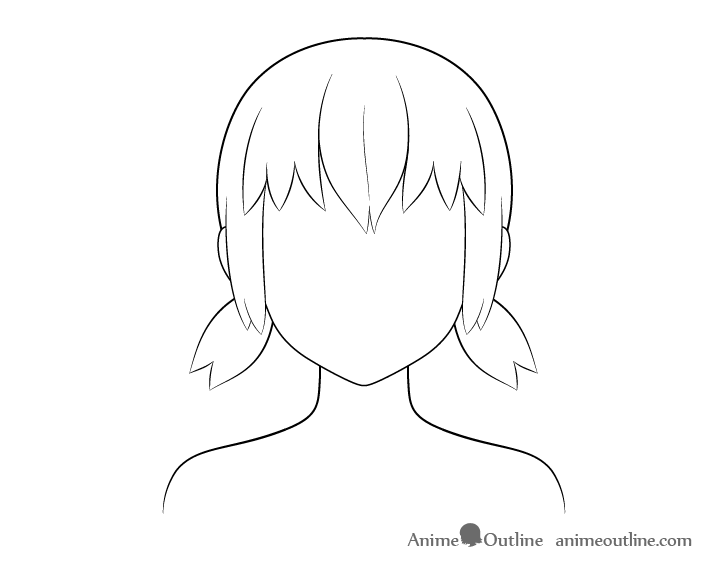
Shading Pigtails Anime Hair Step by Step
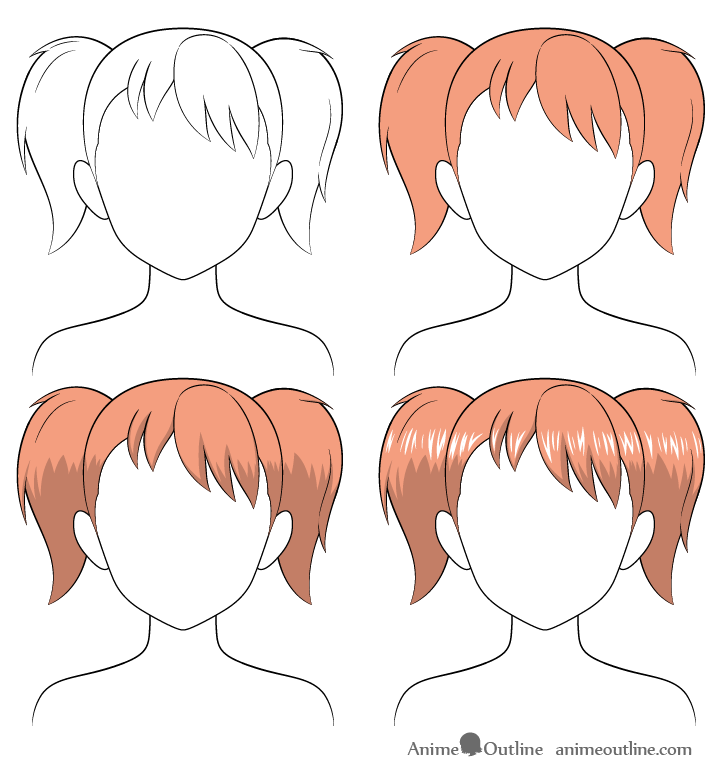
Step 1 – Prepare a Line Drawing of the Hair
First make a line drawing of the pigtails hairstyle.
Step 2 – Color the Hair

Either fully fill the hair with a solid color or leave the highlight area white depending on what drawing options you have available.
If you are drawing digitally or have a white correction pen/paints you can add the highlights over top of the color.
If those options are not available to you then leave the highlights white and color around them (see step four for their shape and placement).
Step 3 – Add the Shading
The pigtails will be shaded similar to the pony tail in an earlier example with the hair clumps being shaded similar to most other examples.
Add the shadows in the following places:
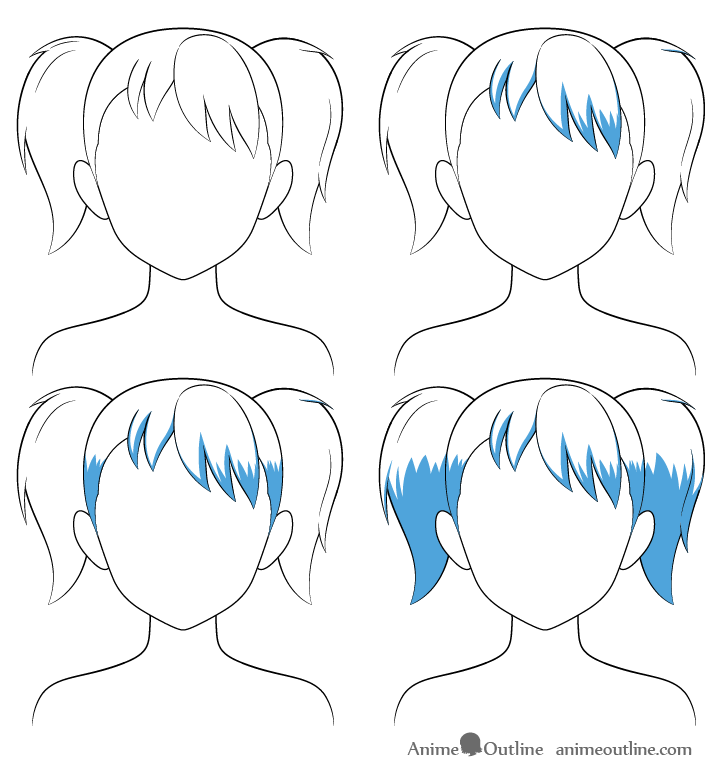
- At the sides and bottom ends of the clumps of the forehead hair
- Along the sides of the head
- At the bottom halves of the pigtails
Similar to the ponytail example the pigtails will tends to have a shadow cast on them by their upper part as they get narrower towards the bottom.
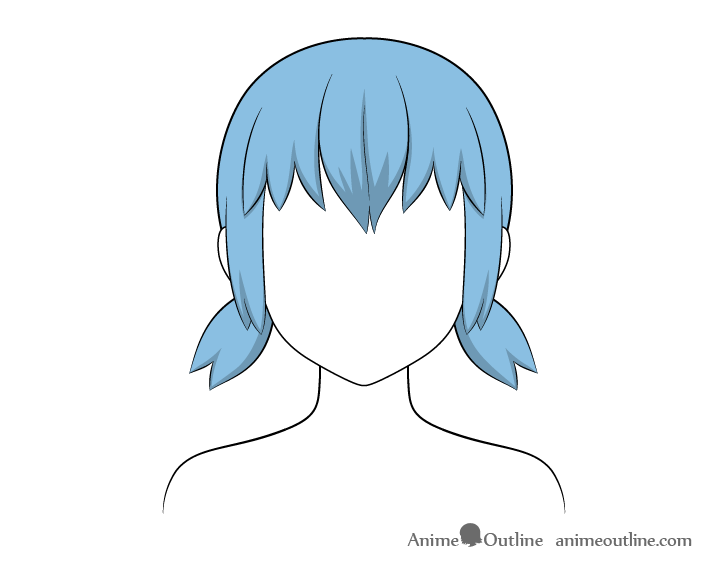
Step 4 – Add the Highlights

Draw the highlights as a series of small curves and zigzags. In this case there will be three highlight areas with one being across the forehead and one across each pigtail but you can pretty much just draw them as one continues set.
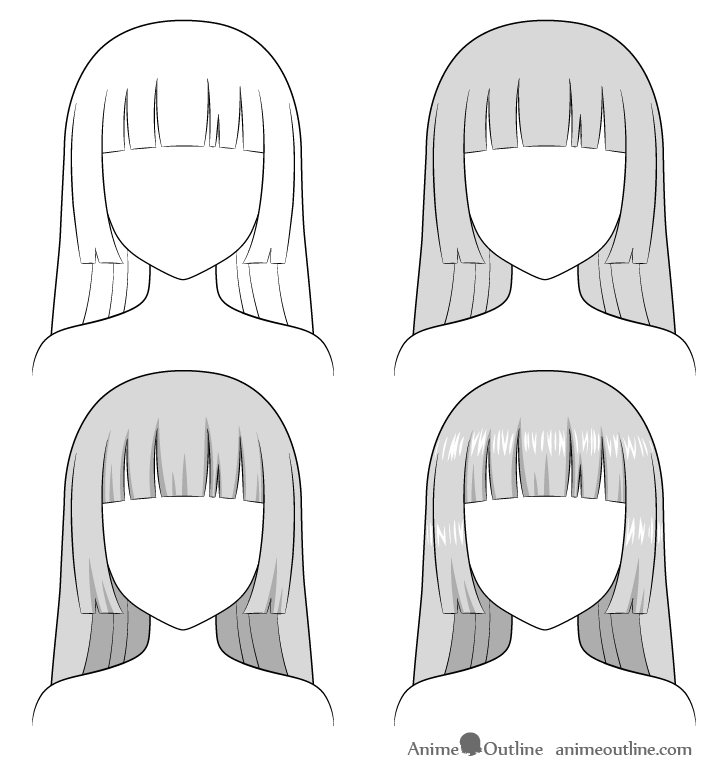
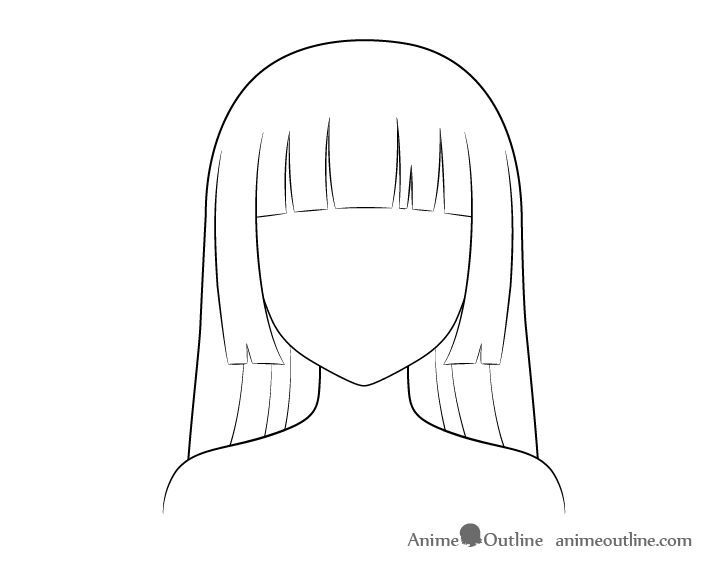
Shading Combed Anime Hair Step by Step
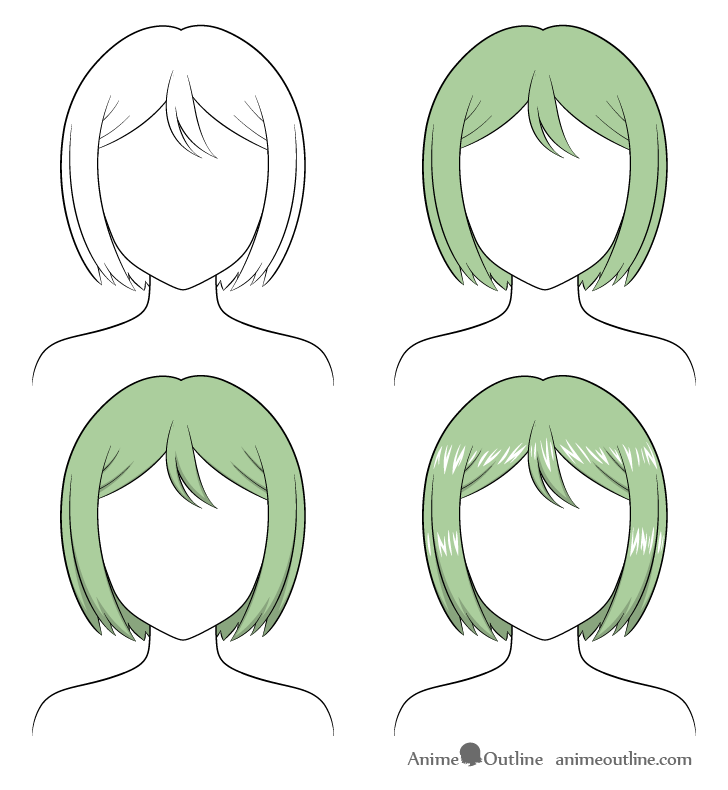
Step 1 – Prepare a Line Drawing of the Hair
Start by making a clean line drawing of the hair.
Step 2 – Color the Hair
Either fully color in the entire area of the hair or leave the highlights white based on the drawing method you are using.
If drawing digitally or if you have a white correction pen or white paints you can add the highlights over top of the hair color. If not you can color around them (optionally lightly outlining them with a pencil).
For the shape and placement of the highlights see step four.
Step 3 – Add the Shading
As there are fewer hair clumps shading this particular hairstyle is fairly simple. You can shade the parts of the forehead hair tucked under the sides with very thin shadows along their bottoms and some fairly small shadows along the lines of the folds. The hair clumps in the middle can be shaded as other similar examples.
Shade the hair as follows:
- Along the forehead area of the hair as described above
- Bottom portions of the side hair sections
- Fully shade the area of the back hair between the neck and the sides
Step 4 – Add the Highlights
Draw the highlights as a series of curved and zigzag lines. Position the first highlight across the forehead area of the hair. Try and draw the lines that comprise it to flow along the shape of the part of the hair that they are on. For example draw the lines on more of an angle to flow along the curved parts of the hair that are tucked under the sides.
Add the next two sets of highlights lower down along each side of the hair.
Shading Curly Anime Hair Step by Step
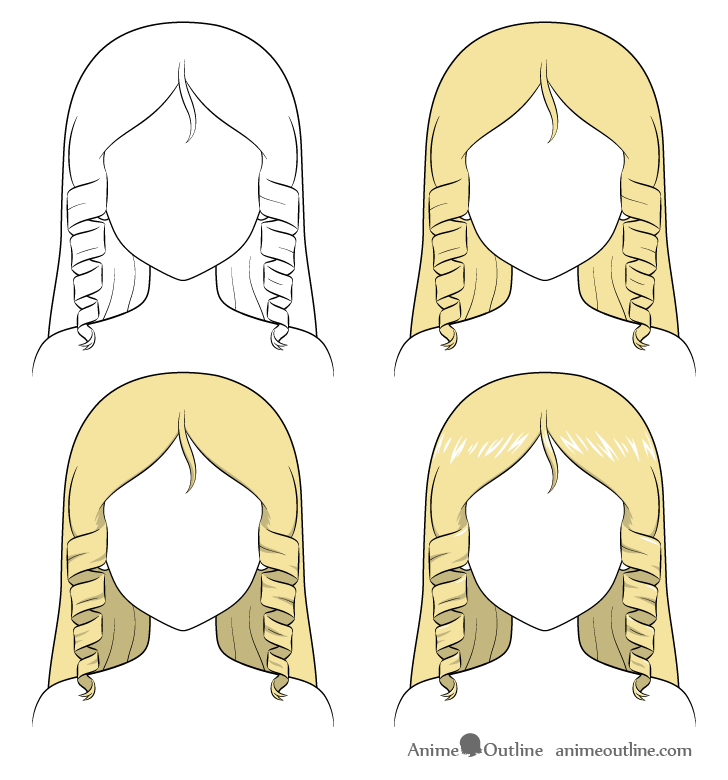
Step 1 – Prepare a Line Drawing of the Hair
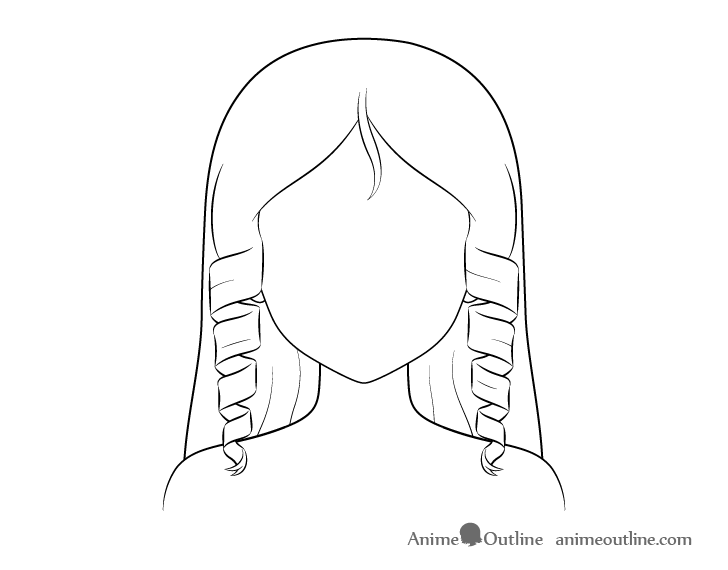
Start by preparing a clean line drawing of the curly hair.
Step 2 – Color the Hair
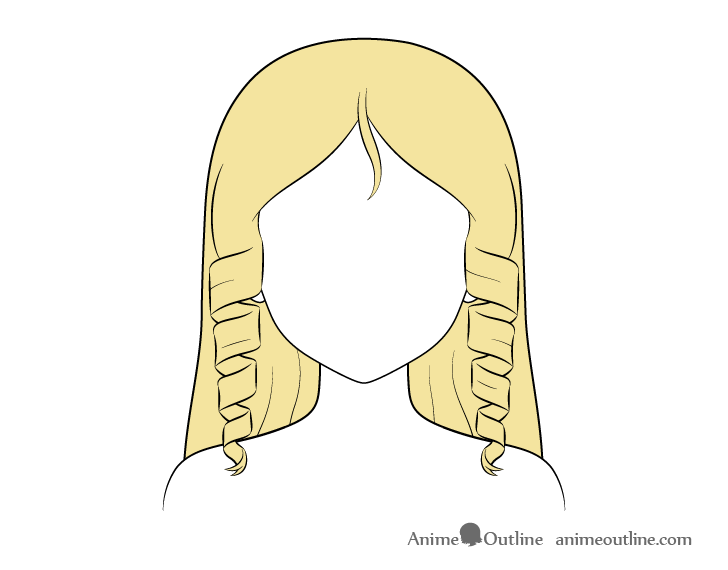
Fully color in the hair if you have an option of adding the highlight over top of it such as if you are drawing digitally or have a white correction pen/paints. Otherwise leave the highlights white and color around them.
For the shape and placement of the highlights see step four.
Step 3 – Add the Shading
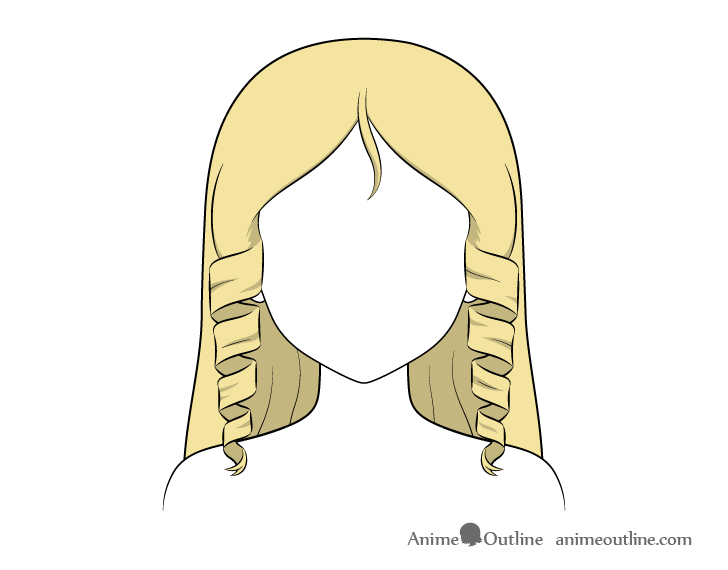
Shading the curls will be a little different then the regular hair clumps
For this generic shading described earlier you can fully shade the inner parts of the curls and add only a few small streaks of shadows along their outsides to give a hint of some folds.
In general you can add the shading as follows:
- A tiny bit of shading along the forehead part of the hair (including the small clumps)
- Along the curls on the sides of the hair (as already described)
- Back section of the hair between the neck and the curls
Step 4 – Add the Highlights
Add the highlights (one major highlight in this case) as a series of small lines and zigzags.
For the main highlight draw the lines that comprise it angled in the direction of the hair flow on each side of the head (similar to the combed hair example earlier). This will help emphasize the shape of the hair.
After the main highlight draw some small highlights (just one line each) along the the hair curls on the sides. Place these highlights close to the edges curves as those will tend to catch the light.
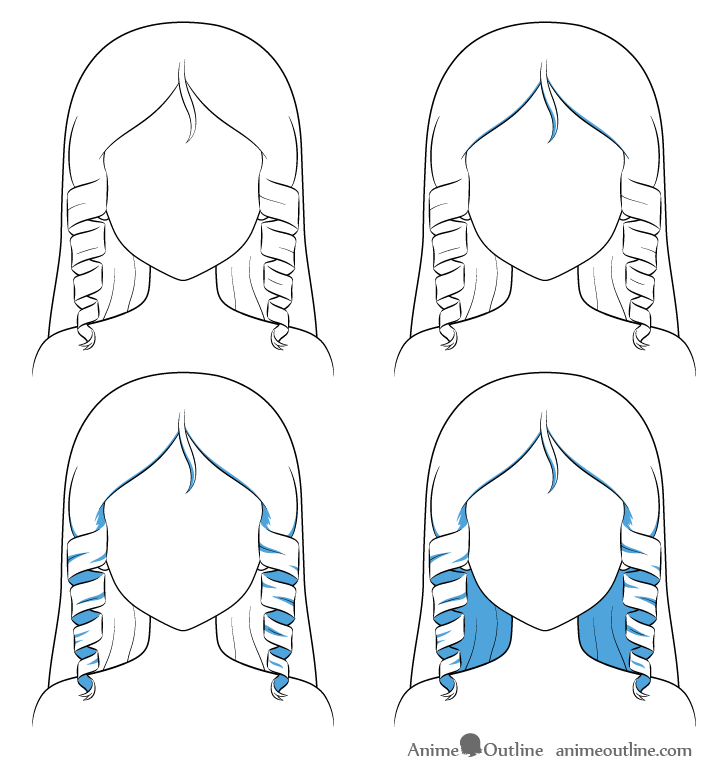
Shading Anime Hair Buns Step by Step
Step 1 – Prepare a Line Drawing of the Hair
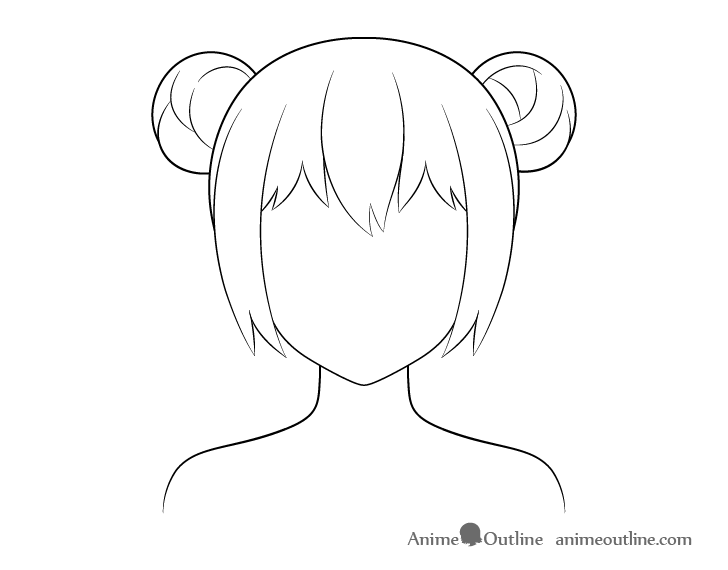
Begin by making a nice and clean drawing of the “hair buns” hairstyle.
Step 2 – Color the Hair
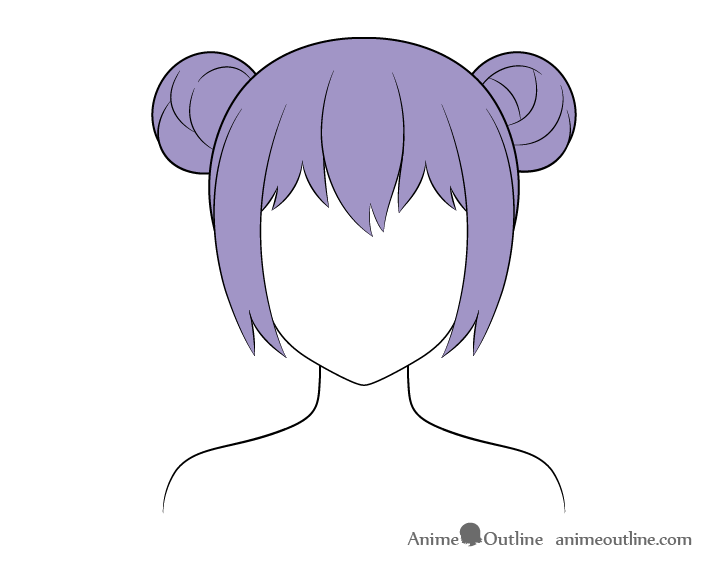
Either fully color the hair (if adding highlights later) or leave the highlight areas white.
You can add the highlights over top of the hair color if you are coloring digitally or if you have a white correction pen or white paint.
If you are going to color around them instead than see step four for their shape and placement.
Step 3 – Add the Shading
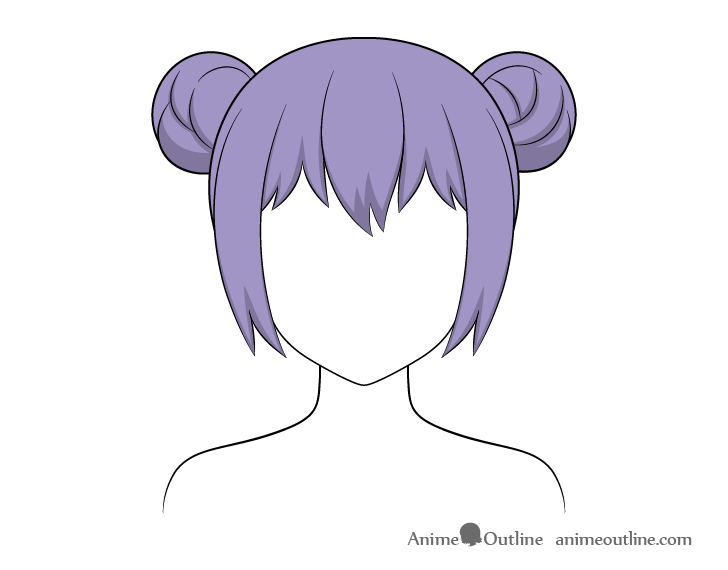
The main difference between this example and the rest are obviously the hair buns which are fairly easy to shade. In the generic lighting described earlier you can place the the larger shadows along their bottoms as well as along their more downwards facing curves.
Overall pace the shadows as follows:
- Along the bottom and sides of the clumps of the forehead hair
- At the bottom halves of t he side sections of the hair
- On the hair buns as already described
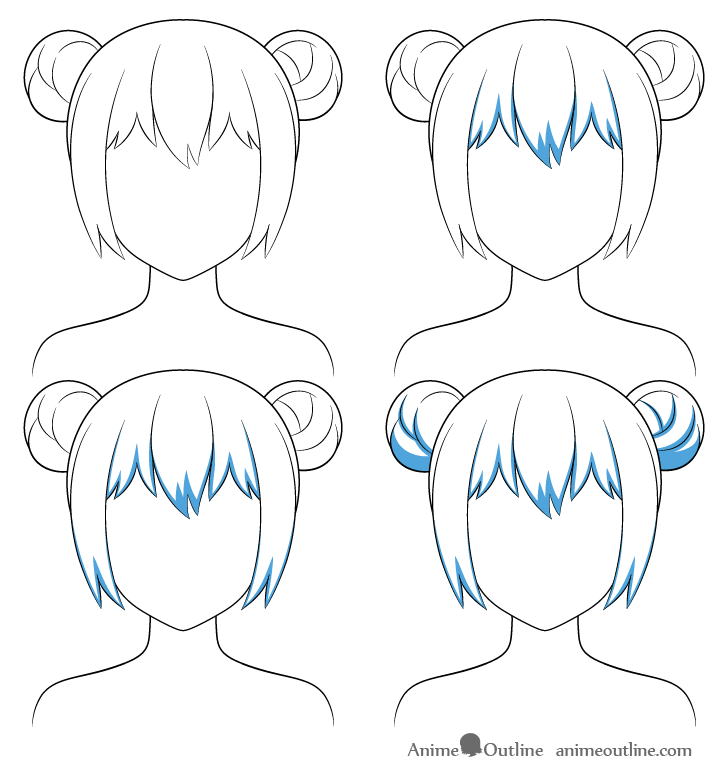
Step 4 – Add the Highlights
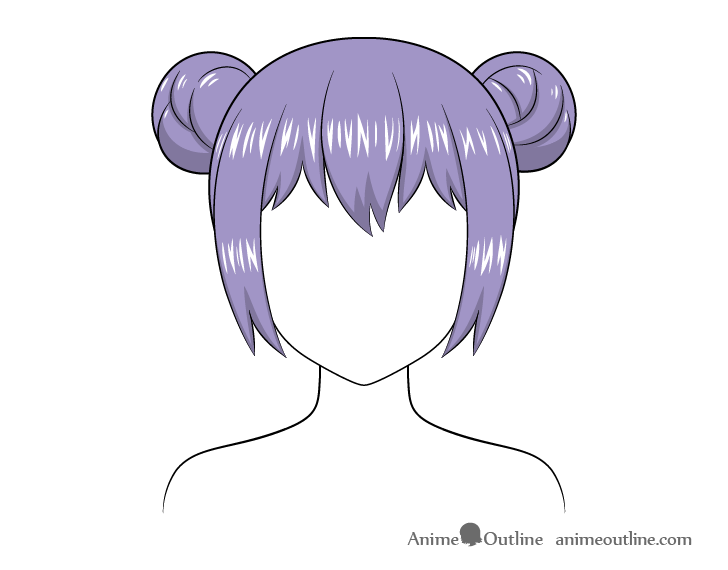
For the main highlight going across the forehead as well as the smaller highlights going across the side sections of the hair draw them as a series of small liens and zigzags.
On the buns add some tiny highlight with just one or two liens each along their various folds.
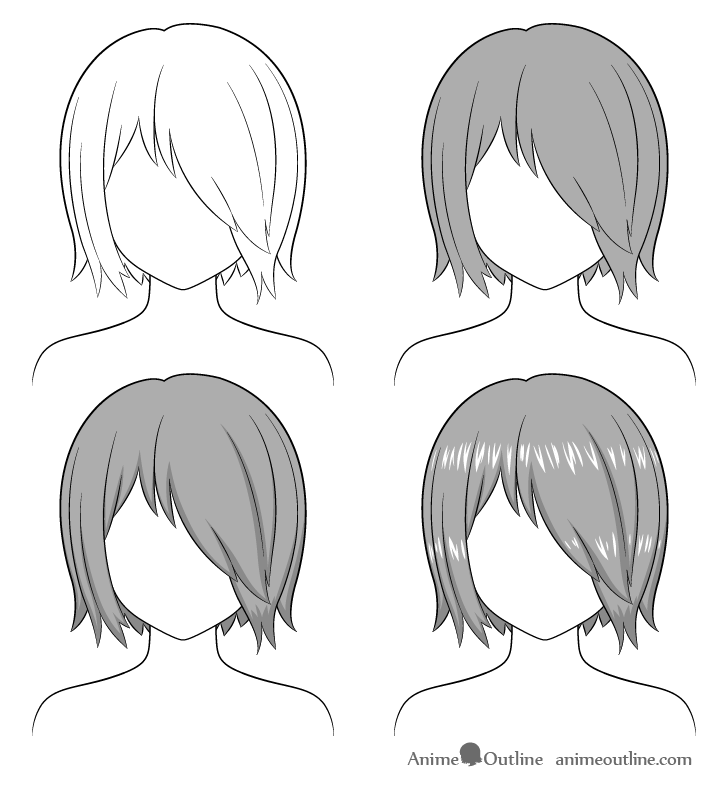
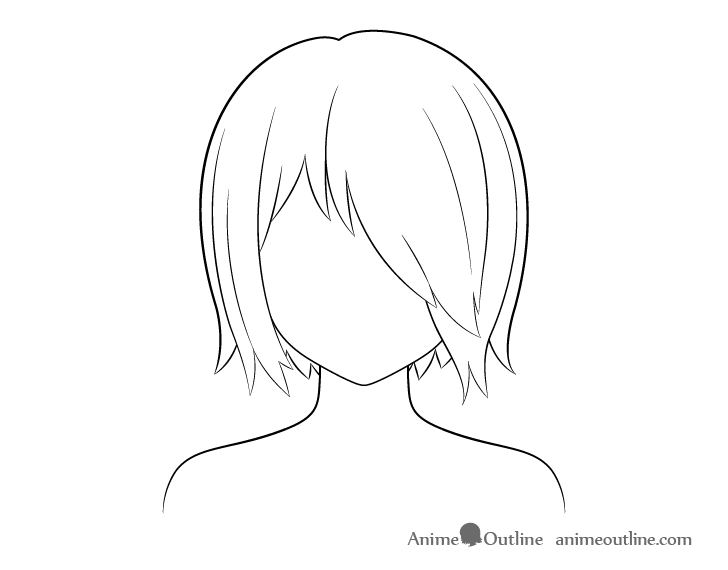
Shading Short Messy Anime Hair Step by Step
Step 1 – Prepare a Line Drawing of the Hair
Same as the other examples begin by making a clean line drawing of the hairstyle.
Step 2 – Color the Hair

Either fully fill in the hair or leave the highlights white based on the coloring method you’re using.
Adding the highlights over top of the color can be done if drawing digitally or using a white correction pen/paints.
If you don’t have those options you can color around the highlights leaving them white. For their shape and placement see step four.
Step 3 – Add the Shading
For this particular example the middle large clump of forehead hair will have a shadow on its tip as it will be curving inwards. The other clumps will be curving upwards (facing more towards the light) and thus will only have small shadows running along their bottoms.
Place the overall shadows of this hairstyle as follows:
- On the hair clumps of the forehead as already described
- Towards the bottom parts of the side section of the hair (running along the sides and bottoms of the clumps)
- Along the side clumps of the back section of the hair with the part between the neck and the sides being fully shaded
Step 4 – Add the Highlights
Draw each of the highlights as a series of curves and zigzags.
Place the first set of highlights along the forehead. Try and draw the highlight in a way where the lines that comprise it flow along the the general shape of that part of the hair.
Afterwards add another set of highlights lower down along each of the sides.
Finally to emphasize the hair’s messiness add some tiny highlights on the small clumps sticking out from the different parts of the hair.
Shading Short Pigtails Anime Hair Step by Step

Step 1 – Prepare a Line Drawing of the Hair
Same as the other example yet again begin with a clean line drawing of the hairstyle.
Step 2 – Color the Hair

If you are going to be adding the highlights over top you can fully fill in the hair with color. This will apply if you are drawing digitally or have a white correction pen or paints.
Otherwise you can simply leave the highlights white and color around them. If you are going to do this it may also help to first lightly outline them in pencil.
For the shape and placement of the highlights see step four.
Step 3 – Add the Shading
This particular example is fairly easy to shade. You can simply add a few shadows running along the bottom portion of the pigtails as shown in the above example. The rest of the hair can be shaded similar to what’s already been described in other examples.
Overall place the shadows as follows:
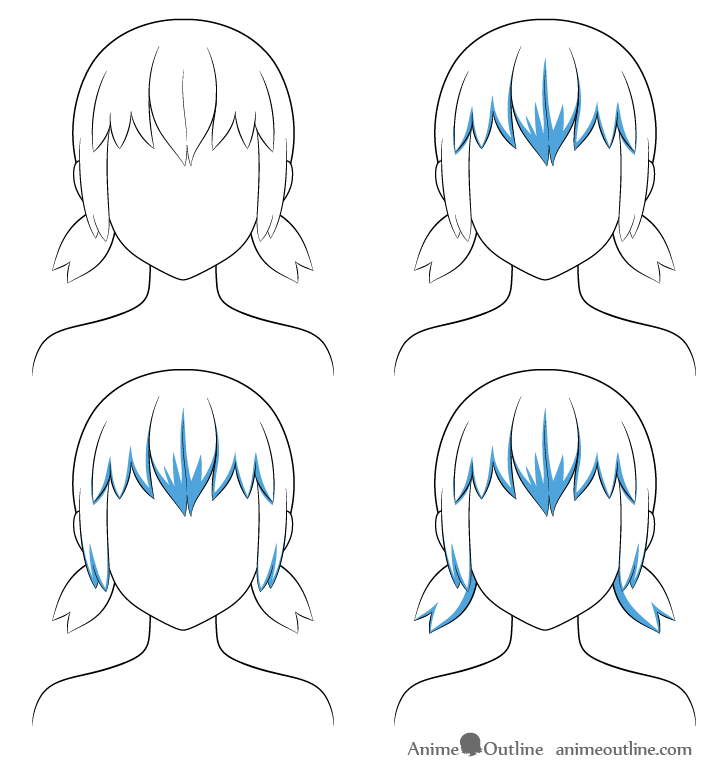
- On the forehead area of the hair running along the sides and bottoms of of the clumps
- Towards the bottoms of the side sections of the hair (again along the sides and bottoms of the hair clumps)
- Along the short pigtails as already described
Step 4 – Add the Highlights

Draw the highlights as a series of small lines and zigzags.
Position the main highlight running across the forehead area of the hair. Afterwards add two more highlights along the side sections.
Finally draw the last pair of highlights along the upper area of each pigtail.
Conclusion
The process of shading anime hair is fairly simple. The main challenge comes in knowing where to places the shadows and highlights. This tutorial should give you a good idea of how to do that in fairly standard lighting conditions and for quite a few different hairstyles.
For more similar tutorials see:
- Beginner Guide to Picking Colors When Drawing Anime & Manga
- How to Color an Anime Character Step by Step


