
How to Draw a Princess in 12 Step (Anime or Manga)
This tutorial shows how to draw a princess in the anime or manga style. It consists of 12 steps with illustrated examples and easy to follow instructions.
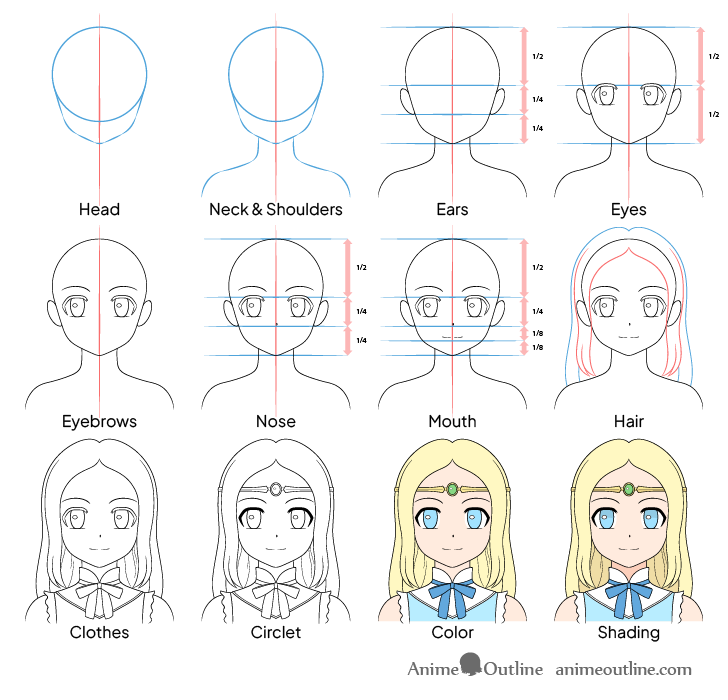
There are several types of princesses that are common in anime. This guide focuses on drawing one that can fit well into a medieval European fantasy setting. The emphasis of this guide in on two things. One is on creating a character with an anime look and the other on giving her giving her an appearance of a royal.
Overall the tutorial is fairly easy as the character does not have too many complex details. To make things even simpler there are also additional step by step examples provided for drawing the ribbon and tiara.
If you are going to be following along using pencil and paper you should begin with light lines as you will need to do some erasing in a few of the steps. You can darken them by tracing over your drawing later on. Also, you may notice that in a few of the steps some parts of the line drawing are shown in different colors. This is done just so that it’s easier to distinguish between them. You can of course draw everything in one color.
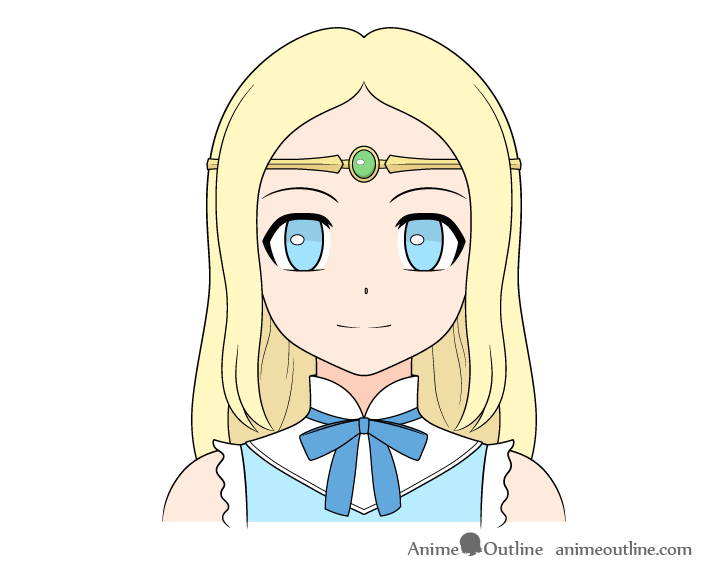
Above is a line by line guide of the princess drawing. You can watch it for a more detailed breakdown of the drawing process and read the more in depth instructions.
If you like these types of videos please be sure to leave a like and to subscribe to the AnimeOutline channel. Your likes and subscriptions are very helpful and important in getting this type of content to reach more people.
More likes and subscriptions means more tutorials in the future.
Step 1 – Draw the Head
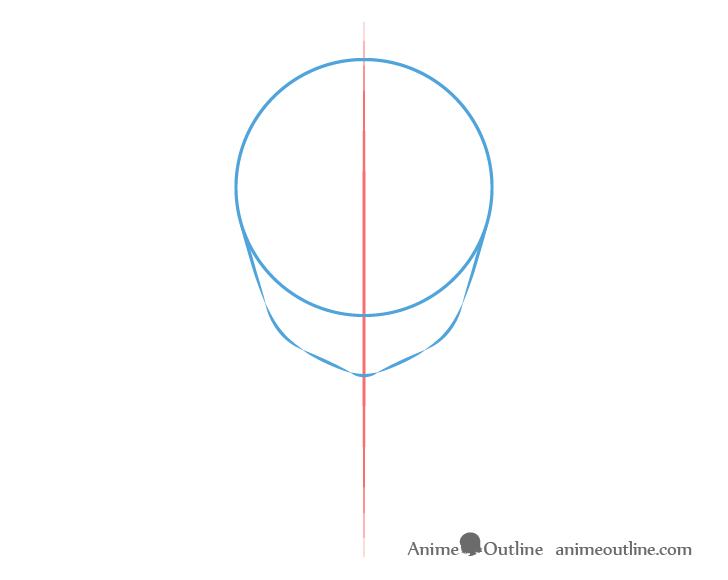
Generally it’s a good idea to start a portrait style drawing with an outline of the head. Begin by making a straight vertical line through the middle of your drawing area and add a circle towards it’s upper end.
The vertical line will act as a guide that can help you see if the drawing is symmetrical. The circle is an easy way to get the shape of the upper part of the head.
Going down from the circle add the lower part of the face. You can can see how to create it’s shape based on the line segments in the example above. For each side draw a line that runs down from the circle and is slightly angled towards the center of the face, followed by a curve and another line that is angled even more towards the center. Afterwards join the two sides with the curve of the chin at the bottom. Making the chin fairly small is important in getting an anime look.
In general you will want the lower part of the face to be fairly short to create a rounder face. This will make it look both cuter and younger.
Step 2 – Draw the Neck & Shoulders
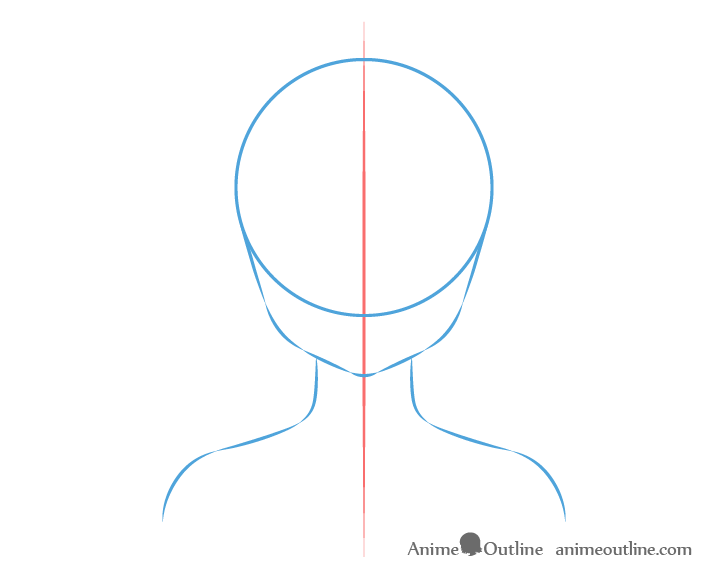
Going down from the lower part of the head add the neck and shoulders. As this is an anime character make the neck fairly thin and the shoulders fairly small in relation to the head.
You can again see the shapes of these defined by the line segments in the example. First draw the neck with two fairly straight lines that curve near the bottom. Next, draw the shoulders one at a time starting with a fairly straight downward line followed by a curve.
For more on drawing anime necks and shoulders see:
How to Draw Anime Neck & Shoulders
Once done you should have a drawing similar to the above.
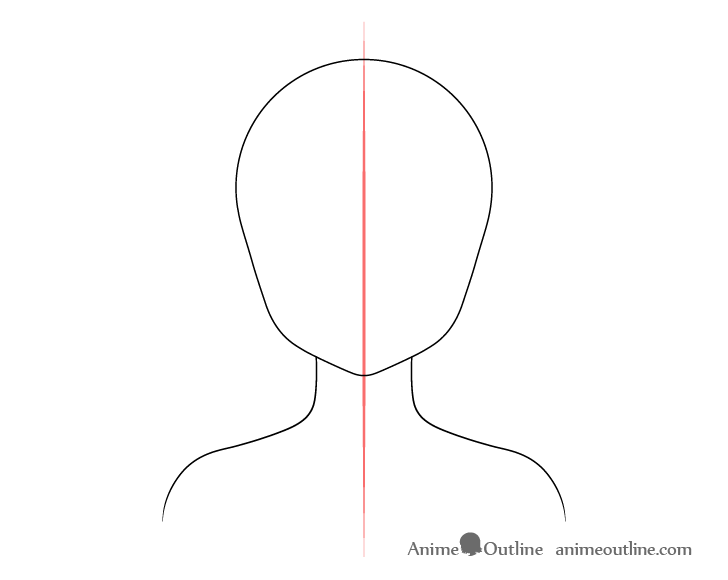
For a more in depth explanations of the structure of an anime head and face see the following tutorial:
How to Draw an Anime Face (Structure & Proportions)
Step 3 – Draw the Ears

Please note that the ears will be fully covered by the hair in later steps. However, it can still be good practice to outline them just so that you know how much volume the hair needs for them to be fully covered. It’s also useful in case you wish to draw the character with a different hairstyle.
Place the ears with their bottoms about 1/4 of the way up the head and their tops slightly below the 1/2 point.
For more ways of drawing anime and manga eras as well as alternative ways of placing them on the head see the following:
How to Draw Anime & Manga Ears (3 Different Ways)
Step 4 – Draw the Eyes
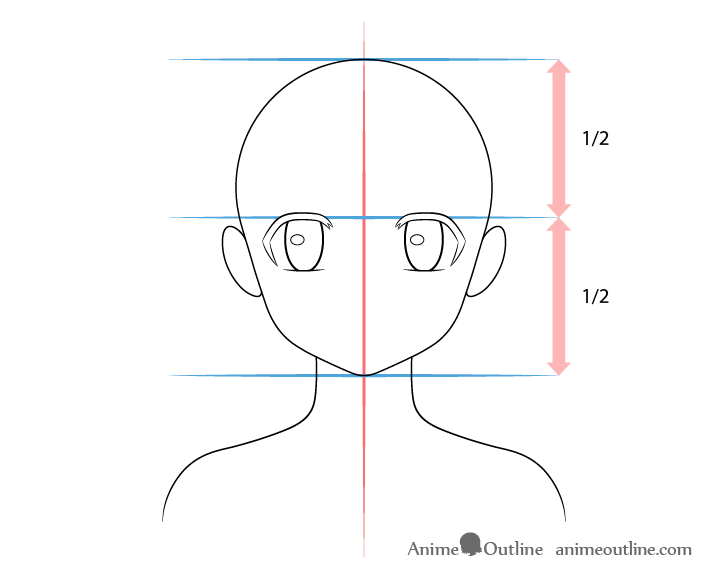
Position the eyes roughly below the horizontal halfway point of the head. Draw them fairly large and tall (even by anime standards). This will again give the princess a younger appearance and make her look cute/pretty.
For this particular character the eyes wont have a lot of detail other than an oval shaped reflection to tone side of each of them.
Space the eyes in a way that you have roughly the width of one eye in between them.
For drawing eyes with different expressions see the following:
How to Draw Anime Eyes and Eye Expressions
Step 5 – Draw the Eyebrows
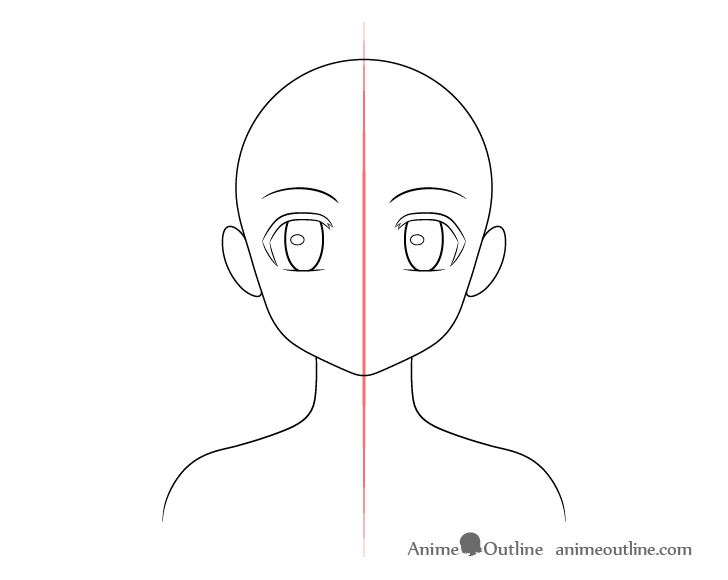
Draw the eyebrows little bit above the eyes (in their normal/relaxed state). This will help create a fairly calm expression.
You can draw each eyebrow with just a single curved line.
Step 6 – Draw the Nose

Position the nose slightly to one side of the vertical middle of the face. In this example the it’s actually an outline of it’s own shadow.
For more on drawing anime style noses see:
How to Draw Anime and Manga Noses
Step 7 – Draw the Mouth

Place the mouth slightly above the halfway point between the nose and the bottom of the head. Draw it with a slight curve to give the princess a light smile. The lightly smile can help create a polite and at the same time reserved look fitting for a royal princess.
For more on drawing anime mouths see:
Step 8 – Draw the Hair
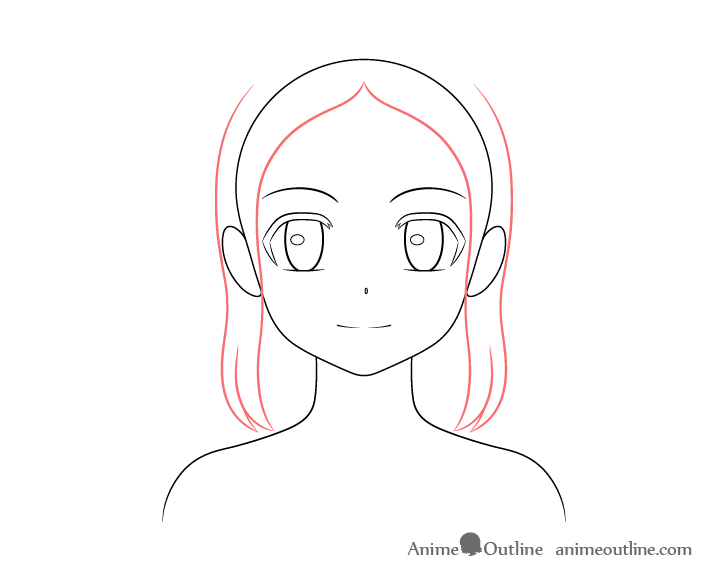
The princesses’ hairstyle can be drawn in two main parts. First outline the hair at the front/sides of the head (as shown in red above).
Add the hair right over top of the outline of the head/ears as though it’s transparent.

Next, outline the hair that is farther in the background (shown in blue).
In the example above you can see how outlining the head and ears before drawing the head makes it very easy to see just how much volume you’re giving it.
For more good drawing practices also see the following:
Beginner Guide to Drawing Anime & Manga
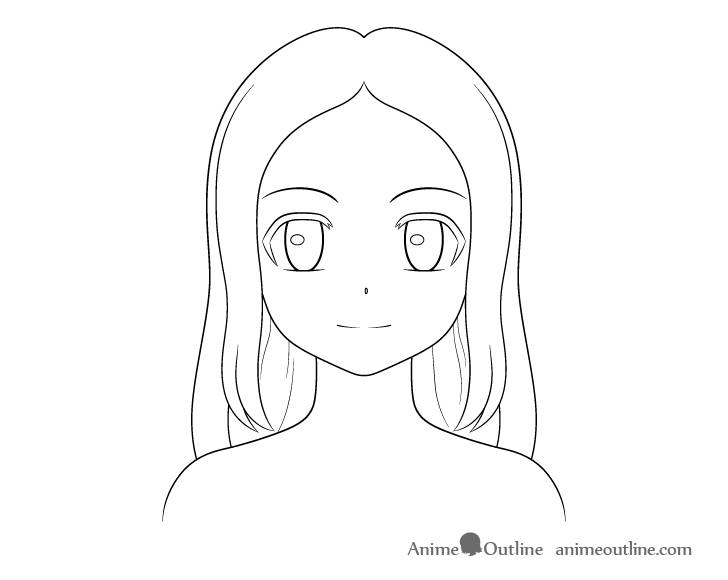
You can then erase the parts of the head covered by it and draw a few curved and wavy lines around the area of the neck to create hints of folds in the hair.
For drawing other hairstyles for a female anime character see:
How to Draw Anime and Manga Hair – Female
Step 9 – Draw the Clothes
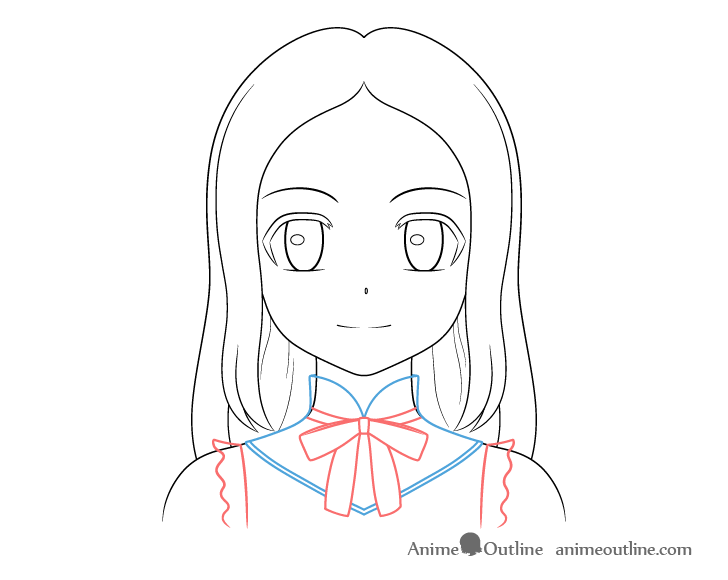
Another important aspect of creating a character that looks like a princess is of course the clothes.
You can see the different parts of them shown in red and blue in the example above. Similar to drawing the hair over top of the head draw the clothes over top of the body as though they are transparent and erase any parts that should be hidden afterwards.
In this case the area dress the visible parts of which only really consists of the part around the neck/upper chest area and the frills around shoulders. The frills in particular are a good choice as these are fairly common on fancy dresses that royalty might ware.
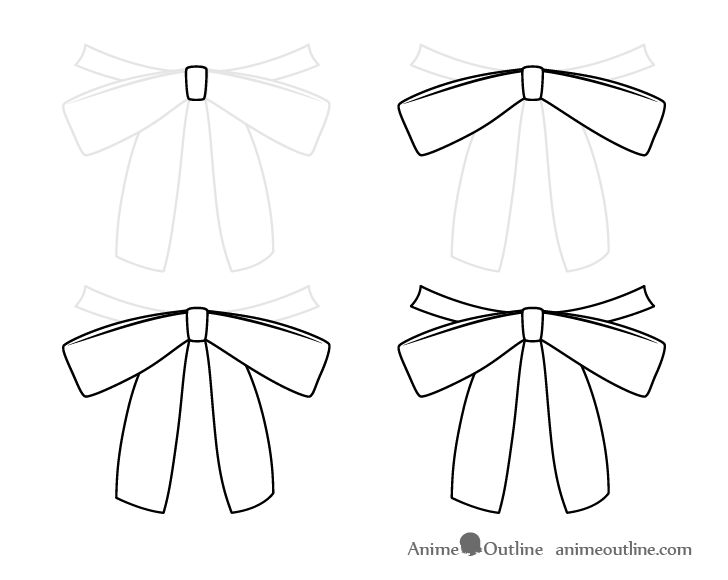
As mentioned at the start of the tutorial, a step by step drawing of the ribbon is shown above. First draw the knot, followed by the two bows on the sides, followed by the two ends hanging down and finally the part that is tied around the neck.
Draw the ribbon over top of the dress and erase the bits that it covers.
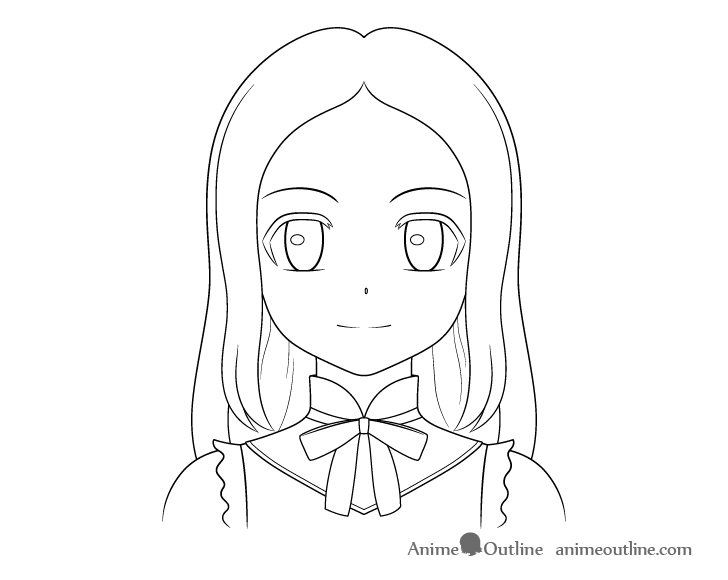
Once you clean up the drawing it should look something like the example above.
Step 10 – Draw the Circlet
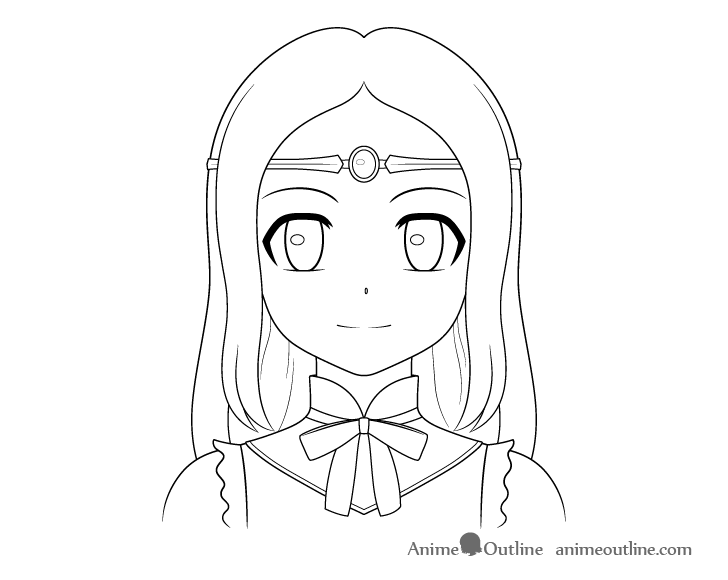
For the final (but important item) add the circlet to complete the “princess look”.

Draw the circlet as shown in the step by step example above.
- Draw the centerpiece (oval in shape) and followed by the band on each side
- Connect the band to the centerpiece
- Outline the jewel (smaller oval)
- Define the edge of the band with a pair of lines (one on each side)
- Outline a highlights/reflection in the jewel (shows that it’s shiny)
Parts of the tiara will be behind the hair but you can again draw the whole thing as though the hair is see though and then erase the parts that are covered up. Doing this can help you avoid mistakes like parts that look misaligned.
For an example of this and other common drawing mistakes see the following:
Common Mistakes When Drawing Anime & Manga
Once you’ve added the tiara you can trace over your drawing with darker lines.
Step 11 – Add Color

A good combination of colors for the princess drawing is yellow and blue.
Yellow is close to the color of gold which is often associated with royalty and blue generally goes well with yellow. Parts of the dress are also white which goes well with everything.
For an explanation of how different colors work together see:
Beginner Guide to Picking Colors When Drawing Anime & Manga
Color the princess as follows:
- Hair – yellow (blonde)
- Eyes – light blue
- Dress – white and light blue
- Ribbon – medium blue
- Jewel – green
You can also fill the eyelashes with black (or dark pencil shading).
Step 12 – Add Shading
To make the drawing appear less flat add some basic shading by lightly darkening the following places:
- Tiara – bottom half
- Jewel – bottom and right side
- Eyes – upper parts of irises
- Nose – inside the outline of the shadow
- Neck – entire area
- Hair – inner area round the neck
- Ribbon – inner parts of the bows
In this particular example the shading is done in a very generalized way. The shadows are added in the areas where shadows are most likely to occur in a well lit environment.
Conclusion
This tutorial shows how by combining the right proportions, expression, clothing and colors you can create a character of a certain status/occupation in a given style. In this case it’s a princess that looks like she is from a medieval fantasy anime or manga.
Whatever character you are trying to create in whatever style it can be a good idea to consider the most defining characteristics of both and apply them to your art.
For more similar tutorials also see the following:
- How to Draw an Anime Elf Girl Step by Step
- How to Draw Anime Wolf Girl Step by Step
- How to Draw an Anime Vampire Girl Step by Step
- How to Draw a Cute Girl Step by Step
- How to Draw Fantasy Weapons (10 Different Types)
- How to Draw a Sports Car Step by Step


