
How to Draw Anime Hair in 3/4 View Step by Step
This tutorial explains the specifics of drawing anime and manga style hair in 3/4 view. It provides two sets of examples for each hairstyle, one static and one dynamic (blowing in wind).

Before looking at this tutorial you may want to see (if you haven’t done so already):
Drawing hair in 3/4 view is actually not that much more difficult than drawing hair from the front or side. You can apply the technique of splitting it up into tree basic sections (explained in more detail in the tutorial linked above).
The three parts that hair will be split up into in this tutorial will be:
- Front Section
- Side Sections
- Back/Top Section
If you are going to be following along using pencil and paper be sure to make light lines as you will need to erase parts of the drawing as you move from one step to another.
You can darken your lines by tracing over them after you are sure everything is in the right place.
It’s also recommended that you read over the drawing instructions for the first hairstyle as they are slightly more detailed. The other example have less explanation to avoid repetition.
For a tutorial on drawing facial feature from this angle see:
How to Draw an Anime Female Face 3/4 View
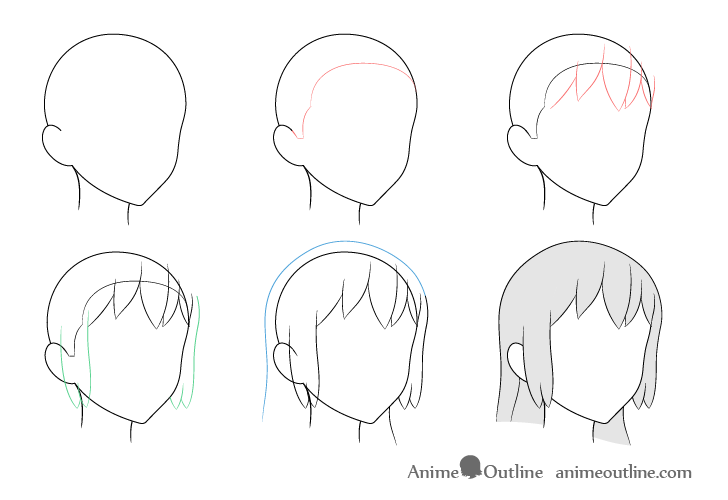
How to Draw Natural Short Hair in 3/4 View Step by Step
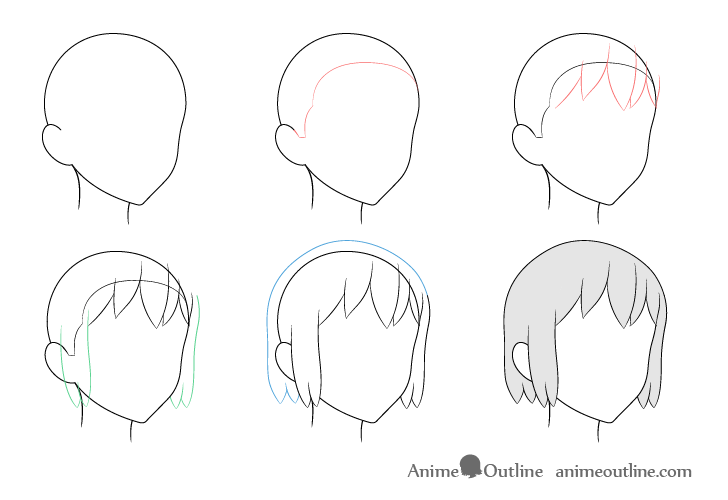
This first example is of fairly short female hair drawn in large clumps as is typical for an anime/manga style.
Step 1 – Draw the Head
Before drawing the hair it’s a good idea to draw a basic outline of the head as shown in the example above. Creating a drawing of the head will make it easier to determine the volume of the hair and can help you avoid making mistakes.
Step 2 – Draw the Hairline
After drawing the head add the hairline (again as shown in the example). The hairline will help you determine where to place the front and side sections of the hair. For example the splits in the hair clumps (areas between which the skin is visible) should not really go up past the hairline.
Step 3 – Draw the Front Section of the Hair
For this hairstyle start with the front section of the hair. Draw the middle clumps pointing more downwards and the side clumps pointing more towards their respective sides.
Step 4 – Draw the Side Section of the Hair
Add the side section with the one in the background partially hidden by the head. Erase the hairline after you’re done with this step.
Step 5 – Draw the Back/Top Section of the Hair
Finally add the last section of the hair with the top part somewhat tracing the shape of the head and transitioning into the splits at the bottom.
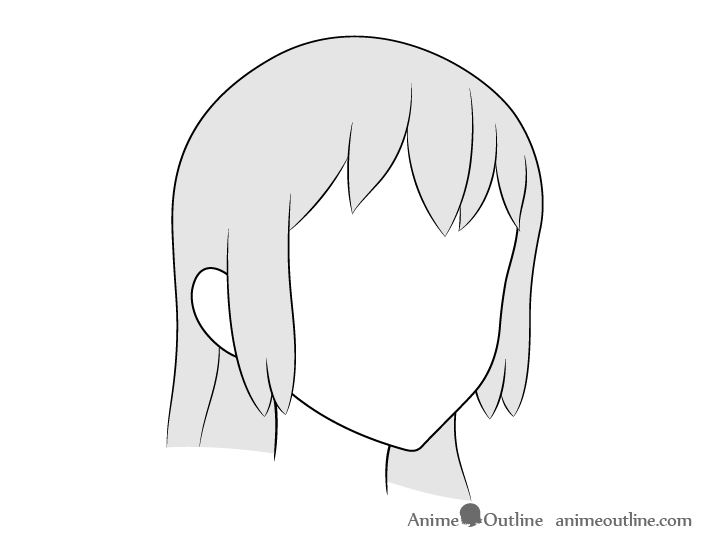
Step 6 – Finish the Hair Drawing
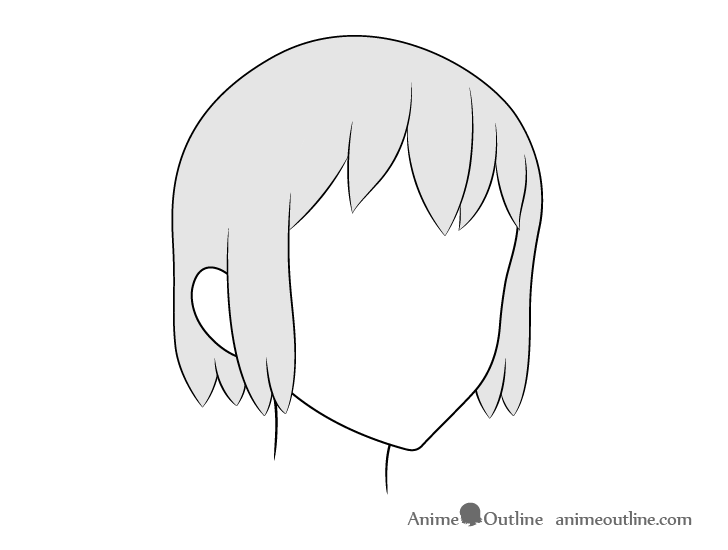
Once you are finished drawing the hair erase all of the parts of the head that are covered by it so that you have a nice and clean drawing. If you have made light lines as was suggested at the start of the tutorial you can trace over them to make them darker. Finally you can also apply some light shading similar to the above example.
For examples of adding more advanced shading with highlights to different hairstyles see:
How to Shade Anime Hair Step by Step
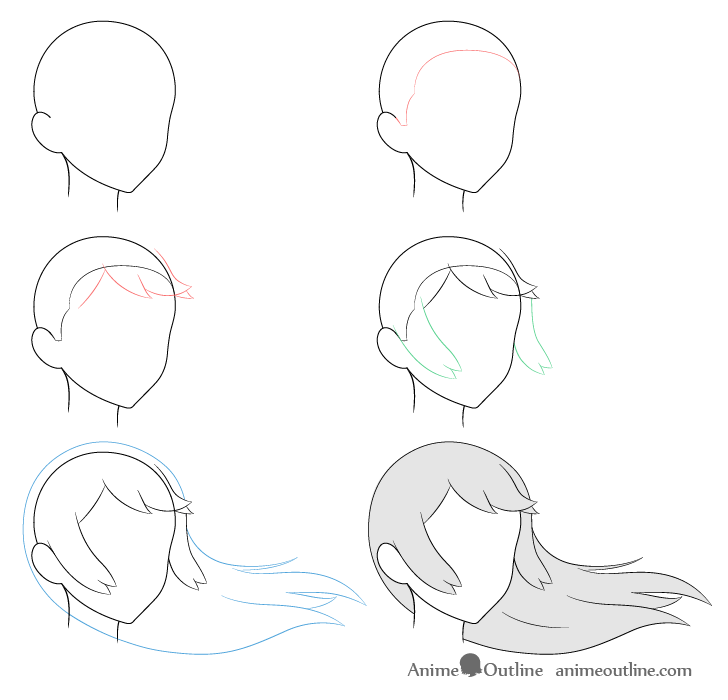
How to Draw Natural Short Hair Blowing in the Wind in 3/4 View Step by Step
In this example the previous short hairstyle swill be drawn blowing in the wind.
Step 1 – Draw the Head
Again start the drawing by first making a basic outline of the shape of the head.
Step 2 – Draw the Hairline
Add the hairline as shown in the example.
Step 3 – Draw the Front Section of the Hair
One important thing to note is that when drawing hair blowing in the wind the base of each section should not really move (sort of like it’s taped in place).
Draw the front section with the base of the clumps starting from roughly the same spot as in the previous example but draw the shapes of the clumps swinging in the direction of the wind.
In this case the hair will be blowing forward and slightly to the left (side facing away from the viewer) in relation to the head.
Step 4 – Draw the Side Section of the Hair
Similar to the front section draw the sides of the hair starting from the same spot as the “static” example but swinging in the direction of the wind.
After you draw the sides you can erase the hairline.
Step 5 – Draw the Back/Top Section of the Hair
For the last section of the hair you can draw it pretty much the same around the top (tracing the shape of the head).
However the lower part of this section will be swung forward which means the part around the visible ear will curve more towards the head. You can also add another a small part of the lower/back section of the hair sticking out on the far side of the head (below the side clump).
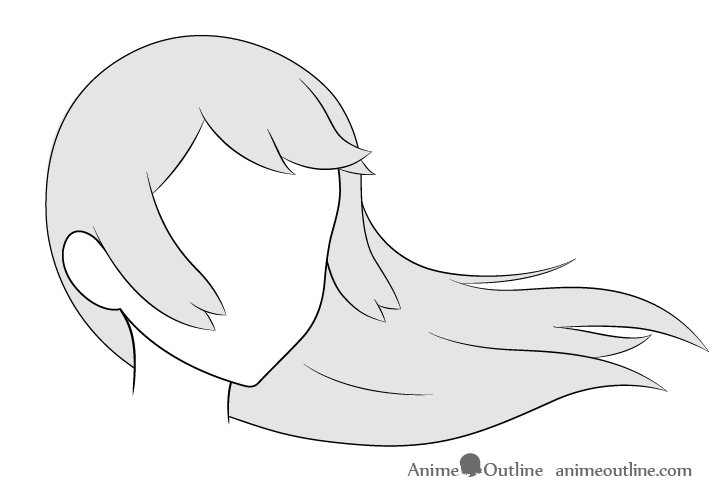
Step 6 – Finish the Hair Drawing
Finish the drawing by erasing the parts of the head covered by the hair. You can also apply some light shading as done in the example to make the hair to stand out a little bit more.
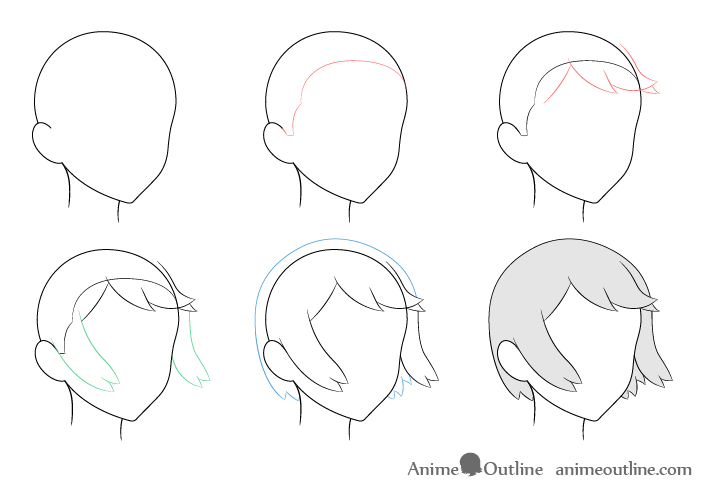
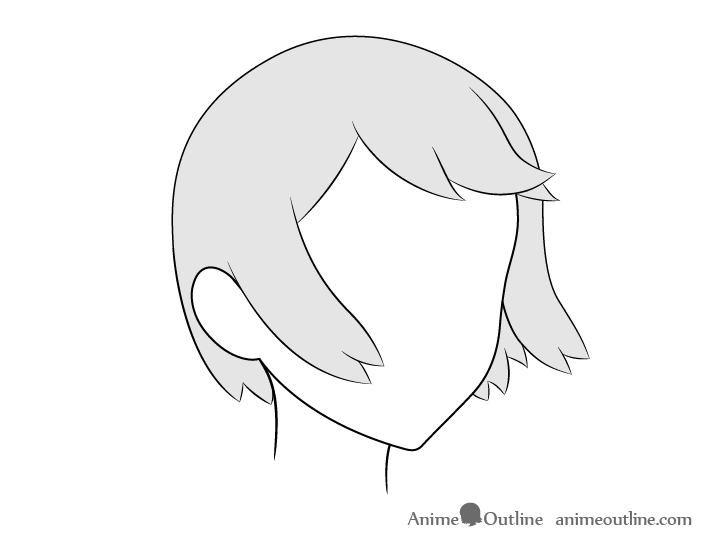
How to Draw Ponytail Hair in 3/4 View Step by Step
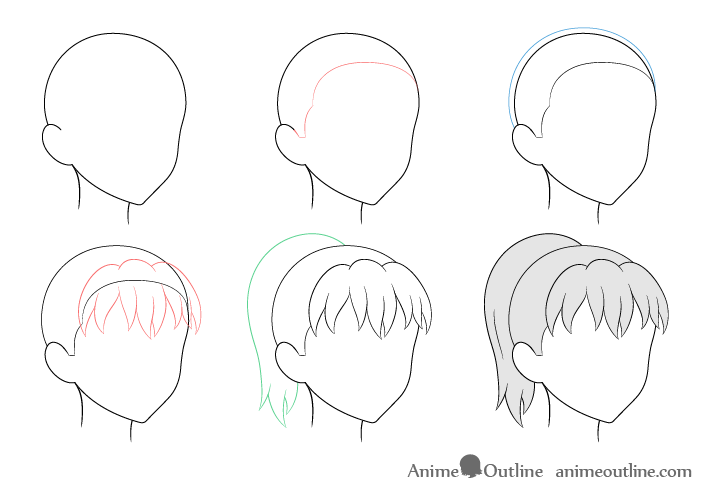
The ponytail is another fairly common hairstyle but the steps for drawing it will be slightly different than the previous examples.
Step 1 – Draw the Head
Draw a basic outline of the head.
Step 2 – Draw the Hairline
Add the hairline to the head drawing as shown in the example.
Step 3 – Draw the Back/Top Section of the Hair
Unlike the previous examples you can start the ponytail hairstyle drawing with the back section of the hair.
As this part of the hair is pulled around the head it will not have much volume so draw it fairly close to the head.
Erase the parts of the head covered by this section of the hair after you’re done.
Step 4 – Draw the Front Section of the Hair
Add the front section of the hair in fairly large clumps with the ones in the middle pointing more downwards. Draw the ones on the sides pointing more towards their respective sides.
Erase the parts of the head and hairline covered by this section once finished.
Step 5 – Draw the Ponytail
Add the ponytail shaped a bit like a question mark spitting up into several clump at the end. From this angle a good portion of it should be hidden behind the head so draw accordingly.
Step 6 – Finish the Hair Drawing
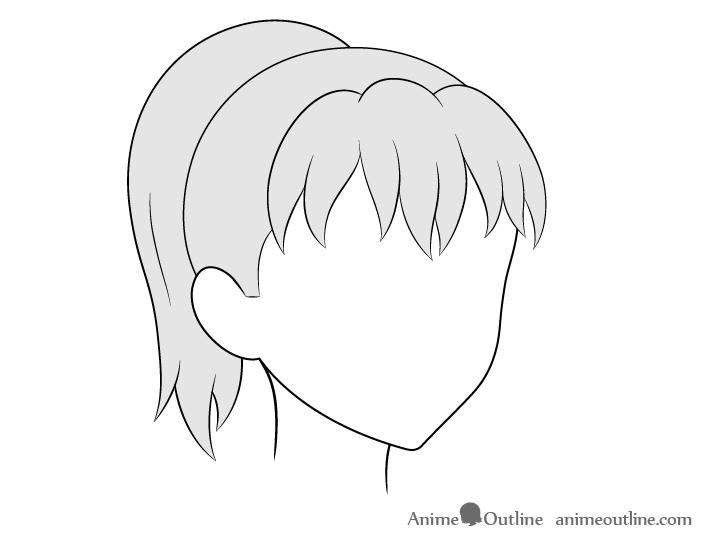
To finish the hair drawing you can add just one or two folds to the ponytail similar to the example. You can also lightly shade the hair.
How to Draw Ponytail Hair Blowing in Wind in 3/4 View Step by Step
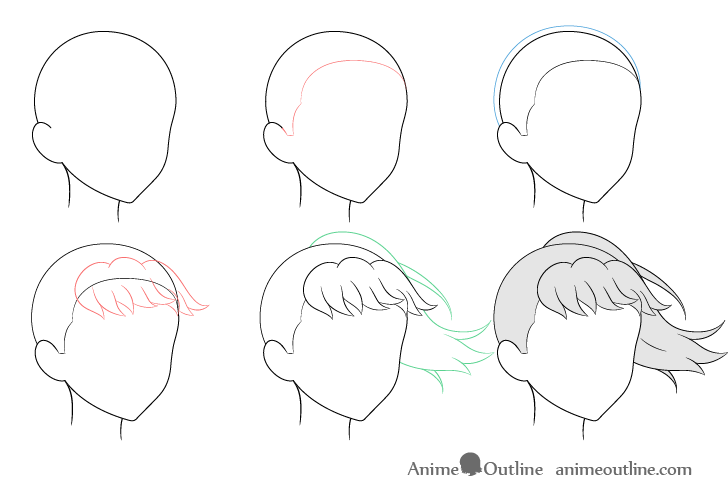
Step 1 – Draw the Head
Again star the drawing with the outline of the head.
Step 2 – Draw the Hairline
Add the hairline as shown in the example.
Step 3 – Draw the Back/Top Section of the Hair
Draw the back/top section of the hair same as in the previous “static” example of this hairstyle.
Erase the part of the head covered by it once done.
Step 4 – Draw the Front Section of the Hair
Once again the hair will be getting blown forward and slightly to the side of the head facing away from the viewer.
Similar to the first example try and draw the clumps originating from roughly the same spots as in the static version of the hair. Draw all of the clumps lifted up but with some curving downwards and some upwards to make the hair look more natural.
Erase the parts of the head and hairline covered by this section of the hair once done.
Step 5 – Draw the Ponytail
Draw the ponytail swinging in roughly the same direction as the hair clumps on the from section of the hair and make the splits on it’s end point in random directions.
You can also draw a few more clumps coming out from behind it to make the hair look more messy.
Step 6 – Finish the Hair Drawing

To finish the drawing you can again add a fold or two into the ponytail and then lightly shade the hair.
How to Draw Pigtails Hair in 3/4 View Step by Step
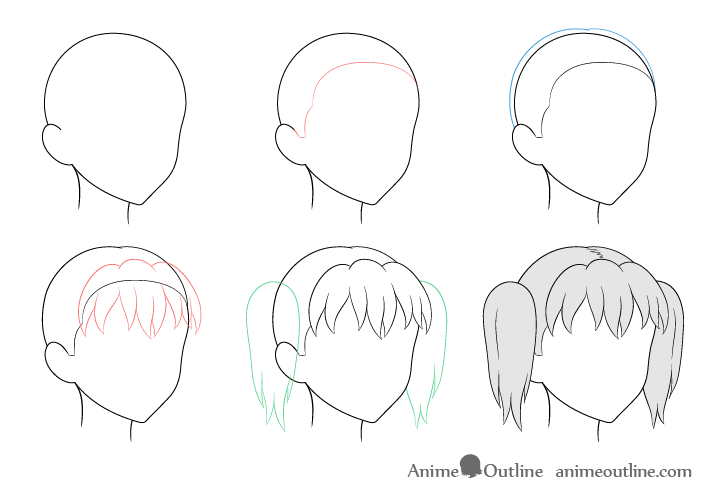
The pigtails hairstyle will be very similar to the ponytail in the way that it’s drawn.
Step 1 – Draw the Head
Draw a basic outline of the head.
Step 2 – Draw the Hairline
Add the hairline as shown in the example.
Step 3 – Draw the Back/Top Section of the Hair
Similar to the pony tail start the drawing with the back section of the hair. Since the hair will be getting pulled in two directions (to each pigtail) draw it with two curves that join up near the top of the head.
Erase the part of the head covered by this hair once done.
Step 4 – Draw the Front Section of the Hair
You can draw the front section of the hair exactly the same as for the ponytail example, in large clumps with the ones in the middle pointing more downwards and the ones on each side pointing more towards their respective sides.
Erase the parts of the head/hairline covered by this hair afterwards.
Step 5 – Draw the Pigtails
Draw the pigtails slightly wider towards the top and narrower towards the bottom (splitting up into smaller hair clumps).
Erase the part of the head covered by the pigtail in the front once done.
Step 6 – Finish the Hair Drawing
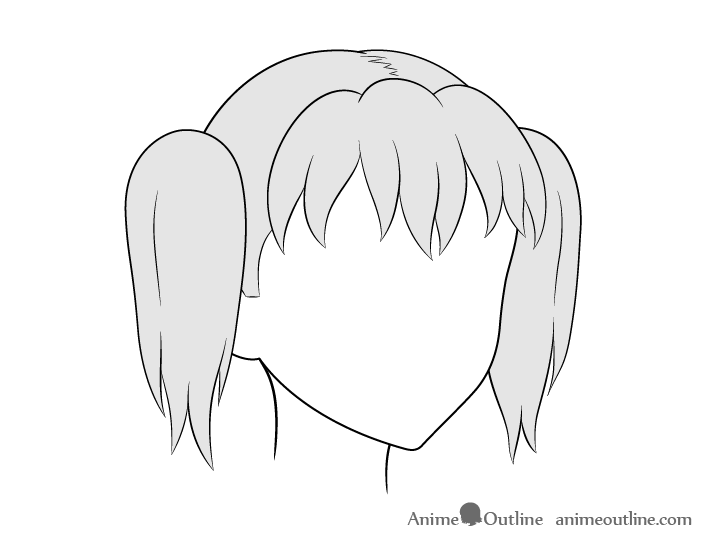
To finish the drawing first add a parting line down the middle of the hair where it’s being pulled in opposite directions. You can draw this as pretty much a zigzag. Afterwards add some folds to the pigtails.
To finish the drawing you can also add some light shading.
How to Draw Pigtails Hair Blowing in Wind in 3/4 View Step by Step

Step 1 – Draw the Head
Again draw a basic outline of the head.
Step 2 – Draw the Hairline
Add the hairline as shown in the example.
Step 3 – Draw the Back/Top Section of the Hair
Draw the back/top section of the hair as in the previous example (in two curves that join near the top of the head).
Erase the part of the head covered by this hair section once done.
Step 4 – Draw the Front Section of the Hair
Again you can draw the front section of the hair as described in the ponytail example (swinging forward and slightly to one side of the head). Be sure to keep the origins of the clumps starting from roughly the same spot as in the static example.
Erase the parts of the head and hairline covered by this part of the hair afterwards.
Step 5 – Draw the Pigtails
Draw both pigtails swinging in the direction of the wind (again forward and slightly to the far side of the head).
Erase the part of the head covered by the pigtail in the front once done.
Step 6 – Finish the Hair Drawing
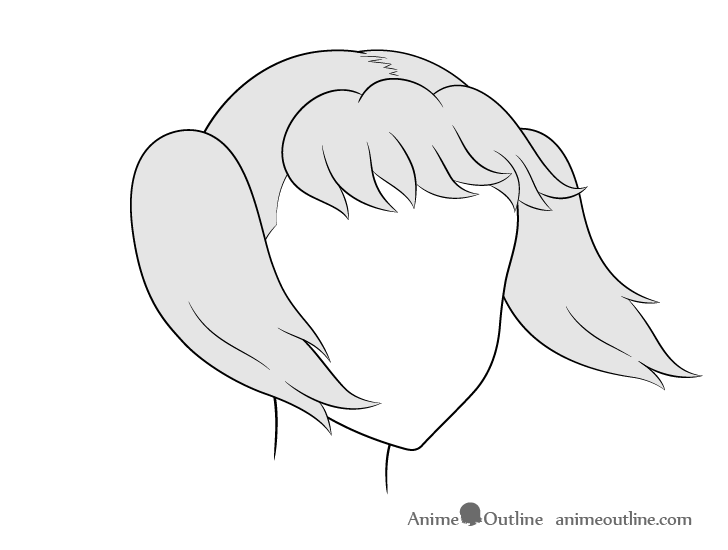
Finish by adding the parting line to the upper part of the head to show that the hair is being pulled in different directions (to each pigtail). You can also add some folds to each pigtail and some basic shading.
How to Draw Trimmed Hair in 3/4 View Step by Step

This example is of neatly trimmed hair. If you combine it with the back section from the “long hair” example you can get the “hime cut” that is so popular in many anime.
Step 1 – Draw the Head
Begin by drawing a simple outline of the head.
Step 2 – Draw the Hairline
Add the hairline as shown in the example.
Step 3 – Draw the Front Section of the Hair
For this hairstyle you can view the front section of the hair as pretty much one solid chunk with some split added into it. Another way to think of it is as the hair clumps from the other examples with the ends chopped off.
A good way to draw the front part of this haircut is simply by making a lightly curved line for it’s bottom and then drawing the splits on top of it. You can then erase the parts that have the splits.
Step 4 – Draw the Side Section of the Hair
Draw the side sections similar to the ones in the first hairstyle example but again with their ends looking like they’ve been “chopped off”.
You can erase the hairline once done with this step.
Step 5 – Draw the Back/Top Section of the Hair
Again similar to the first hairstyle add this section somewhat following the shape of the head near the top and transitioning into some clumps on the bottom (draw these with “chopped off” ends).
Step 6 – Finish the Hair Drawing
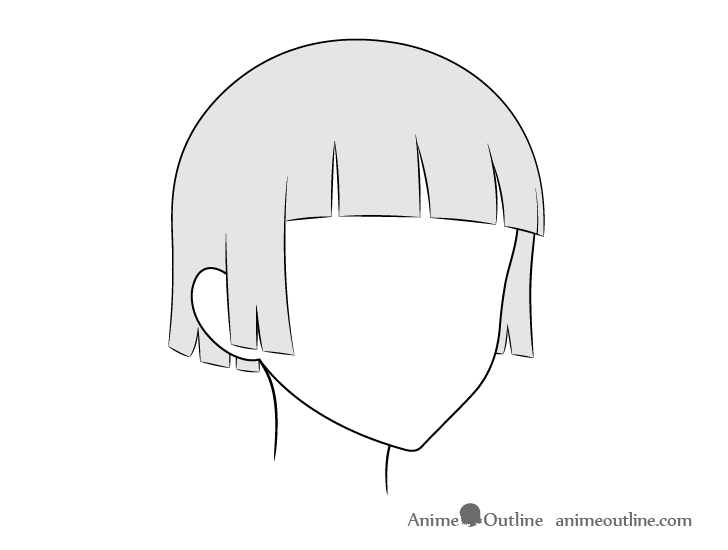
Erase the parts of the head covered by the hair and add some light shading to finish the drawing.
How to Draw Trimmed Hair Blowing in the Wind in 3/4 View Step by Step

When drawing the trimmed hair in the wind you will want to draw more splits into it then in the previous example.
Step 1 – Draw the Head
Again draw a basic outline of the head.
Step 2 – Draw the Hairline
Add the hairline as shown in the example.
Step 3 – Draw the Front Section of the Hair
Again the hair will be blown forward and slightly to the far side of the head.
To show that the hair is blowing in the wind draw the front section on an angle with more splits in it. You can also draw some of the longer splits with “wavy” lines.
Step 4 – Draw the Side Section of the Hair
Draw the sides blowing in roughly the same direction as the front with more splits towards their ends as well.
You can erase the hairline after you finish this part of the drawing.
Step 5 – Draw the Back/Top Section of the Hair
Draw the upper part of this section of the hair same as for the static example with the lower part being swept more towards the head.
Unlike the first hairstyle example the “back hair” in this one is shorter so it does not need to be shown popping out on the other side of the head.
Step 6 – Finish the Hair Drawing
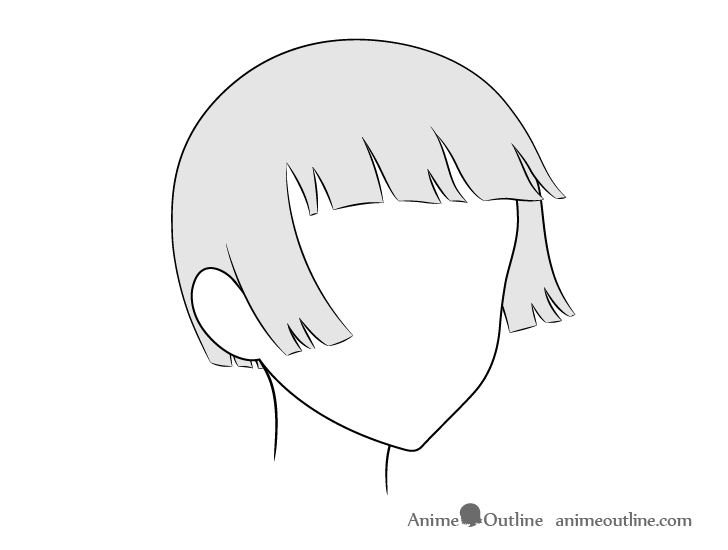
Erase the parts of the head covered by the hair and finish the drawing by adding some light shading.
How to Draw Long Hair in 3/4 View Step by Step
In this static view of the “long hair” most of it’s lower back section will not be shown because even if you were to draw out the full body it would be hidden behind the shoulders. As a result this example is not much different from the first hairstyle.
Step 1 – Draw the Head
Start by drawing a simple outline of the head.
Step 2 – Draw the Hairline
Add the hairline as shown in the example.
Step 3 – Draw the Front Section of the Hair
Draw the front section of the hair the same as described in the first hairstyle example (middle hair clumps pointing down side clumps pointing more to the sides).
Step 4 – Draw the Side Section of the Hair
Draw the side sections splitting into small clumps towards their ends with the one on the far side of the head partially hidden.
You can erase the hairline after you’re done with this step.
Step 5 – Draw the Back/Top Section of the Hair
Draw the top part of the hair pretty much following the shape of the head and then getting wider as it goes down towards the neck.
Step 6 – Finish the Hair Drawing
To finish the drawing first erase the parts of the head covered by the hair and then add some light shading.
How to Draw Long Hair Blowing in the Wind in 3/4 View Step by Step
Step 1 – Draw the Head
Again draw a basic outline of the head.
Step 2 – Draw the Hairline
Add the hairline as shown in the example.
Step 3 – Draw the Front Section of the Hair
As in all of the other example the hair will be blow forward and slightly to the far side of the head.
Again be sure to draw the base of the hair clumps in roughly the same spot as for the static example but draw the clumps themselves swinging in the direction of the wind.
Step 4 – Draw the Side Section of the Hair
Draw the sides of the hair sweeping in the direction of the wind similar to the front section.
Erase the hairline after you finish this part of the drawing.
Step 5 – Draw the Back/Top Section of the Hair
Draw the upper part of this section of the hair following the shape of the head and the lower part waving in the direction of the wind. Add some fairly long clumps towards it’s end that curve in slightly different directions.
You may also want to use a little trick of drawing the hair as though the neck is see though. This can help insure that the two parts of the hair broken up by the neck connect properly and have a continuous flow to them.
For more on this see the example with the sword sheath in:
Common Mistakes When Drawing Anime & Manga
Step 6 – Finish the Hair Drawing
To finish the drawing first erase the parts of the head that are covered by the hair. Next you can add some hair folds (just one in this case). Finally you can also add some light shading that can help the hair stand out a little bit more from the rest of the head.
Conclusion
Drawing hair from different angles instead of just from the front or side view can get a little more complicated. By thinking of the hair as being split into several different sections you can make the drawing process more manageable. You can try and estimate where each section should be located in a particular view of the head instead of trying to figure out what to do with one massive clump of hair.
For more tutorials on drawing hair also see:
- How to Draw Wet Anime Hair Step by Step
- Different Ways to Draw Anime Hair Highlights
- How to Draw Anime and Manga Hair – Female


")


