How to Draw a Girl with Big Eyes (12 Steps)
See how to draw a girl with big eyes step by step using the same techniques common in anime, manga, and comic books.
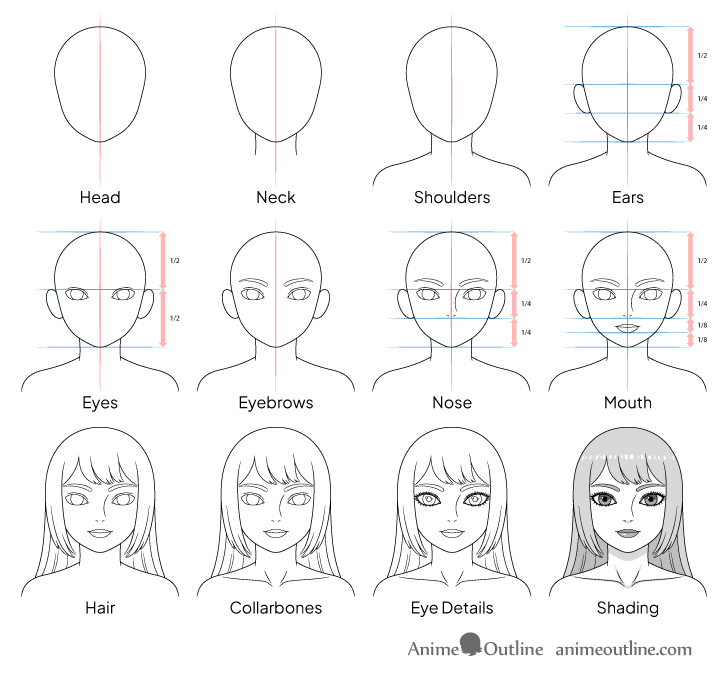
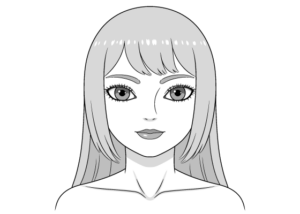
This tutorial shows how to draw the girl in a style that is fairly realistic but is also similar to those mentioned above. The artwork in the examples is done with black outlines and cel shading.
In addition to creating a particular style, the tutorial also demonstrates good overall drawing practices such as proportioning the face and using “see-through” drawing.
Unless drawing digitally, it’s recommended that you do the entire tutorial in regular pencil and start with light and easy-to-erase lines.
Above is a video that shows how to draw the girl line by line. You can watch it for a more detailed breakdown of the drawing process. However, also be sure to read below for more in-depth instructions on why the different facial features are drawn a certain way.
Step 1 – Draw a Fairly Round Head
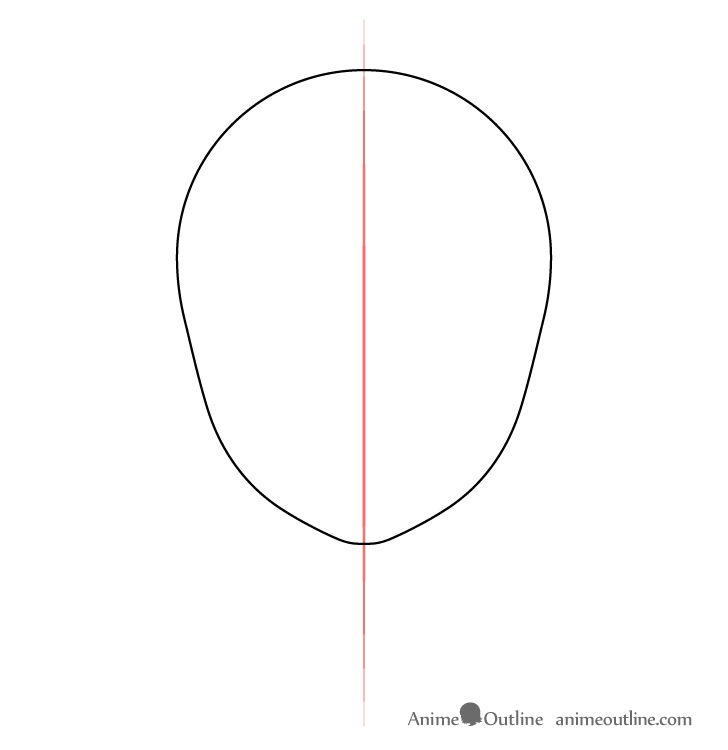
Begin drawing the girl with an outline of the head. As the goal of this tutorial is to create art that looks both realistic and anime, you want to make the head fairly round (as is common for anime characters).
First, make a straight vertical line through the middle of your drawing area. Towards the upper end of this line, draw a circle to help you get the shape of the head’s upper section. Going down from the circle, draw the lower part of the head as follows:
- The Middle Section: Starting from the outer edges of the circle, make this narrower as it runs down.
- The Lower Section: Define this with a pair of inwards curves.
- The Bottom Section: Make this even narrower as it goes down, ending with the slightly curved chin at the bottom.
Once you’ve added its lower section, you can erase the bottom half of the circle to get a clean outline of the head.
Step 2 – Draw a Slender Neck
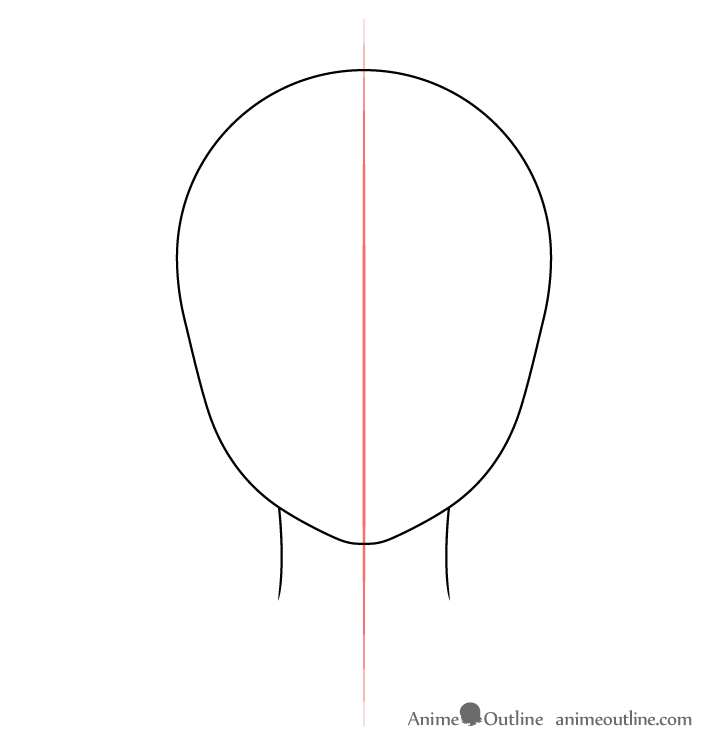
Going down from the head, draw a fairly slender neck. Position its sides to start from roughly the bottom ends of the curves drawn in the previous step. Overall, its outline should be significantly narrower than that of the head.
For more on drawing necks, see:
How to Draw Anime Neck & Shoulders
Step 3 – Draw Slim Shoulders
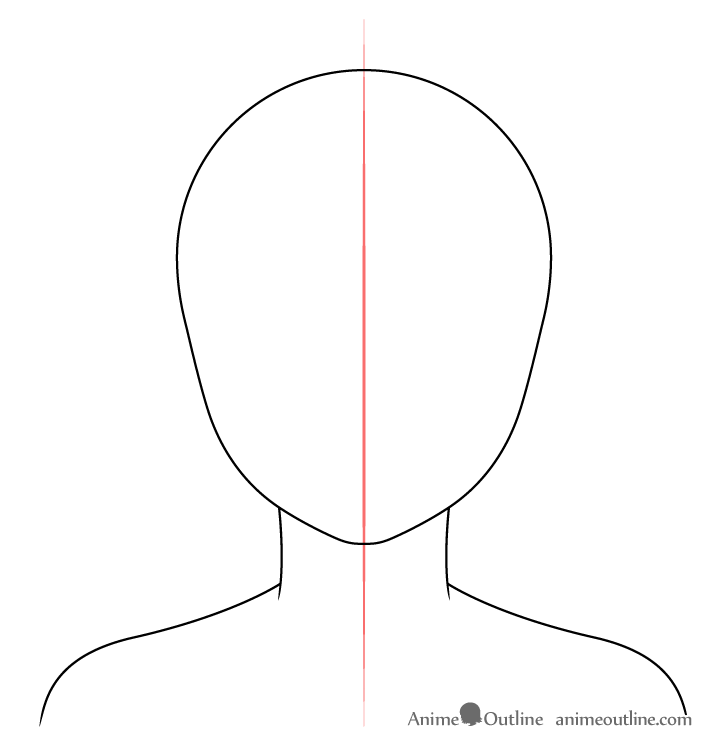
Make the shoulders quite slim. Draw them starting with downwards slopes that originate just a little bit above the bottom of the neck. Eventually, transition the slopes into downwards curves as they go a little bit past the outer edges of the head.
The reason you want to start their outlines a little bit above the end of the neck is to show it being slightly set into the shoulders. This will make the drawing look more organic and less like a wireframe.
The reason you want the shoulders to be fairly slim is because anime characters generally tend to have big heads. Drawing narrower shoulders will help the head appear bigger and more anime-like.
Step 4 – Position and Outline the Ears
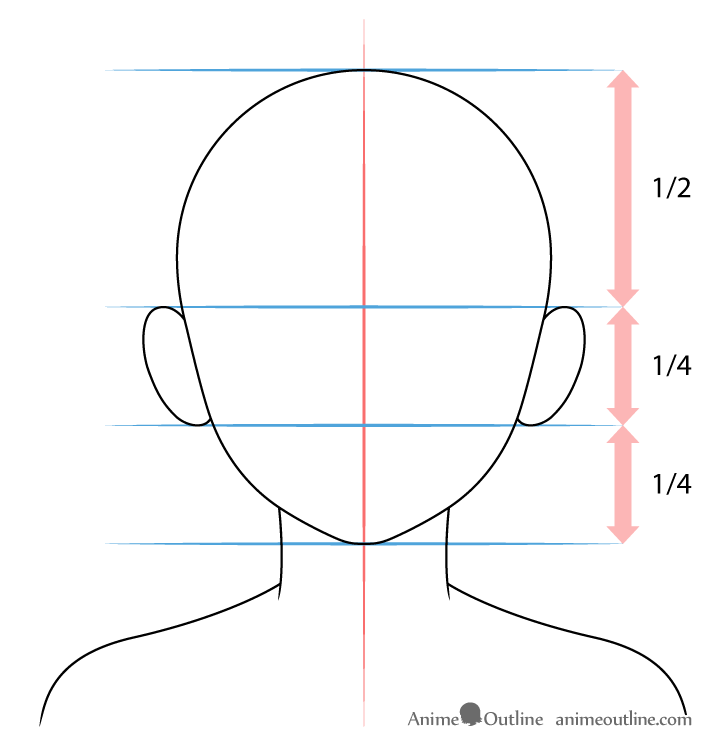
Position the ears with their tops below the horizontal halfway point of the head and their bottom edges halfway between that and the chin. Realistically, the ears are higher up on the head. However, positioning them lower down than normal will help create a larger forehead and a more anime-looking face, as anime characters tend to have big foreheads.
Please note that although the ears will be fully covered by the hair later on in the drawing, it’s still a good idea to at least create their basic outlines so that you know how much hair volume is needed to accomplish this. Knowing their placement can also be helpful in case you wish to draw a different hairstyle where they are shown.
For different ways to draw ears, see:
How to Draw Anime & Manga Ears (3 Different Ways)
Step 5 – Position and Outline the Eyes
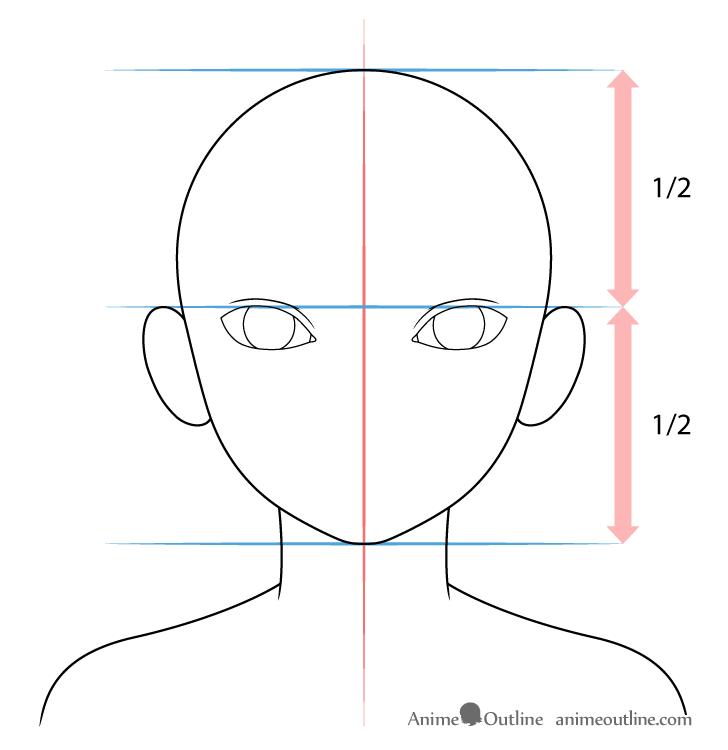
Place the eyes below the horizontal halfway point of the head.
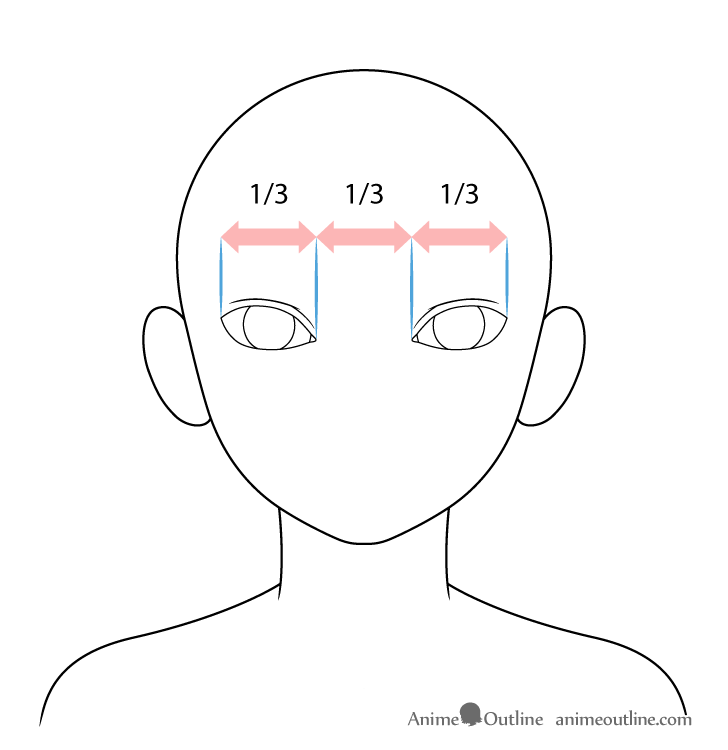
Space them far enough apart that you can fit another eye in between them. In this case, they have realistic overall shapes but are drawn larger than real eyes to, once again, help create an anime look.
Define the eyes as follows:
- Overall Shapes: Outline the overall shape of each to have slightly downward-facing inner ends. Also, leave the outlines open in these areas.
- The Irises: Draw large irises that fill most of the space inside each eye’s outline.
- The Tear Duct Areas: Draw the tear duct areas into the gaps on the inner corners of each eye’s outline.
- The Eyelids: Draw these somewhat following the upper curves of each eye.
Leave the other parts of the eyes for a later step.
For a more in-depth guide on drawing this same pair of eyes, see:
How to Draw Realistic Eyes with Cel Shading (12 Steps)
Step 6 – Draw the Eyebrows
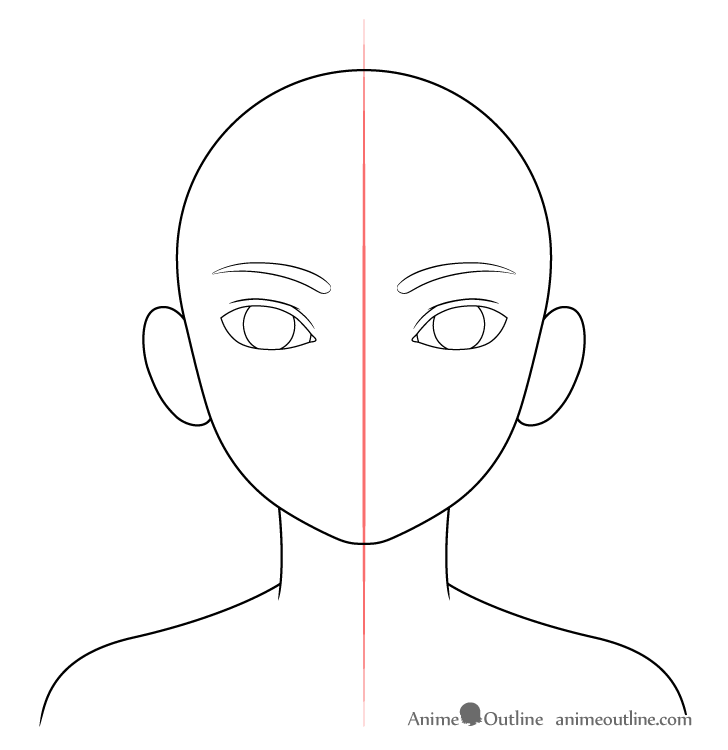
Unlike the other facial features, there is no one set way to position the eyebrows. Draw them a little bit above the eyes with curved overall shapes. Also, draw their inner ends lower down and make them much thicker than their outer ends.
For drawing different kinds of eyebrows, see:
How to Draw Anime & Manga Eyebrows
Step 7 – Position and Draw the Nose
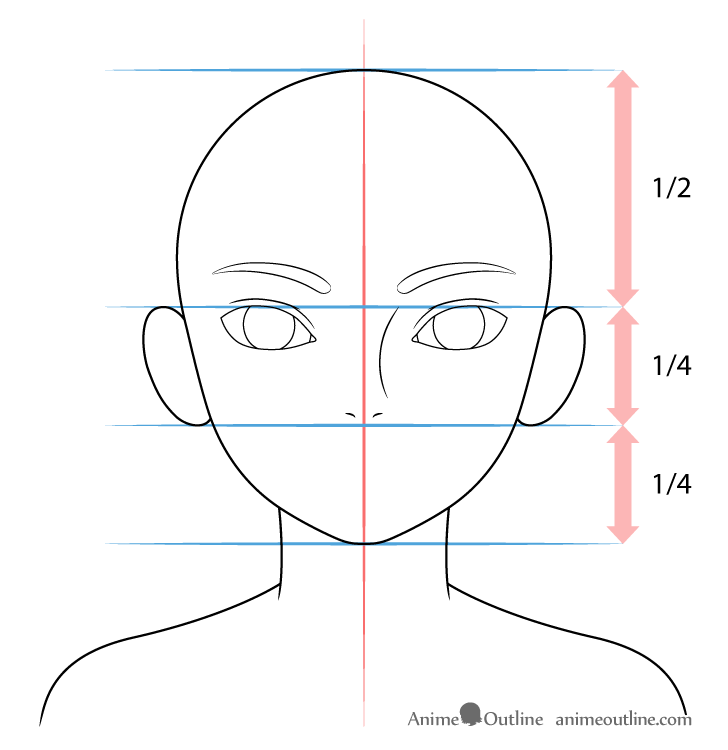
Position the nose the same way as the ears, with its top below the horizontal halfway point of the head and its bottom between that and the chin. In anime, noses are generally barely-defined. To achieve a look that is both realistic and anime-like, only show the bare minimum of the nose’s features.
- The Bridge: Define only one side of the bridge using a single curved line.
- The Nostrils: Draw the nostrils some distance below the bridge to account for the height of the tip but don’t draw the tip itself.
Adding only the nostrils and part of the bridge is enough to somewhat convey the nose’s overall shape.
For drawing different kinds of noses, see:
How to Draw Anime and Manga Noses
Step 8 – Position and Draw the Mouth and Lips
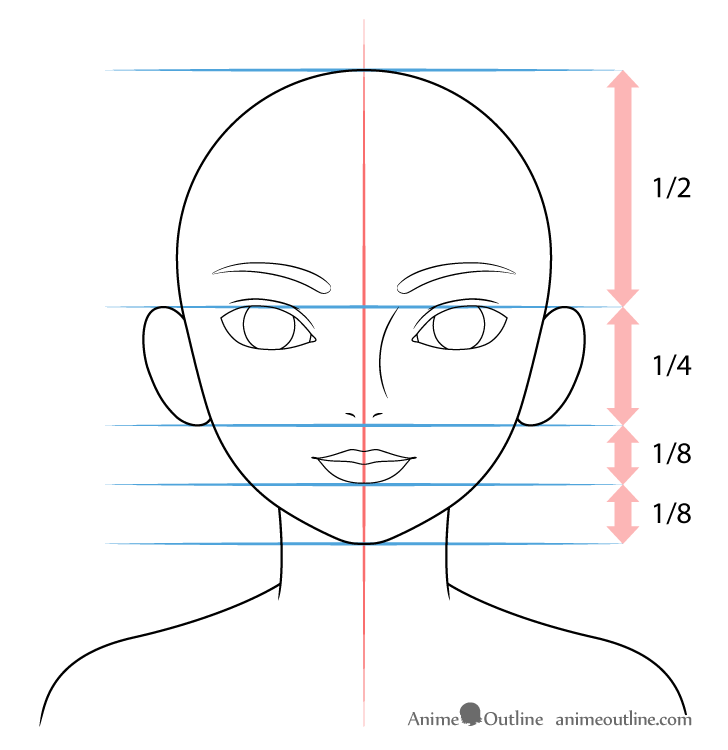
To position the mouth, draw it so that the bottom of its lower lip is halfway between the bottom of the nose and the bottom of the chin. In this case the lips are fully defined. Although this is something that is rarely done in anime, it’s important for creating a realistic-looking face. However, to give it a slightly more anime look, make the lips fairly narrow (anime characters generally have small mouths).
Draw the mouth as follows:
- Upper Lip: Define the shape of the upper lip to look like the flattened letter “M”.
- Lower Lip: Draw the lower lip as a smooth continuous curve that joins up with the ends of the upper lip.
- Mouth Opening: Draw the opening of the mouth as a curve that has a downward “dip” in the middle.
Once you’ve added the mouth you should have the base outlines of all of the facial features. To avoid the drawing getting too cluttered, you can erase the center guide line after finishing this step.
For different ways to draw lips, see:
For drawing various mouth expressions, check:
How to Draw Anime and Manga Mouth Expressions
Step 9 – Draw the Hair
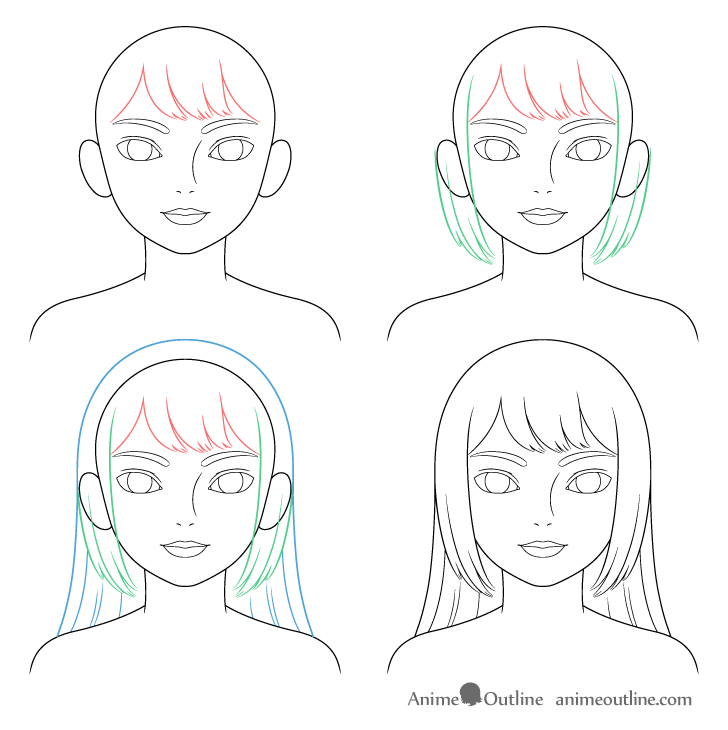
In this example, the girl has long hair that is trimmed to be shorter on the sides (going just past the chin). To draw the hair, this guide demonstrates a method of splitting it into three distinct sections. These are:
- Red Outlines: Hair along the head’s forehead area.
- Green Outlines: Hair along the sides of the head.
- Blue Outlines: Hair along the top and back of the head.
Viewing the hair as these distinct sections can make the drawing process much easier to manage. However, you don’t need to actually use these colors in your drawing. Simply define everything in regular pencil or in grey or black if drawing digitally. Also, draw the hair right over top of the head’s outline as though it’s transparent.
Drawing the Hair Along the Forehead
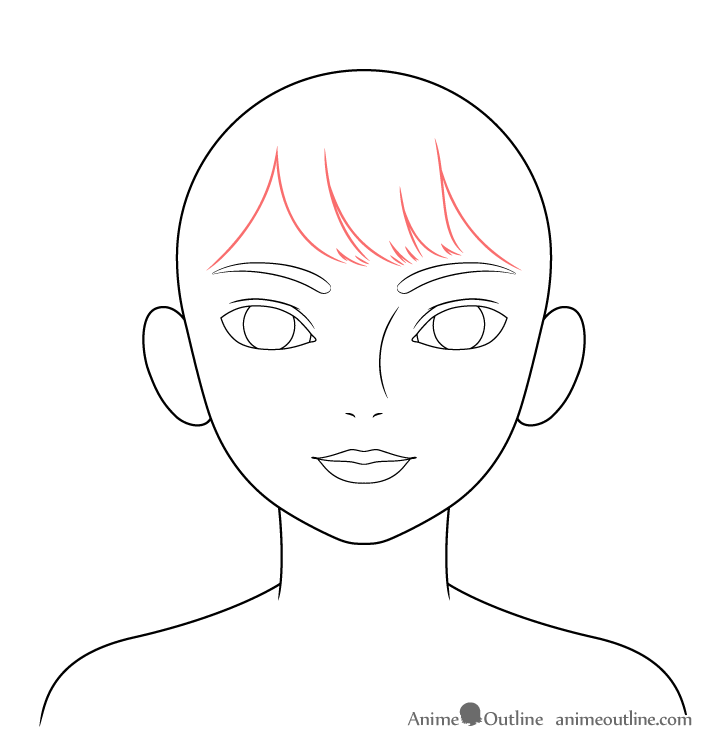
First, draw the hair along the forehead. In this case it’s trimmed to be very short in comparison to the other areas. Most of it is swept to one side excluding the little bit on the left that is swept in the opposite direction (going under the side section that will be added later).
Begin by defining the hair locks. Leave the bottom ends of their outlines open. After you’ve drawn out this section’s major shapes, draw the smaller splits in between them. Show these with either single or paired-up curved lines as in the example. Leave space between the splits and the main outlines of the locks. This will create a softer and more natural look as opposed to the more spiky-looking anime hair.
Drawing the Hair Along the Sides of the Head
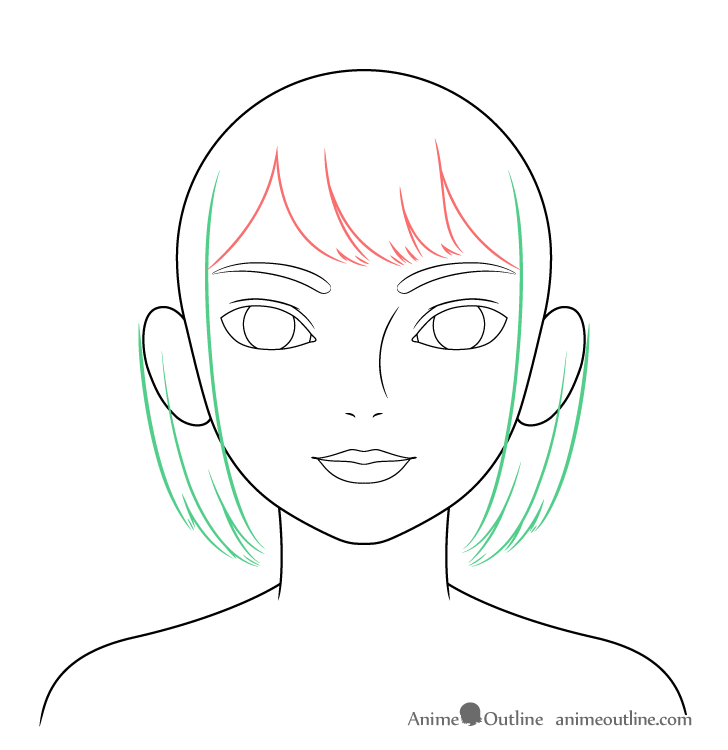
Define each of the hair’s side sections to be curved inwards (hugging the face). After outlining their main shapes, draw the splits along their ends. Start with the larger ones and work down to the smaller details.
Drawing the Hair Along the Top and Back of the Head
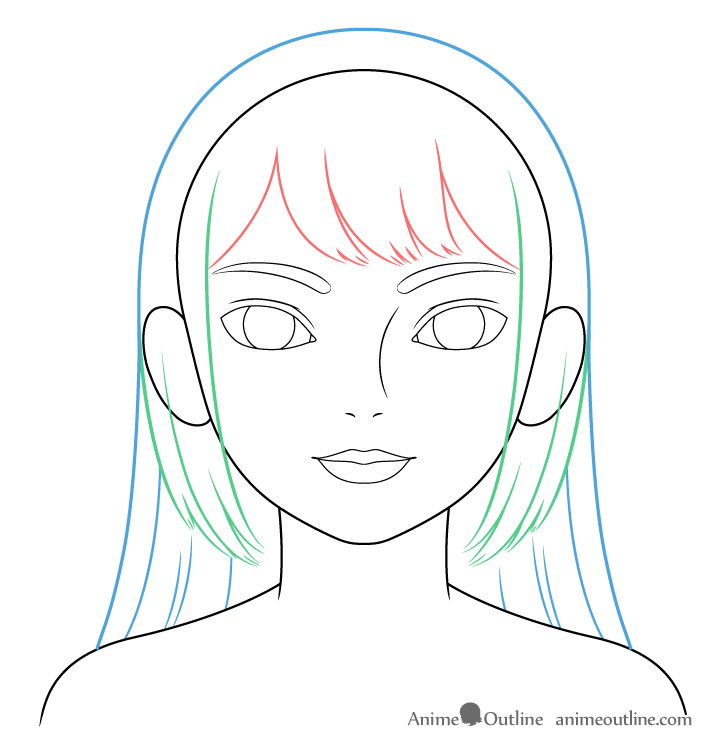
Draw the hair along the top of the head somewhat following its shape but getting slightly farther away from it on the very top. It should fan out as it runs down past the ears and rests on the shoulders.
After defining its main outline, also draw some lines into this section’s inner area (around the neck) to help create an appearance of hair strands. This will help prevent this part from looking like a solid block.
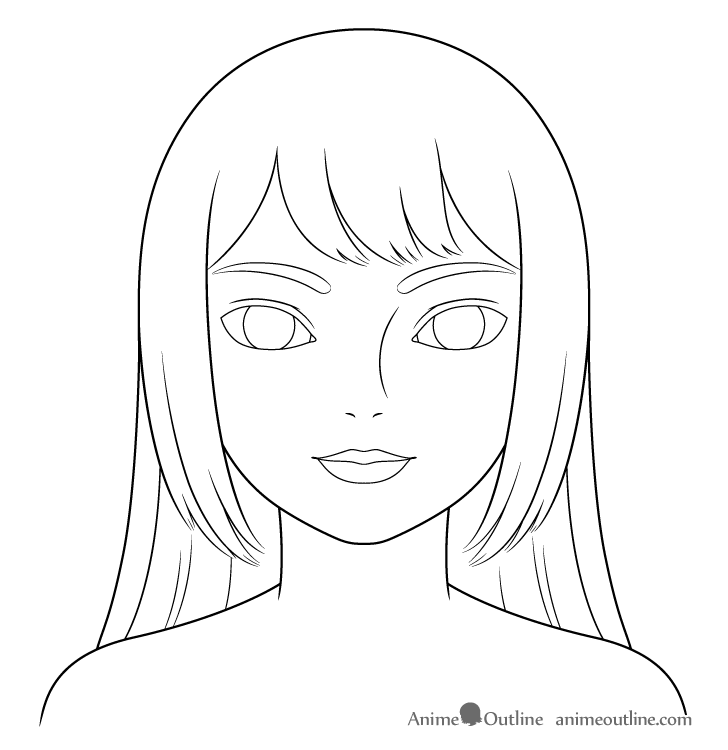
When all of the hair sections are outline, you can erase the parts of the head that they cover.
Step 10 – Draw the Collarbones
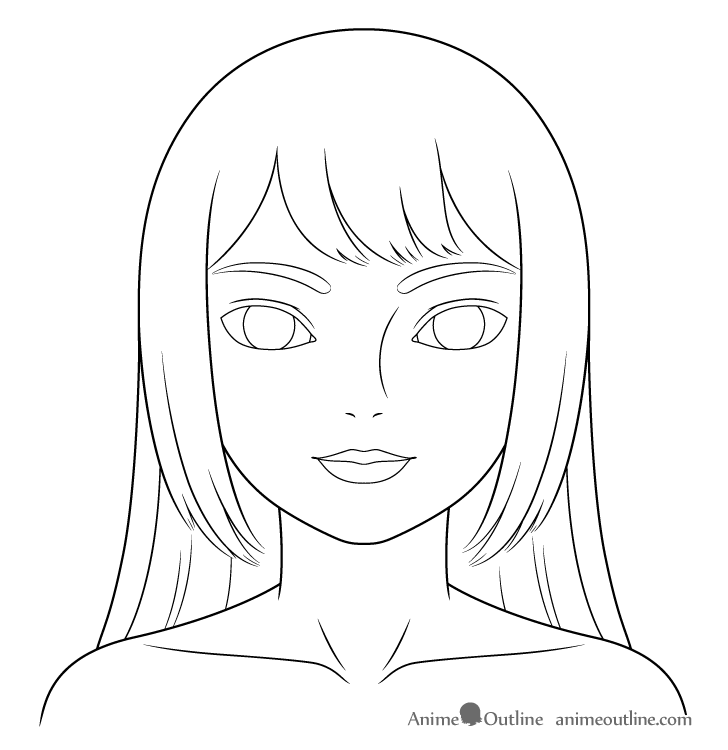
Draw the collarbones running down from roughly where the shoulders start to curve downwards. Define them with lightly curved lines and short, much more rounded curves on their inner ends. Also, draw a hint of the neck muscles coming up from between them.
After adding the above, your line drawing should be finished. If everything looks good, you can trace over your lines with a darker stroke. Otherwise, make any corrections you feel are required prior to doing so.
Step 11 – Draw the Details of the Eyes and Eyebrows
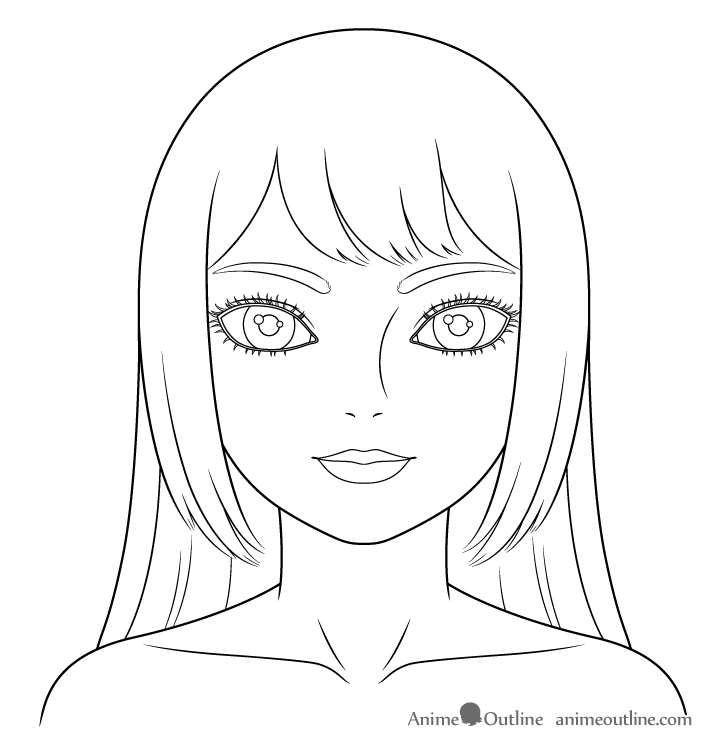
At this stage the girl’s line portrait is almost finished and you can now add the smaller details of the eyes and eyebrows. These are as follows:
- Pupils: Draw these in the middle of each iris.
- Reflections: Add a pair of these to each eye overlapping the pupils and erase the areas where they overlap.
- Eyelids: Draw the edges of the eyelids pretty much following the shapes of the eye outlines but getting farther away from them towards the outer ends.
- Eyebrows: Erase parts of each eyebrow’s outline around their outer and upper inner ends and draw some small curves into these to create hints of individual eyebrow hairs.
- Eyelashes: Draw these fanning out from each eye and try to keep their lengths and spacing somewhat random but generally make those along the upper eyelids longer than those along the bottom eyelids. Also, try to keep their distribution in both eyes fairly balanced.
For a more anime look also make the eyelashes quite thick at the base and thinner as they go out, ending with pointy tips.
Step 12 – Shade the Drawing
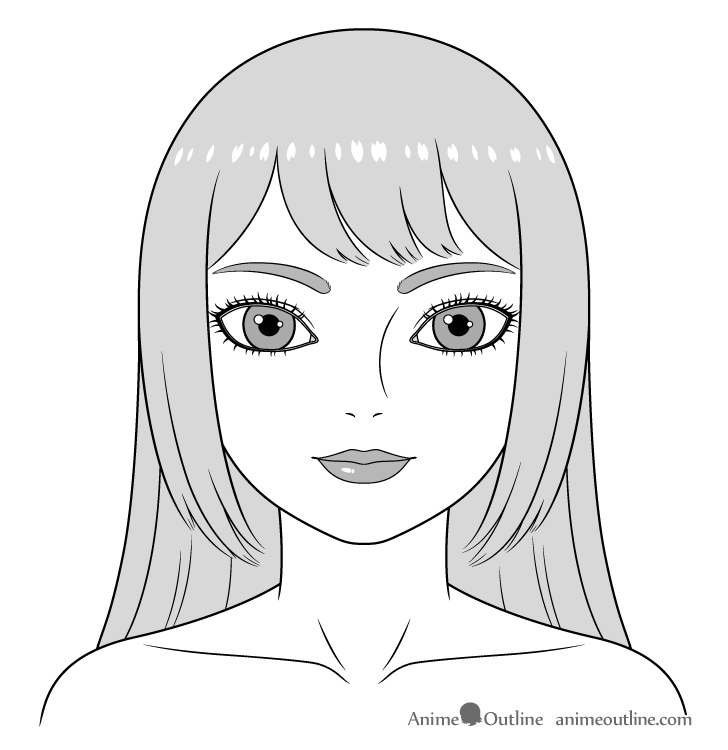
For the final step of the tutorial shade the drawing. However, before doing so it’s important to be aware of the lighting conditions you are trying to portray. In this case the girl is shaded in a fairly generic way, as though she is in a well-lit environment.
To begin, add some thicker outlines to parts of the eyes and apply the base grays (these can be colors if you prefer).
- Hair: Outline a streak of highlights running across the hair before shading it. Next, shade the area around the highlights leaving them white. If drawing digitally, you can add the highlights in over top of the shading.
- Eyelids: Make the lines that define the outer edges of the eyelids much thicker towards their outer ends.
- Pupils and Eyelashes: Fill in the pupils and eyelashes with black or very dark pencil shading. Leave the reflections white.
- Irises: Give the irises thicker dark outlines and shade them grey.
- Tear Ducts: These are small and easy to miss but be sure to make them grey as well.
- Lips: Before shading the lips, add a little broken up reflection inside their outline. Leave the reflection white and shade the area around it grey.
The reason for the little break in the reflection is to help create a sense of the little wrinkles that lips tend to have. Its overall purpose is to help the lips look moist.
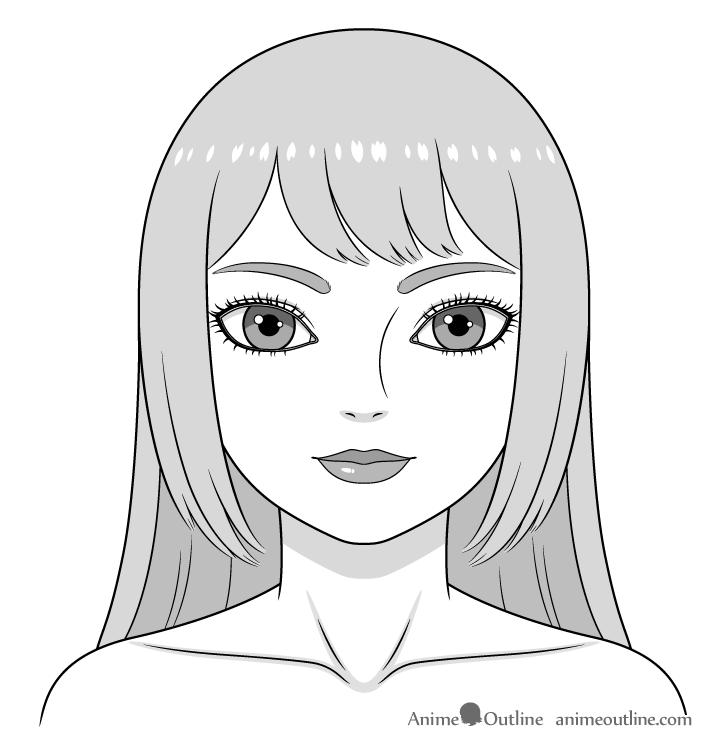
After applying the base grays (or colors) add the shadows as follows:
- Irises: Darken the upper area of each iris to help prevent the eyes from looking like they are staring.
- Eyes: Add shadows along the upper areas of the whites of the eyes cast by the eyelashes.
- Eyelids: Add shadow around the eyelids as these parts are indented allowing less light to reach them.
- Nose: Add a shadow along the underside of the nose. This will also help bring out its shape.
- Lips: Fully darken the upper lip.
- Neck: Add a large shadow along the upper part of the neck cast by the head.
- Hair: Fully darken the inner area of the hair (around the neck).
- Body: Darken the areas around the collarbones and neck muscles.
As already explained at the start, the examples in this tutorial use cel shading (shadows with no gradients) to help create an anime-like look for the artwork.
Conclusion
This guide shows how to draw a girl with big eyes in a fairly realistic style but also one that is similar to anime and manga. This is achieved through the use of black outlines, cel shading and slightly simplifying or stylizing parts of the artwork.
In addition to helping create a drawing that is similar to a certain style, this guide teaches good overall drawing practices such as proportioning the face and drawing out areas that are hidden to help avoid mistakes.
For more common drawing mistakes and best practices, see:
For drawing a face in a semi-realistic anime style see:
How to Draw a Realistic Anime Face Step by Step
For a very in-depth guide on structuring a more traditional anime face, check:
How to Draw an Anime Face (Structure & Proportions)