How to Draw Fantasy Weapons (10 Different Types)
This tutorial explains and shows (step by step) how to draw some of the most common types of fantasy and magic weapons seen in anime and manga.
In addition to showing how to draw each weapon the tutorial gives brief explains for the logic behind their designs and suggests what type of a character is likely to use each of them.
Several of the weapons will have some common design elements to make them look like part of a set (where appropriate).
The tutorial is fairly long as it’s basically ten in one but the instructions drawing each weapon are pretty much self contained so you don’t have to read through the entire thing just to draw one. They are however all fairly detailed and interesting so you can always come back and try drawing the other ones later on.
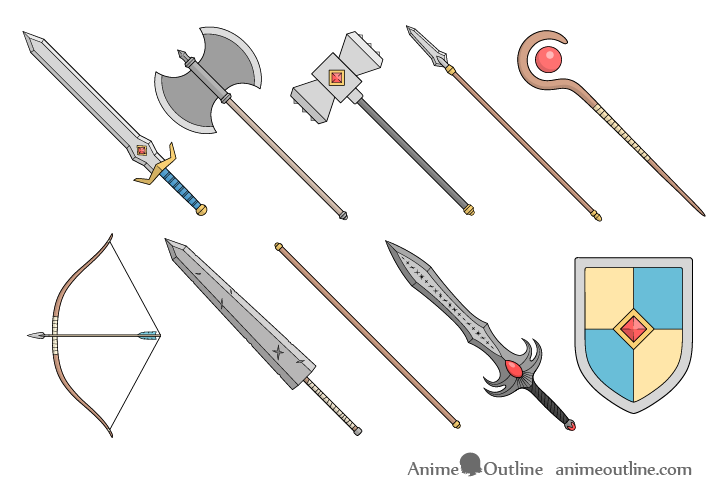
The examples include:
- One-Handed Sword
- Axe
- Hammer
- Spear
- Magic Staff
- Bow
- Huge Two-Handed Sword
- Martial Arts Staff
- Evil Sword
- Shield
If you are looking to draw Japanese style weapons you can find some links to the appropriate tutorials at the end of this one.
It’s recommended that you start each drawing in pencil and keep your lines light and easy to erase until you are ready to color. Darken them once you feel that everything looks right.
How to Draw A One-Handed Sword (8 Steps)
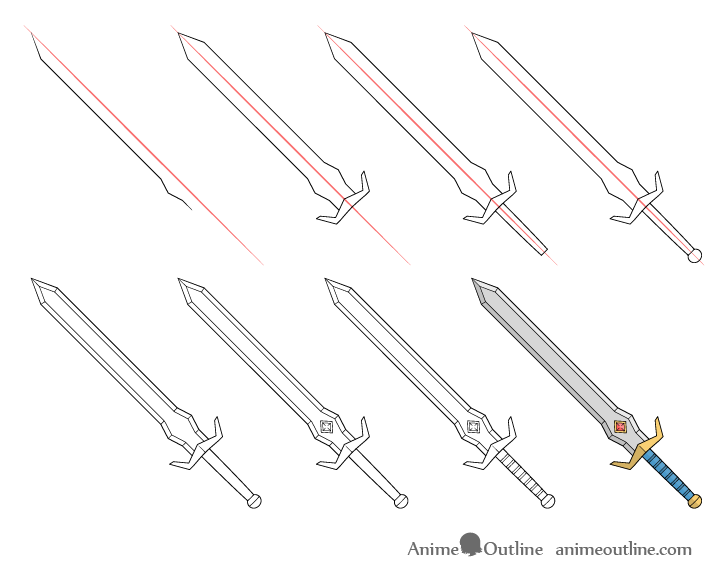
This type of a sword is often used in combination with a shield or for when the character using it needs to have a free hand (for example for casting spells). In this case it’s design will be suitable to one that might be used by a hero or at least a “good guy” type character.
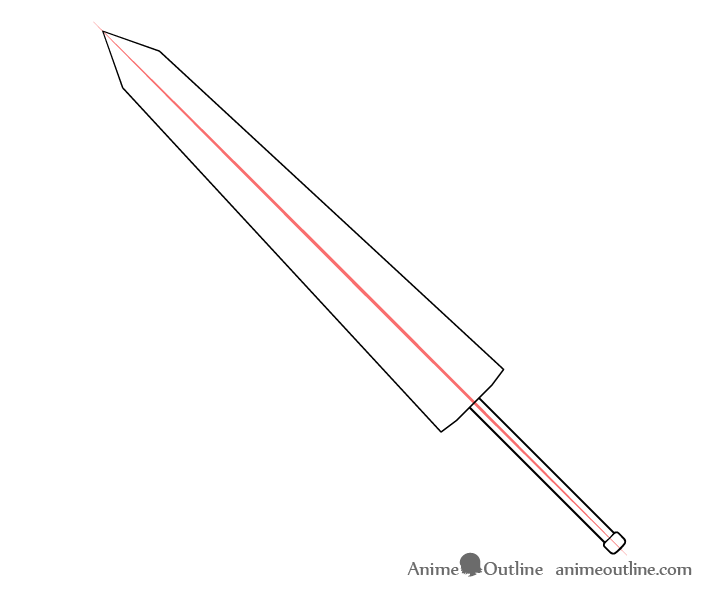
Step 1 – Draw the Blade
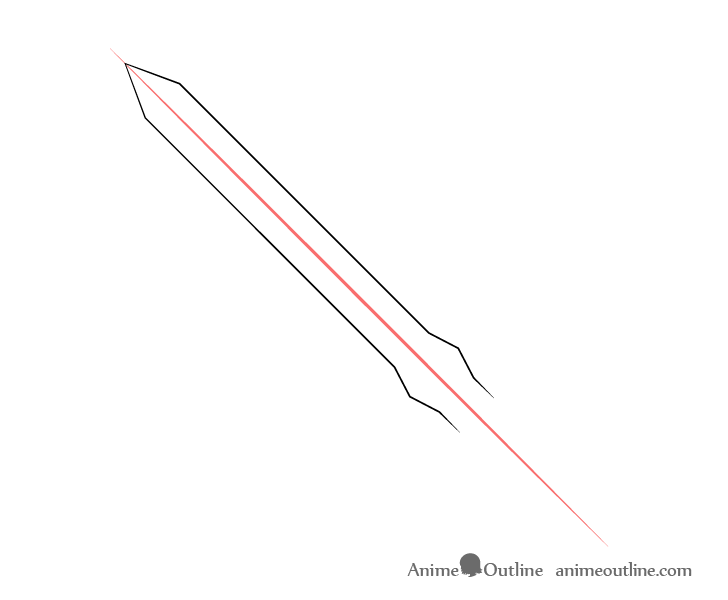
Begin the drawing by first making a straight line at whatever angle you wish to draw the sword at. Next, outline the shape of the the blade. You can use the center line as a guide to better see if both of it’s halves are roughly the same in size and shape.
In this case the blade will be even in width through most of it’s length but it will also have a thicker part near it’s base.
Step 2 – Draw the Hand Guard
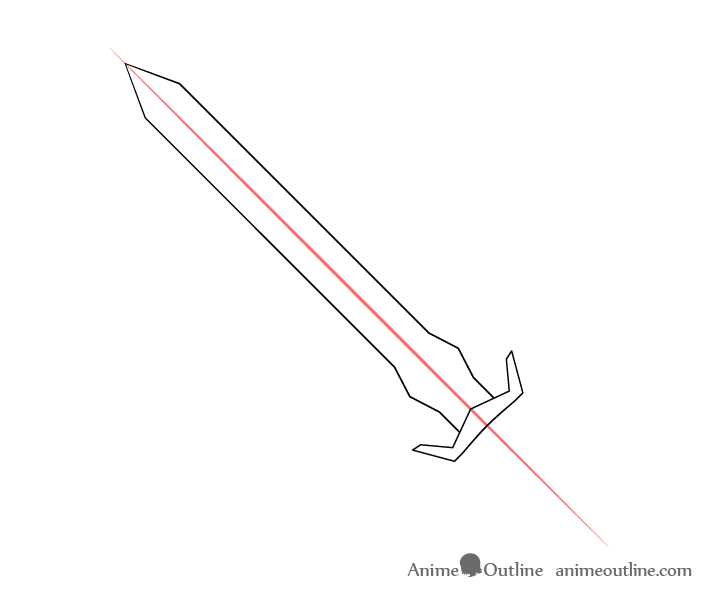
After the blade add the guard. The bit that prevents the hand from slipping onto the blade. As it’s a fantasy sword the guard can have a slightly more unusual design then you would find a on a real sword. Similar to the blade you can again use the center line as as a guide to help see if both of it’s halves are even.
Step 3 – Draw the Grip (Handle)
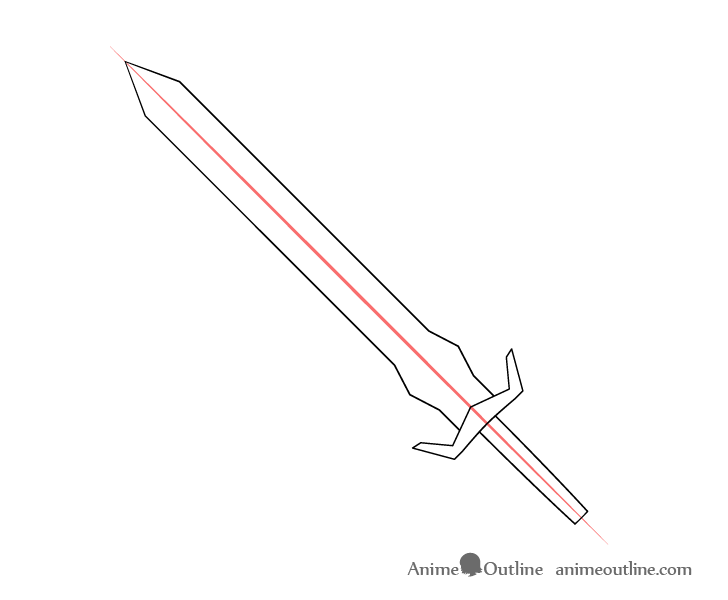
Going down from the guard add the grip. You can make it a tiny bit thicker in the middle. As this is a one-handed sword you can also make it fairly short.
Step 4 – Draw the Pommel
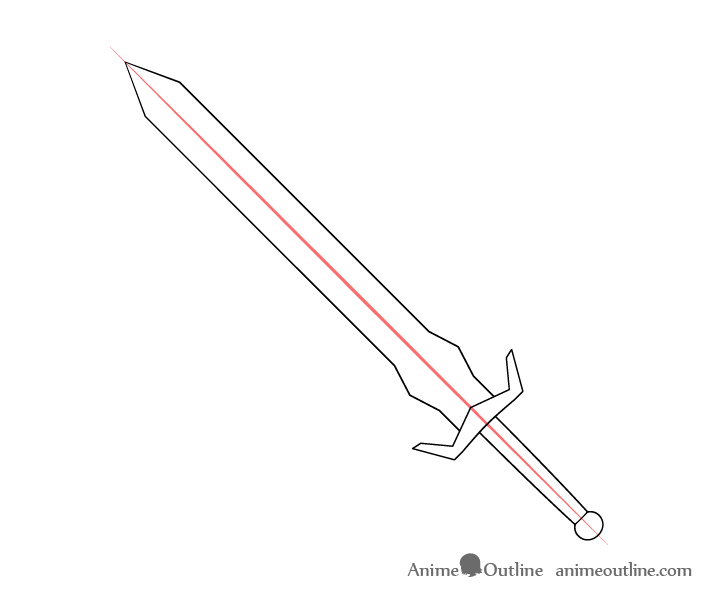
For the last major part of the sword add the pommel at the end of the hilt.
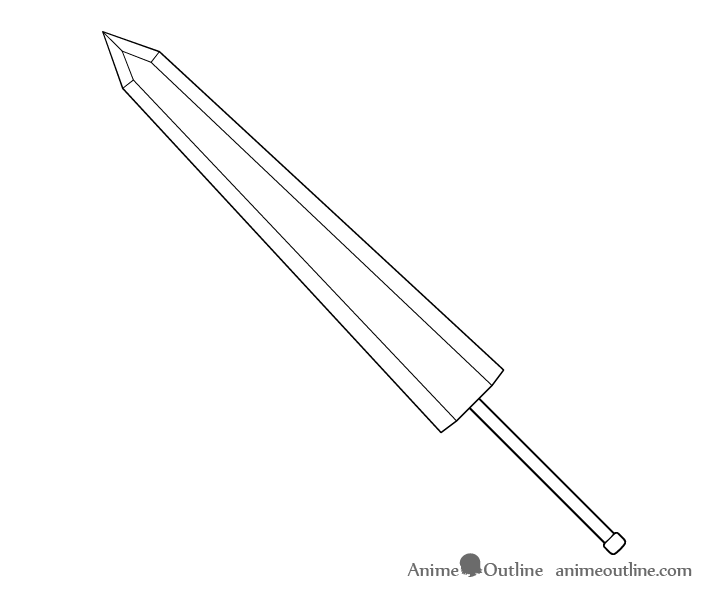
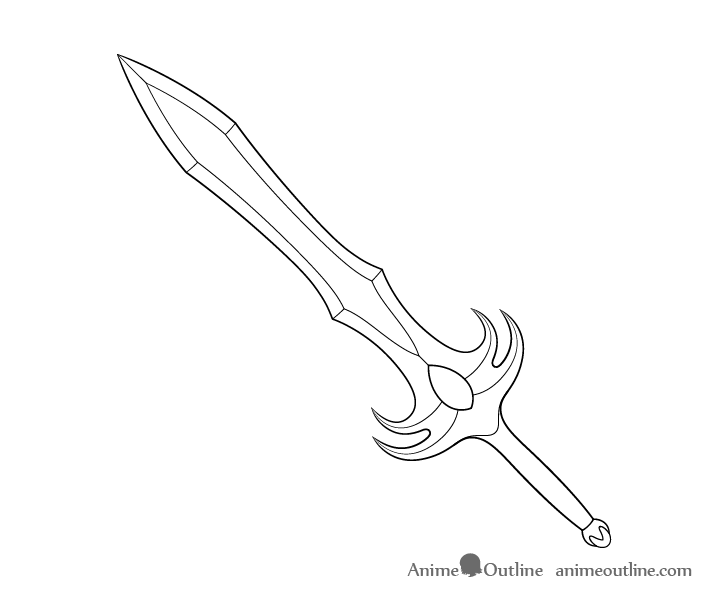
Step 5 – Draw the Edges
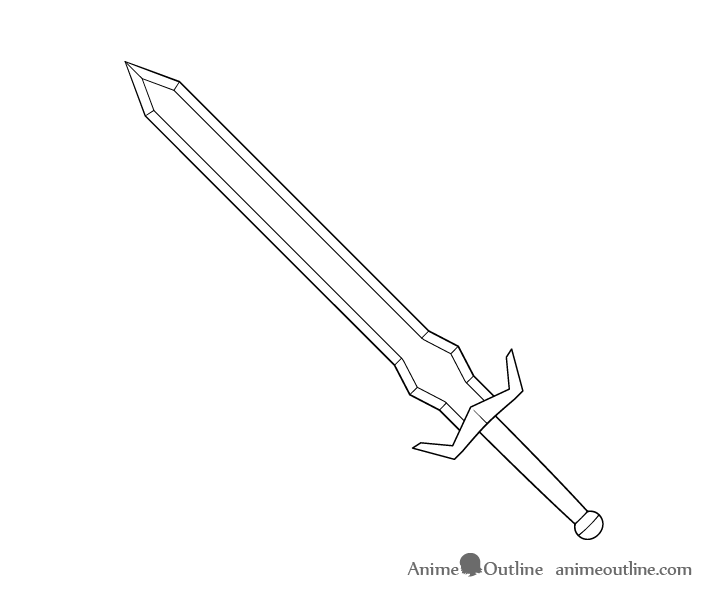
Outline the edges of the blade as shown in the example. You can also erase most of the center line from step one but leave a little bit of it to show a sharp corner along the middle of the guard. You can also (optionally) leave a little bit in the middle of the wider part of the blade to help you place the jewel in the next step.
After you’re done with the above draw a very slightly curved line along the pommel. This will be a design element that helps reinforce it’s spherical shape (makes it appear less flat).
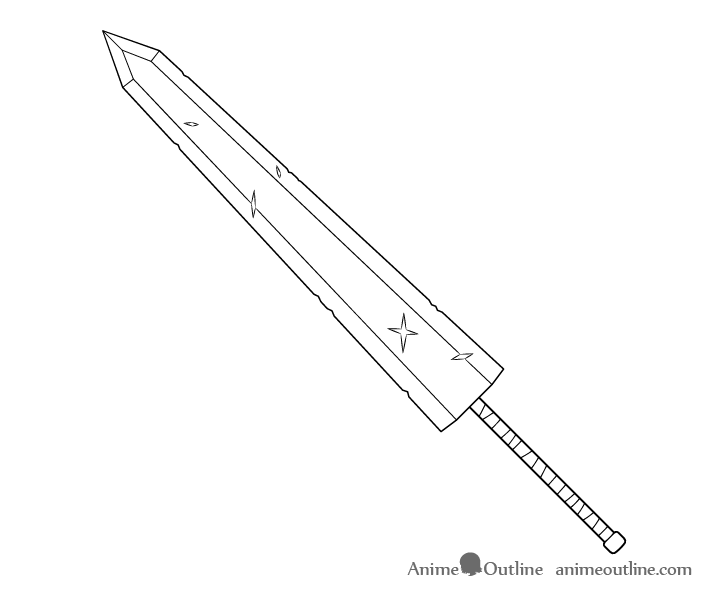
Step 6 – Draw the Jewel
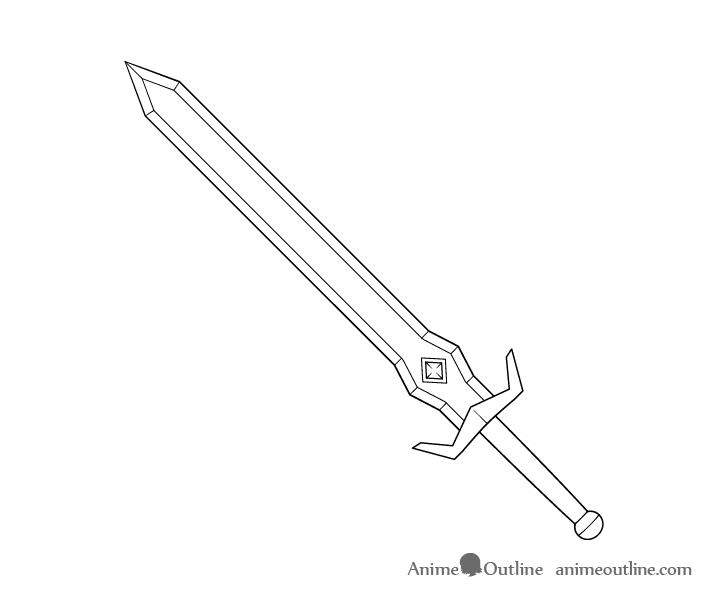
In the middle of the wider part of the blade add a jewel. In this case it will be shaped like a rhombus with a similarly shaped setting around it.
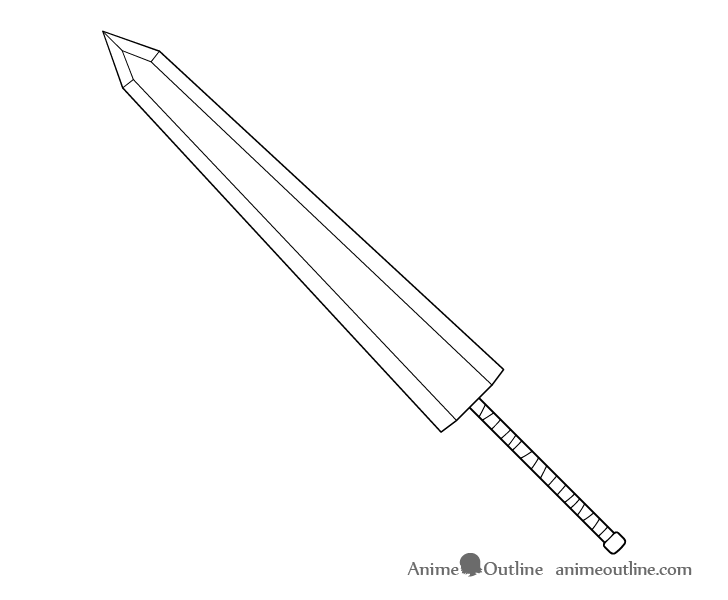
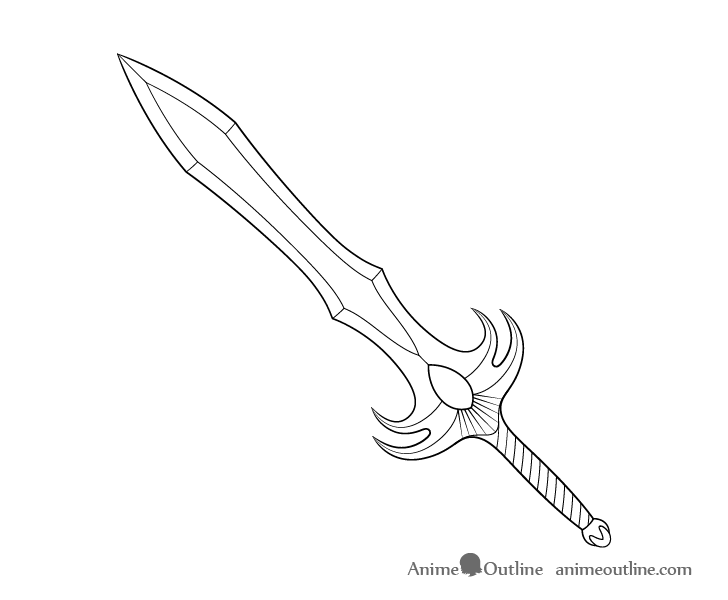
Step 7 – Draw the Texture of the Grip

For the last part of the line drawing add the texture of the grip. You can draw this a series of lines running along it (as shown in the example).
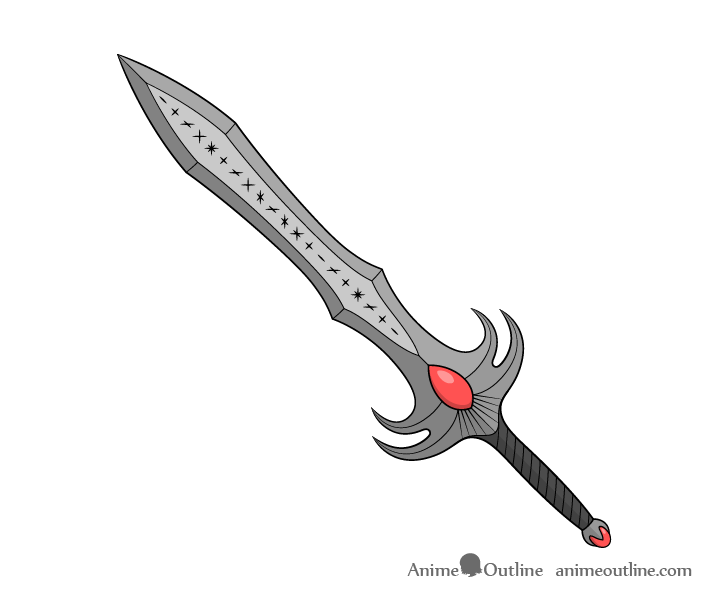
Step 8 – Color the Sword
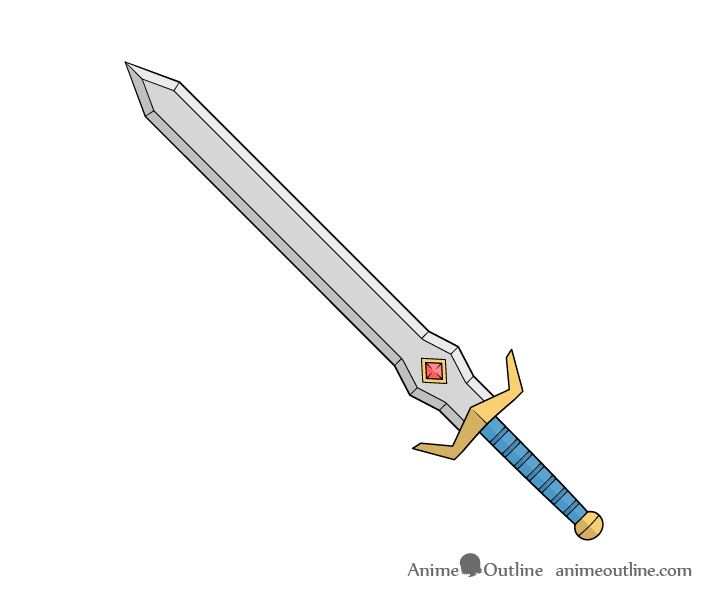
To finish the drawing you can color the sword and give it some basic shading.
For this example the blade will be grey (to show that it’s metallic) the jewel red, it’s setting, the guard and pommel a yellow brown (to make them look like gold) and the handle blue (goes well with yellow and red).
For more on colors and how to apply them effectively see the following:
Beginner Guide to Picking Colors When Drawing Anime & Manga
When it comes to shading it’s always good to have at least a basic idea of the lighting setup the object is in. In this case the light will be coming from the upper right so the darker areas will be on the bottom/left of the sword. To show this make the top edges of the sword a light grey, the middle a medium grey and the bottom a darker grey. You can also darken the bottom halves of the jewel, guard, grip and pommel as well as the narrower strips of the grip.
For a video tutorial on drawing this sword see:
https://www.youtube.com/watch?v=dnWBj7FbQNQ
How to Draw an Axe Weapon (8 Steps)
In fantasy settings an axe such as this one is often used by muscular characters such as a barbarians, dwarfs or an orcs. This particular one will have a fairly simple design that can be appropriate for background characters (ones that don’t play a major part in the story) such as soldiers or guards.
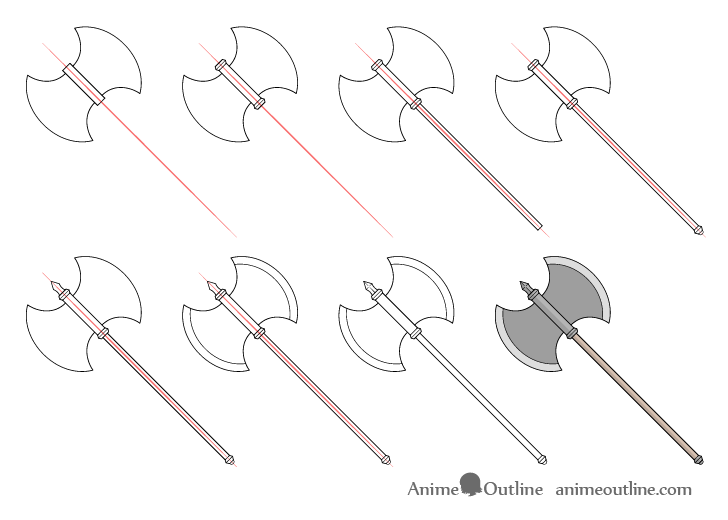
Step 1 – Draw the Head of the Axe
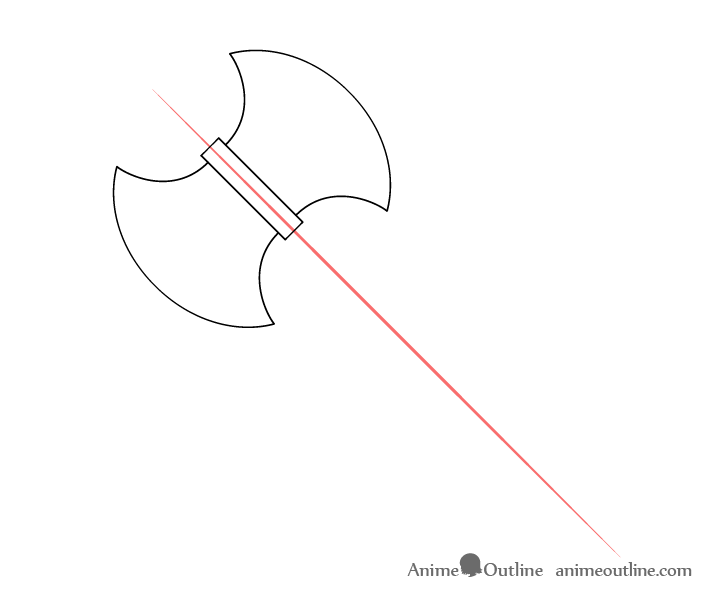
First make a straight line through what will be the middle of the axe. Towards the upper end of this line add the middle section of the axe head (the part that the shaft goes into). You can draw it as a long rectangle. Afterwards add each of the sides.
Step 2 – Draw the Details of the Head
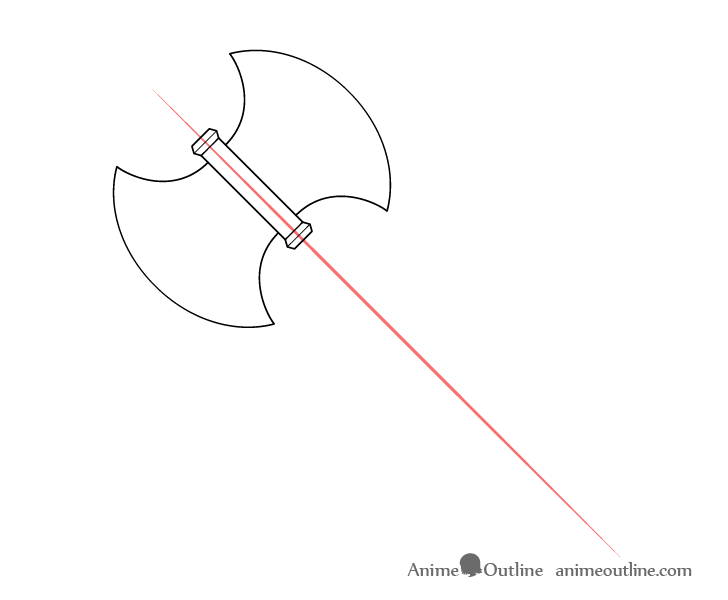
To give the axe a slightly more interesting design add two little ring bits at each end of the head as shown in the example.
Step 3 -Draw the Shaft
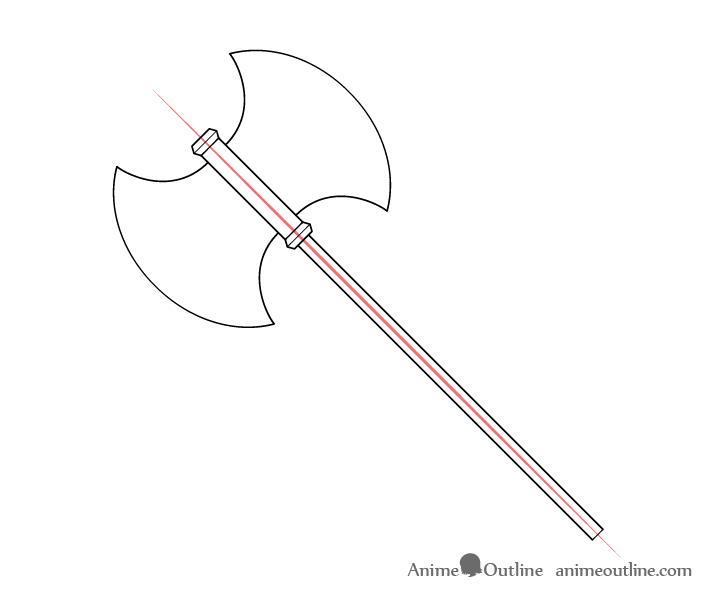
Going down from the head draw the shaft. As this axe is a weapon you can make this fairly long and narrow (as opposed to one you might see on a tool).
Step 4 – Draw the Pommel
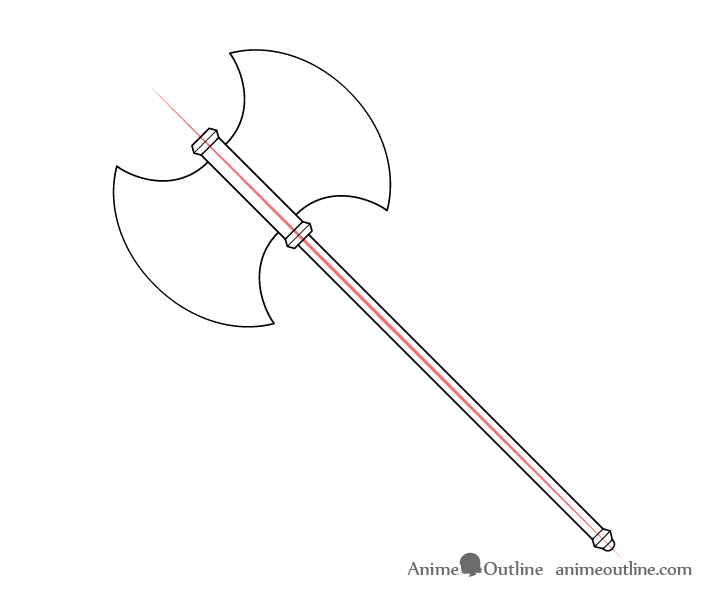
At the end of the shaft add the pommel. You can refer to the example for it’s design.
Step 5 – Draw the Tip
Add a little pointy tip to the front/middle of the head as shown above.
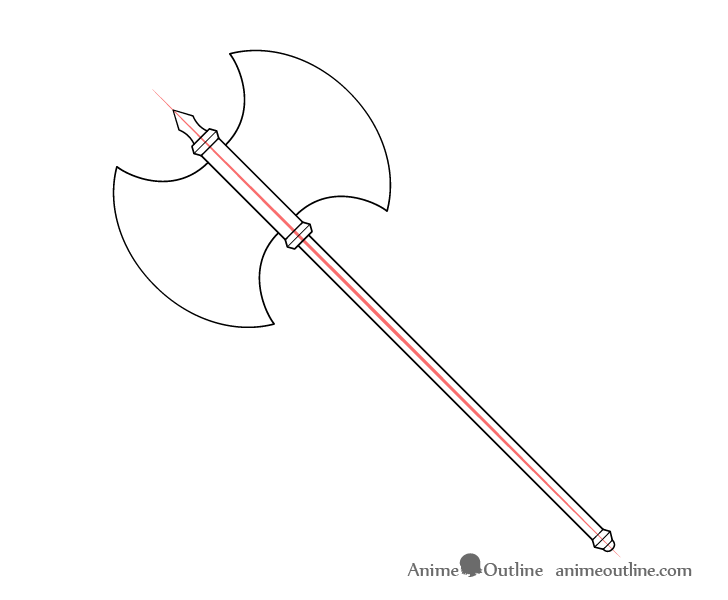
Step 6 – Draw the Edges
On each side of the head outline the edges. Make these fairly thick.
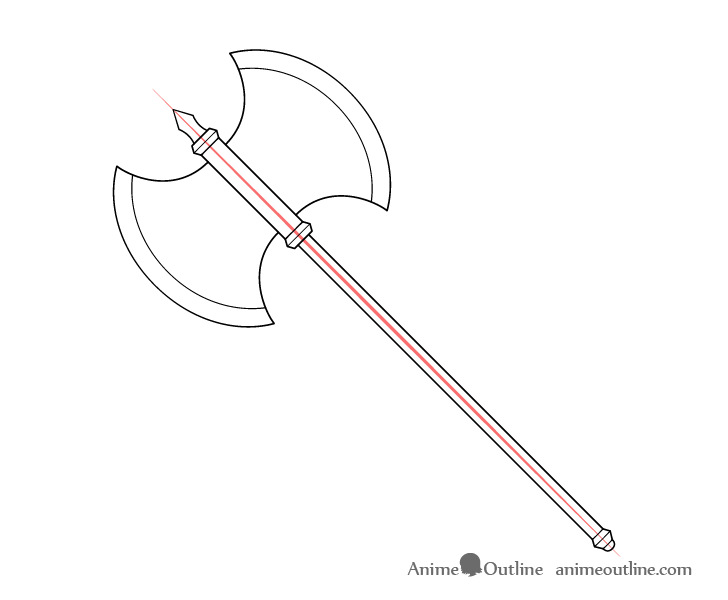
Step 7 – Draw the Edges of the Tip
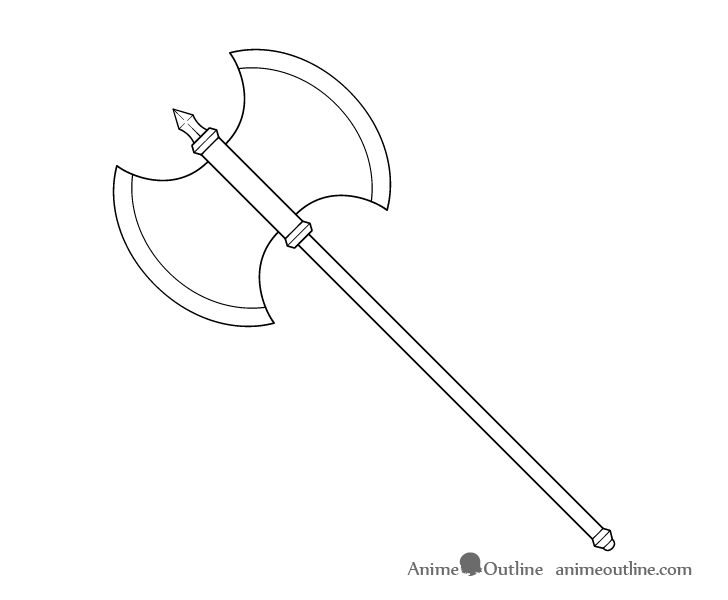
For the last set of details you can add some lines going from the outer of the tip towards the center to help show that it has sharp edges. You can then erase the guide line from step one leaving just a little bit of it along the to again help show it’s sharp edges.
Step 8 – Color the Axe
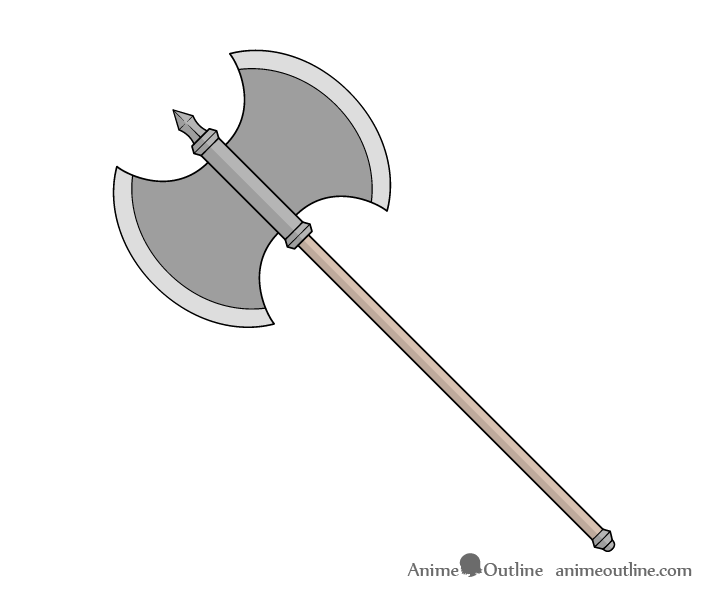
To color the axe you can make most of the head and pommel a fairly dark grey. Make the two large a lighter grey and make the shaft brown (with a bit of grey in it as well).
As in this case the light will be coming from the upper right the top edge of the axe will be it’s lightest part. You can slightly darken the bottom edge.
You can also darker the bottom halves of the tip, middle of the axe head, shaft and pommel.
For a video tutorial on drawing this axe see:
https://www.youtube.com/watch?v=aZEvYMuyvHc
How to Draw an Hammer Weapon (8 Steps)
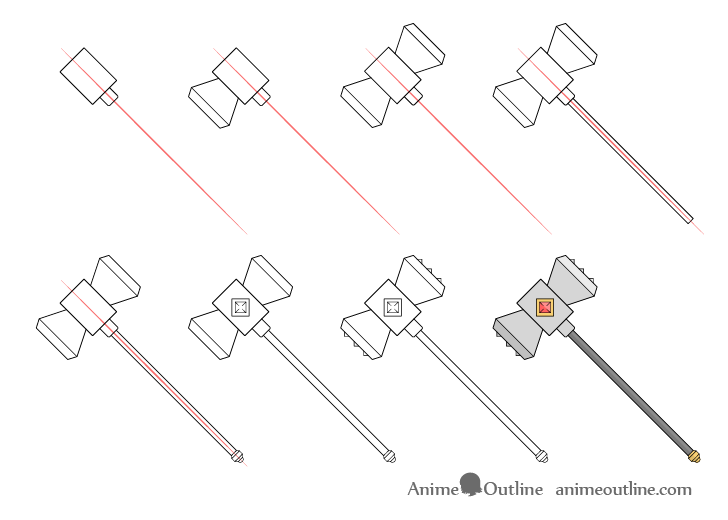
The hammer is somewhat similar to the axe in that it often tends to be used by big warrior type characters. However sometimes it can balso be used by small and more slender ones creating a contrast between the weapon and it’s user.
Also, unlike the axe this particular hammer will have a more detailed design which can make it appropriate for a supporting character and not just a background one.
Step 1 – Draw the Head of the Hammer
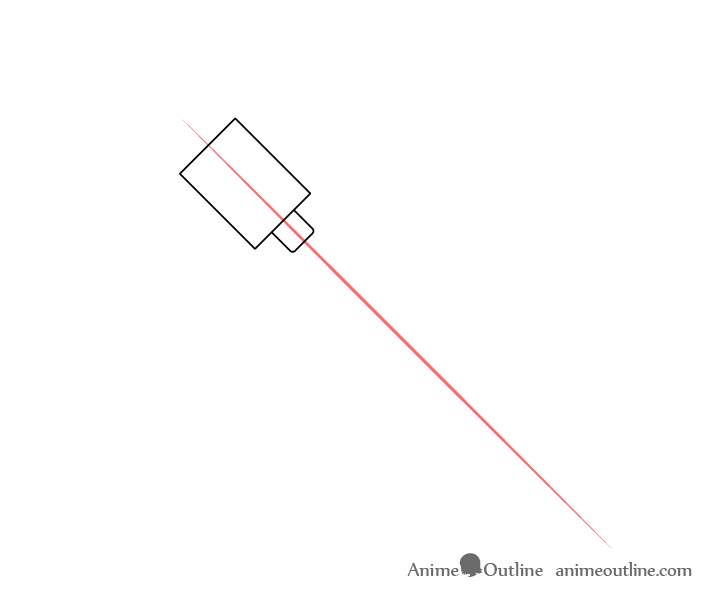
First draw a straight guide line as in the example. Towards the top of this line add the middle part of the axe head as shown above. Start with a fairly large rectangle followed by a smaller bit that the shaft will go into.
Step 2 – Draw the First Neck & Pole
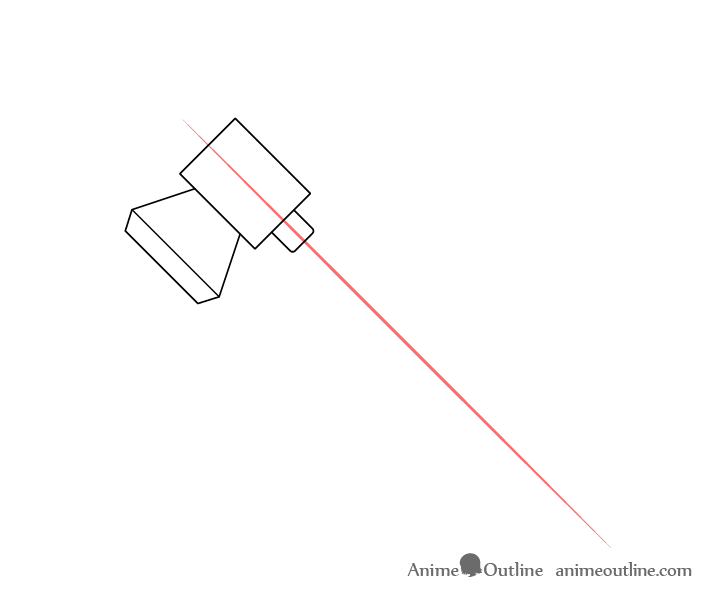
To one side of this draw the first neck (the part that gets wider as it goes down), followed by the first pole (the part that then gets narrower as it goes down).
Step 3 – Draw the Second Neck & Pole
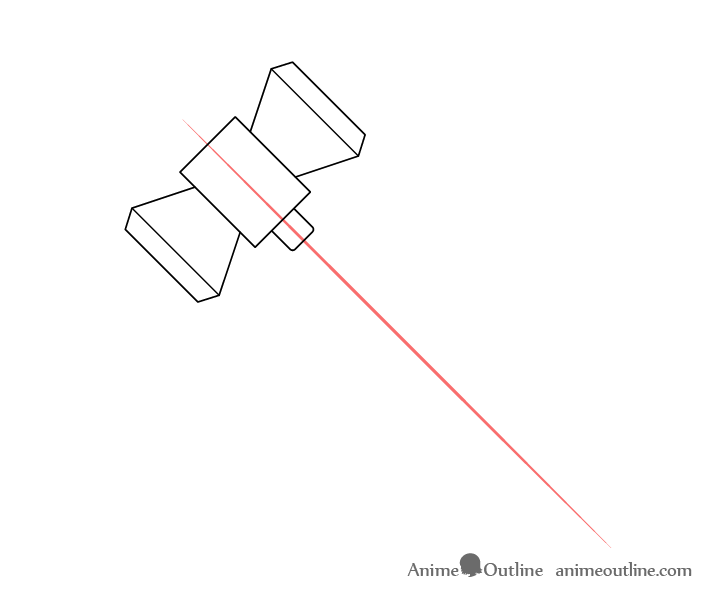
On the opposite side of the head add the second neck and pole mirroring the first ones.
Step 4 – Draw the Shaft
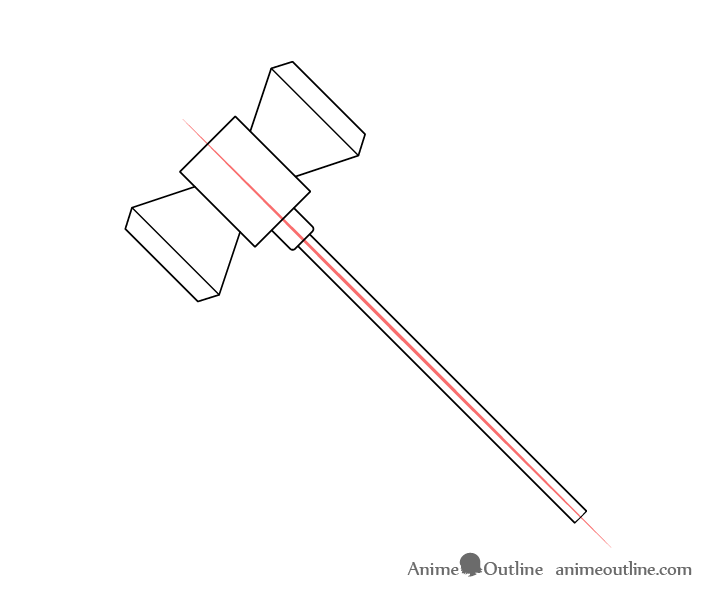
Attached to the head draw the shaft. Similar to the axe you can again make it fairly long and narrow.
Step 5 – Draw the Pommel
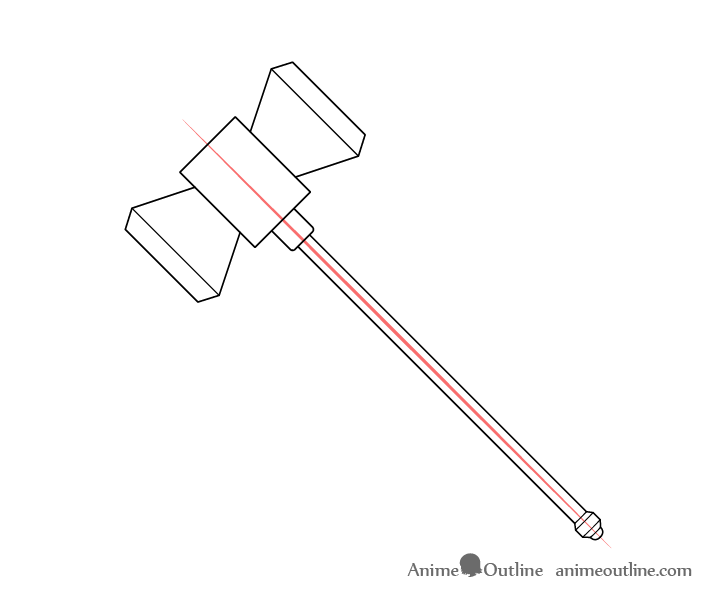
At the end of the shaft draw the pommel (refer to the example for it’s design).
Step 6 – Draw the Details
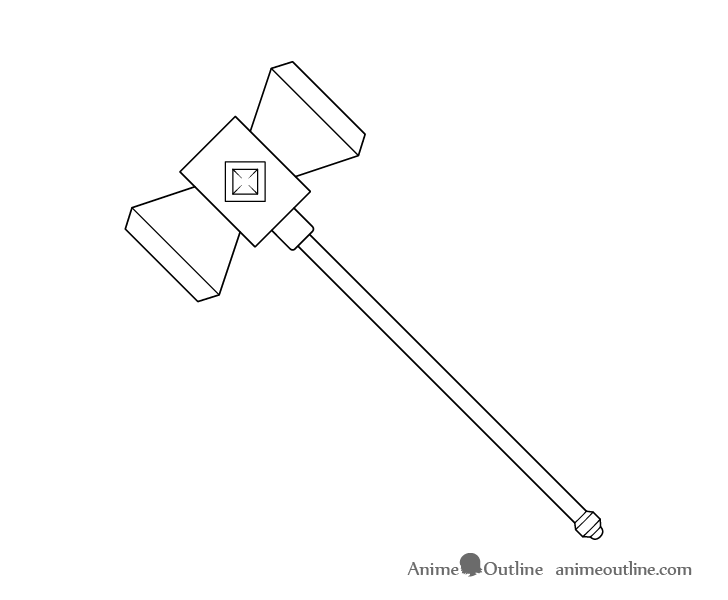
In the middle of the head draw a decorative (or magical) jewel surrounding but it’s setting. These will be similar to the ones on the first sword but square in shape. You can erase the center guide line after adding them.
Step 7 – Draw the Spikes
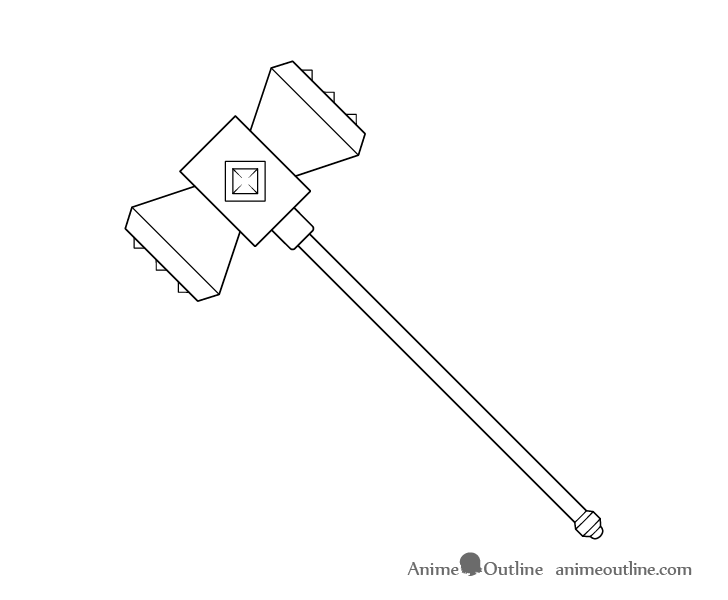
For the last part of the line drawing add some spikes on each side of the hammer’s head. You want these to be very short and thick so that they almost like bumps as pointy spikes would of course be more likely to bend from a strong impact.
Step 8 – Color the Hammer
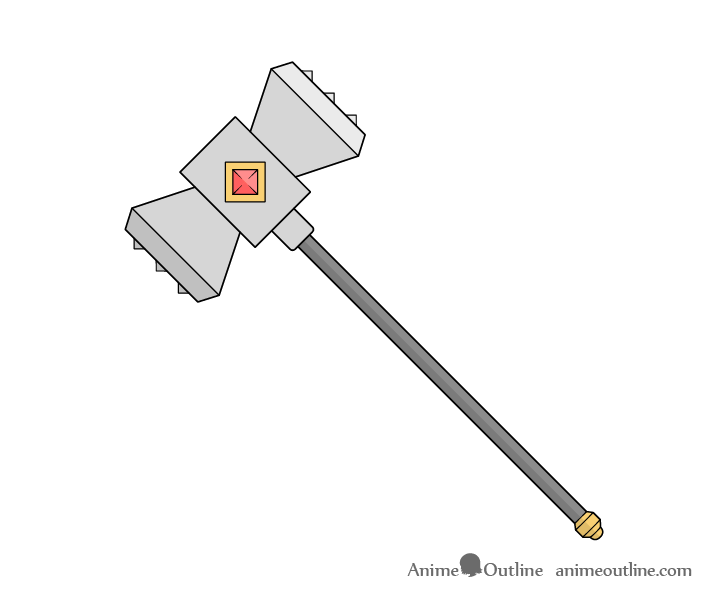
To color the drawing make the hammer head grey, the shaft a dark grey (close to black) the pommel and area around the jewel a yellow/brown (gold) and the jewel red.
For the shading (with the light coming from the upper right) do the following:
Make the upper pole and the spikes along it the lightest parts of the hammer head and the bottom pole and it’s spikes the darkest. Make the rest of the hammer head (excluding the jewel area) a medium grey. Also shade the bottom halves of the shaft, jewel and pommel.
How to Draw a Spear (6 Steps)
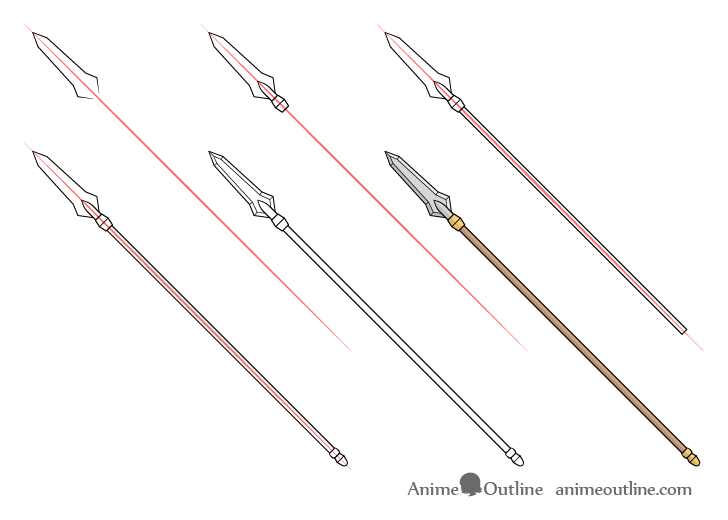
When it comes to anime and manga spears generally tend to be used by side or background characters as the main heroes and villains often use swords (though not always). This particular spear will have a fairly elaborate design that can make it suitable for a character in a support role.
Step 1 – Draw the Head of the Spear
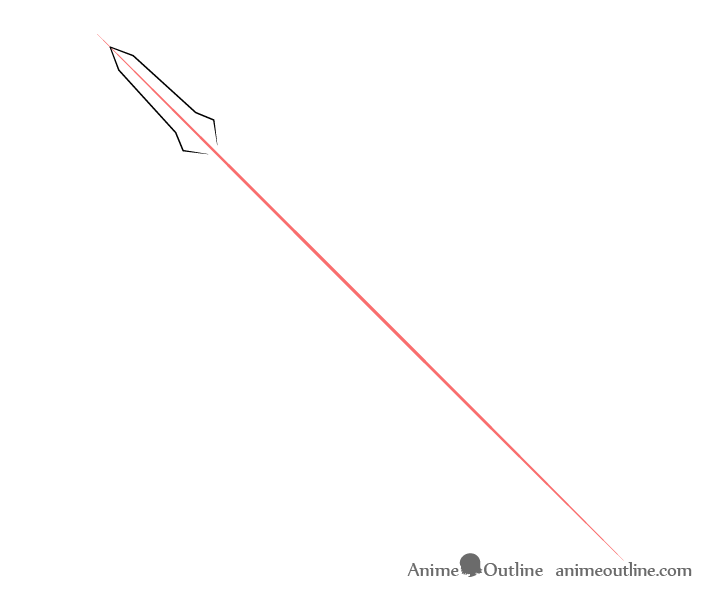
First draw a straight line at whatever angle you wish to draw the spear at. Next outline the shape of it’s head as shown in the example. In this case it will have a wider bit near it’s base similar to the sword.
Step 2 – Draw the Socket
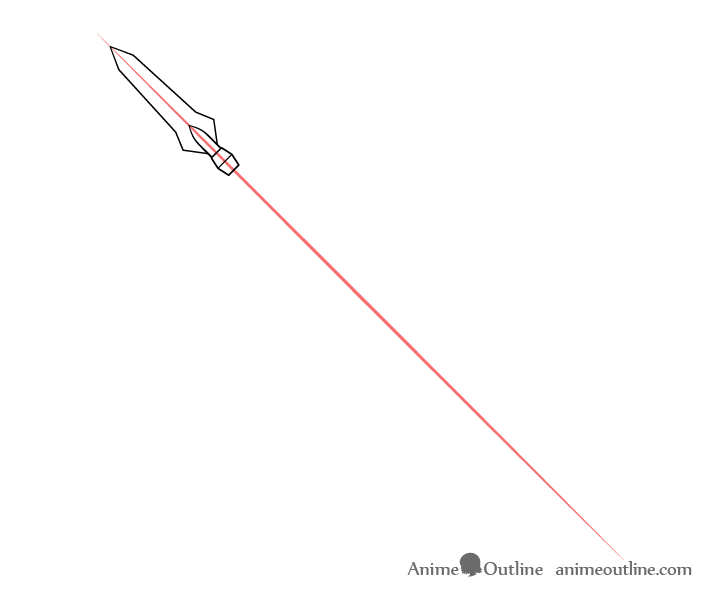
Onto the head add the socket (the part that the shaft goes into). Simply refer to the example for it’s design.
Step 3 – Draw the Shaft
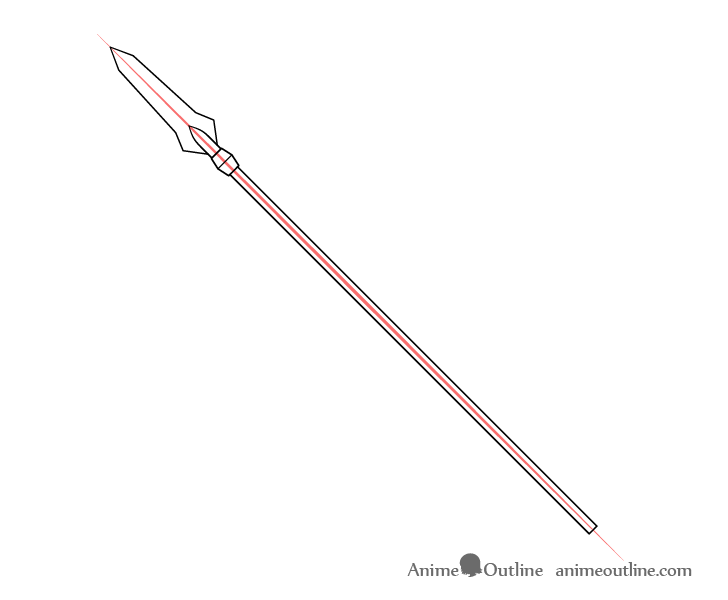
Coming out of the socket add the shaft. As this is a spear you will want to make it fairly long.
Step 4 – Draw the Pommel
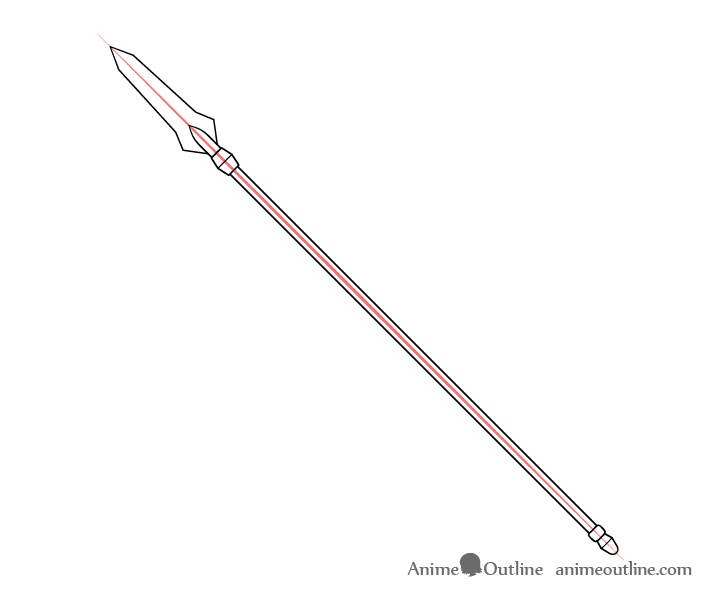
On the end of the shaft add a pommel. You can once again refer to the example for it’s design.
Step 5 – Draw the Edges
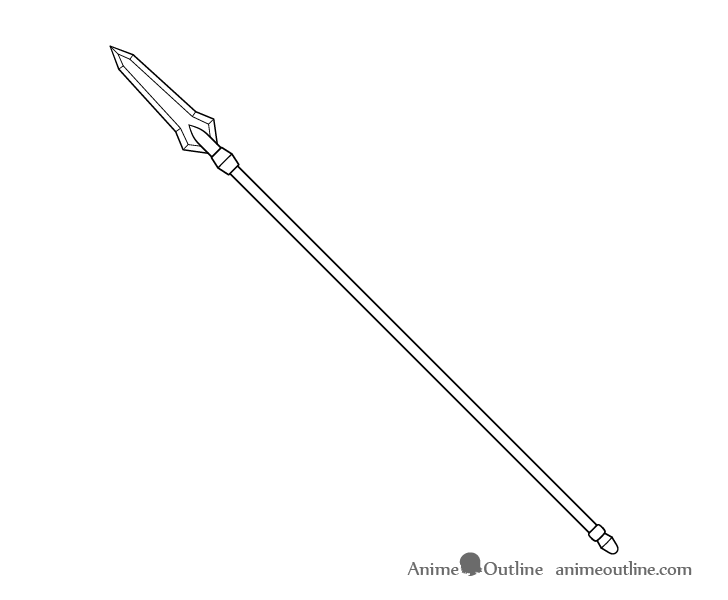
Again very similar to the sword in the first example add the edges around the head of the spear to finish the line drawing. Once this is done you can erase the center line.
Step 6 – Color the Spear
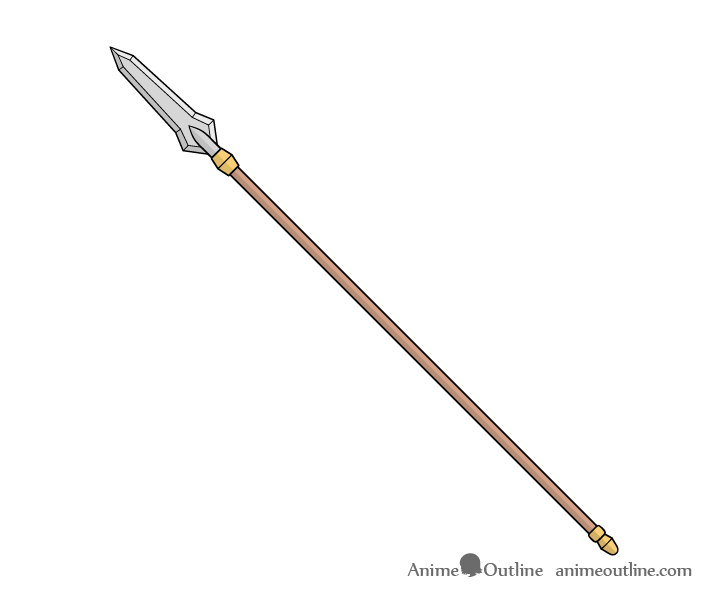
To color the spear make the head grey, the shaft brown and the pommel and bottom of the socket a yellow/brown (gold).
As in the other examples in this tutorial the light in this case will be coming from the upper right. This means that you will want to make the upper part of the spear’s edge the lightest and the lower edge the darkest with the rest a medium grey. Also darken the lower half of the socket, shaft and pommel.
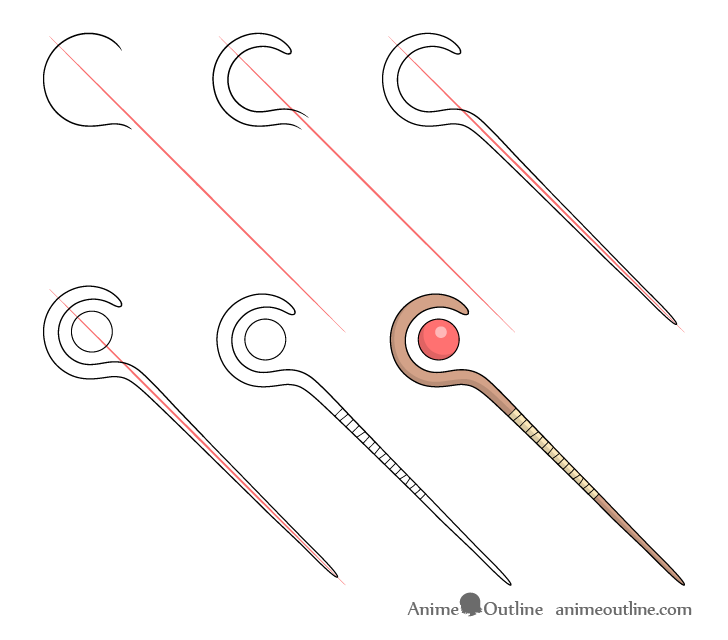
How to Draw a Magic Staff (6 Steps)
The staff is of course used by wizards and magicians. These tend to be in a support role but can sometimes also be the protagonist.
For drawing a character that could use this type of a weapon see the following tutorial:
How to Draw an Anime Wizard Girl Step by Step
Step 1 – Set the Shape of the Head of the Staff

First draw a straight line at whatever angle you wish to draw the staff at. Towards the upper end of this line define the outer shape of the staff’s head. For this particular design it will look like a question mark.
Step 2 – Draw the Head
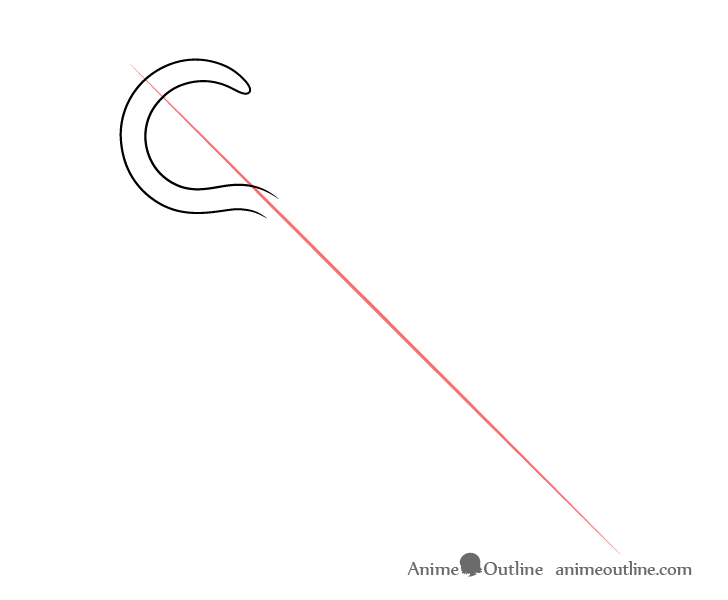
Based on the shape in the previous step fully outline the staff’s head as shown above.
Step 3 – Draw the Shaft
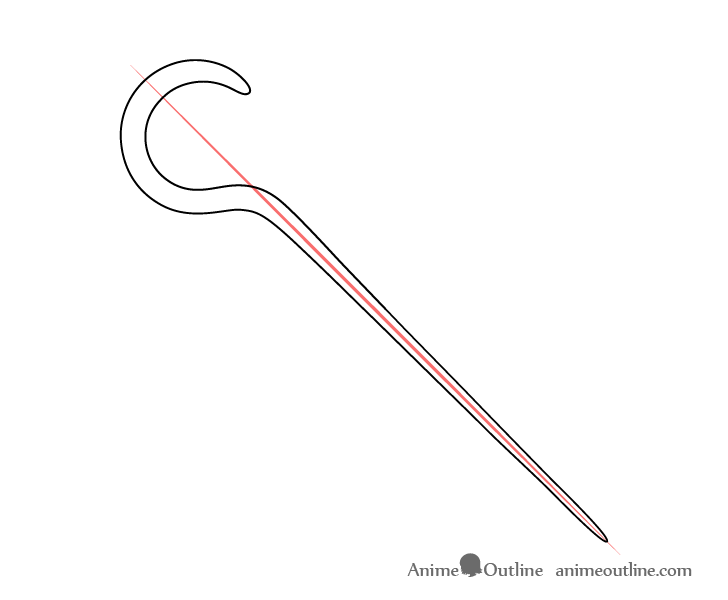
After the head add the shaft that gradually gets narrower as it goes down and end with a rounded tip.
Step 4 – Draw the Jewel

In the middle of the staff’s head draw a floating jewel. In this case it will be round (spherical) in shape. You can erase the center guide line once done with this step.
Step 5 – Draw the Wrapping & Finish the Drawing

To keep the staff from looking too plain you can add some wrapping to it’s grip area. Simply show this with a series of lines around the middle of the shaft.
Step 6 – Color the Staff
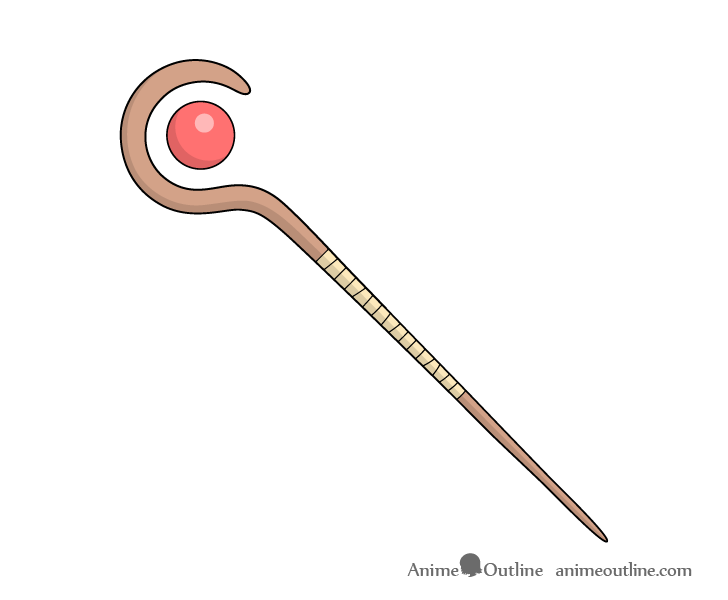
Finally color the staff by making it brown, the wrapping a light yellow and the jewel red. When coloring the jewel leave a lighter area inside it for the highlight (reflected light).
In this example the light will again be coming from the upper right so you can darken the bottom left of the staff and wrapping. You can give the jewel a darker strip along it’s bottom left as well.
For a line by line video on drawing this staff see:
https://www.youtube.com/watch?v=vaAzycRG17s
How to Draw a Bow & Arrow (8 Steps)
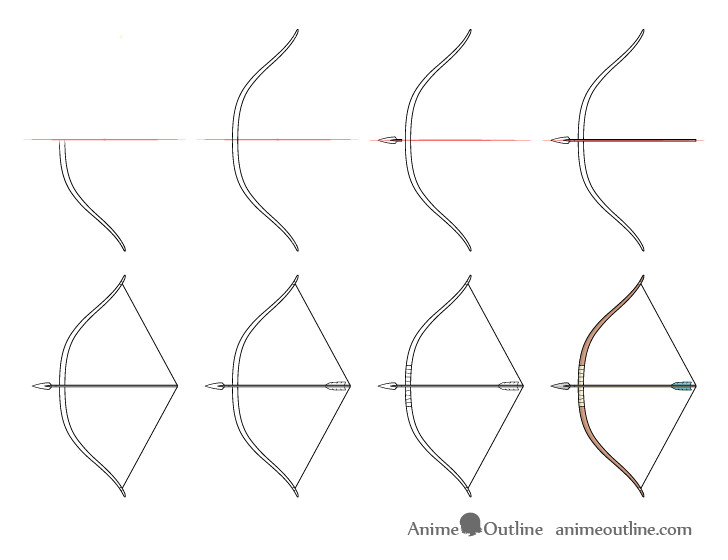
The bow is yet again usually a weapon that in anime is used by side or background characters. In a fantasy setting they often tend to be used by elves.
The design of this particular bow will be fairly plain making it well suited to a background character.
Step 1 – Draw the First Half of the Bow
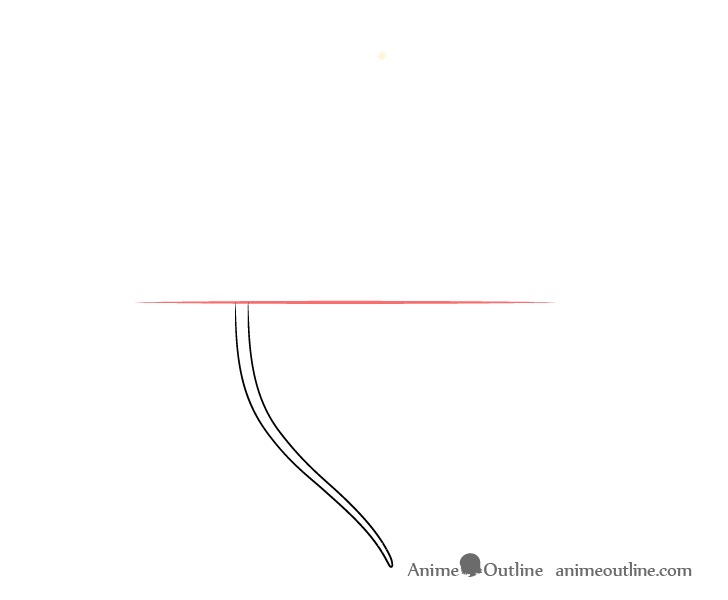
Unless you wish to draw the bow at an angle begin by making a straight horizontal line. Afterwards outline it’s first half to one side of the guide line.
The goal of the line is to help you see if both halves are symmetrical as well as to help draw the arrow later on.
Step 2 – Draw the Second Half of the Bow
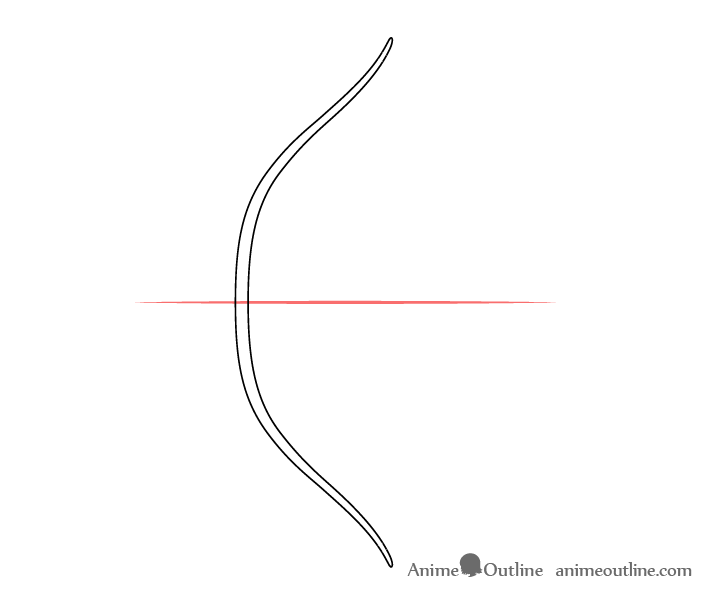
On the other side of the line add the second half of the bow mirroring the first half.
Step 3 – Draw the Arrowhead
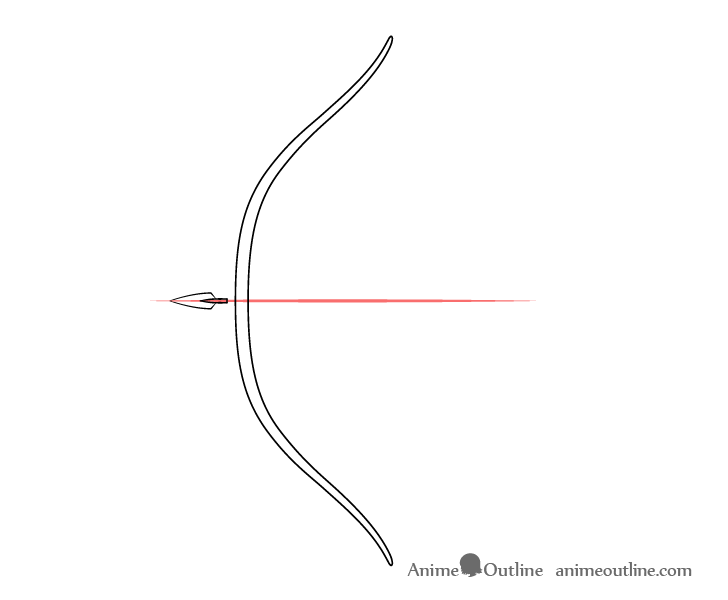
Towards the front of the guide line draw the arrowhead. You can follow the above example for it’s shape.
Step 4 – Draw the Arrow Shaft
Overlapping the bow add the arrow shaft. Be sure to make it fairly thin in comparison to the bow. You can erase the little bit of the bows outline when adding it in. You can also erase the center line once done with this step.
Step 5 – Draw the Bowstring
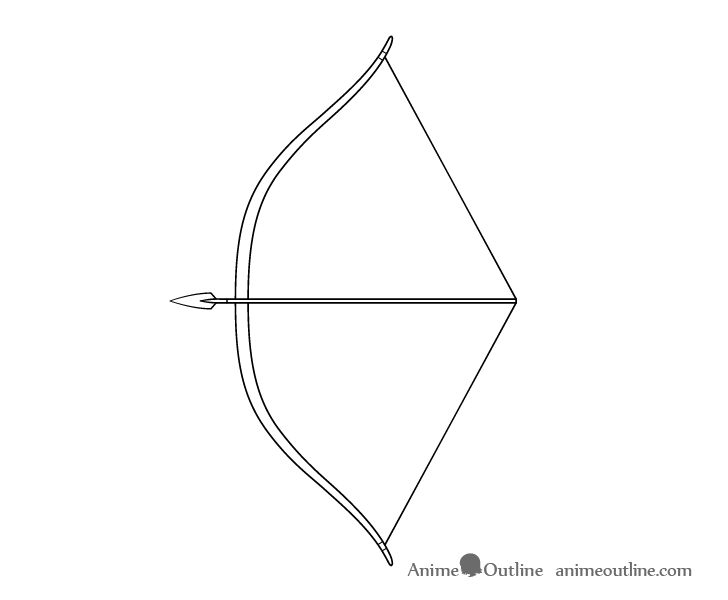
Add the bowstring going from each end of the bow to the back of the arrow as two straight lines. You can also outline the little sections near the bow’s ends where the string is tied.
Step 6 – Draw the Fletching
At the back of the arrow add the fletching. First outline the main shapes of the feathers and then draw some little splits into them.
Step 7 – Draw the Wrapping & Fletching Details
Add some wrapping around middle section of the bow (where it’s usually held) to finish the line drawing.
Step 8 – Color the Bow & Arrow
To color the drawing you can make the bow brow, the wrapping and the areas where the string is tired a light yellow, the arrowhead grey, the shaft a light yellow/brown and the fletching a light blue.
In this example the light will again be coming roughly from the upper left.
The darker areas will be the left side of the bow (including the wrapping and the bits where the string is tied) as well as the bottom half of the arrowhead and the fletching.
How to Draw a Huge Two-Handed Sword (8 Steps)
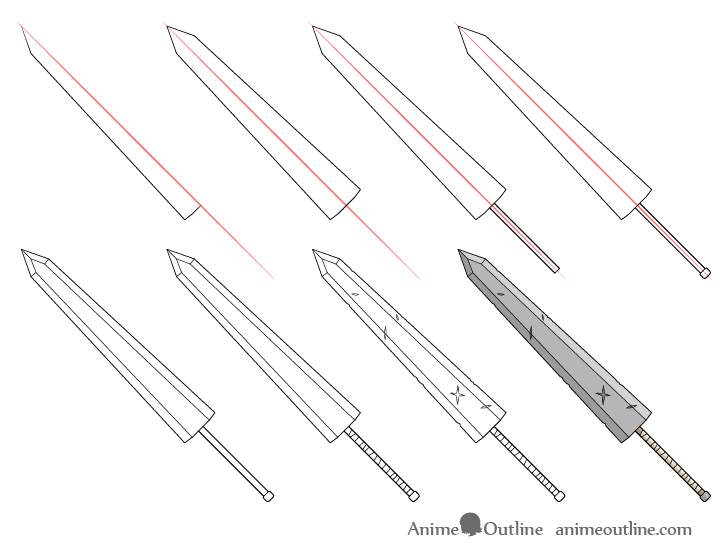
This type of a weapon is generally used by a large/muscular warrior type characters such as a barbarian. The designs of these types of swords are often fairly plain and sometimes even “crude”.
Step 1 – Draw the First Half of the Blade

First draw a straight line at whatever angle you wish to draw the sword at. Next outlined the first half of the blade. In this case it will be wider as it goes toward the hilt.
Step 2 – Draw the Second Half of the Blade
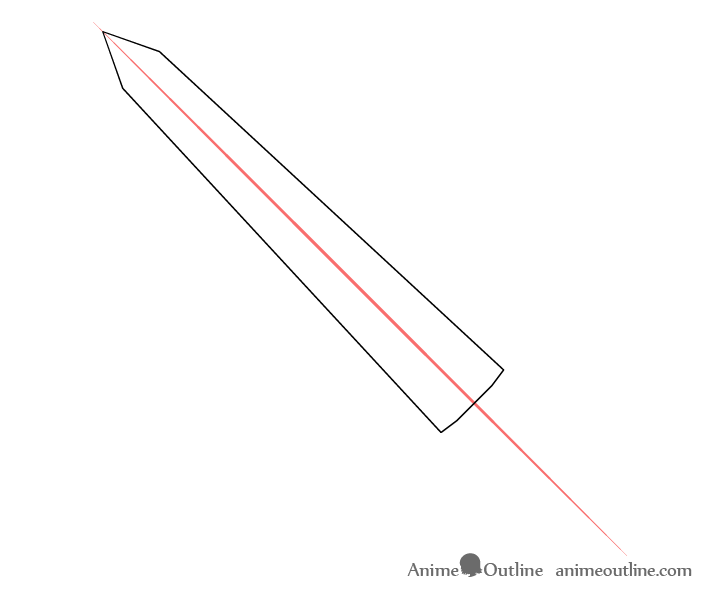
Draw the second half of the blade mirroring the first half.
Step 3 – Draw the Grip
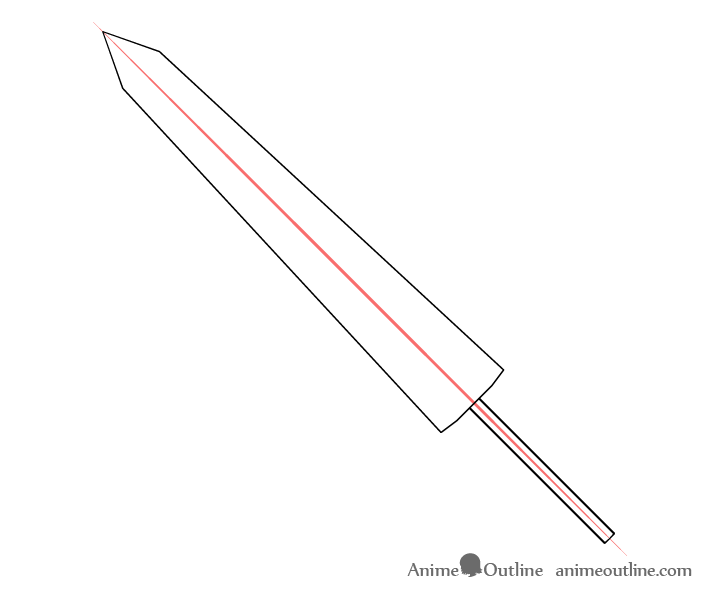
In this case the huge end of the blade will also act as the hand guard so the grip will come directly after it. As this is a two-handed word be sure to make the grip fairly long. You will also want it to be quite narrow in comparison to the blade to help show it’s large size.
Step 4 – Draw the Pommel
At the end of the grip add the pommel. As this sword is supposed to look somewhat crude keep the design of the pommel simple (as in the example) in comparison to the other weapons.
Step 5 – Draw the Edges
Add the edges and make them wider as they go down just like the blade itself.
Step 6 – Draw the Grip Wrapping
Along the grip you can give the sword some fairly rough and uneven looking wrapping. To show this add several angled lines along it’s length, Try and keep the spacing between these somewhat random and uneven.
Step 7 – Draw the Notches & Dents (Optional)
To make the sword look even rougher you can show some wear and tear on it. Do this by adding a few notches and scratches/dents (as in the example). You can erase a little bits of the blade’s outline when adding these. Of course if you want a newer looking sword you can just leave them out.
Step 8 – Color the Two-Handed Sword
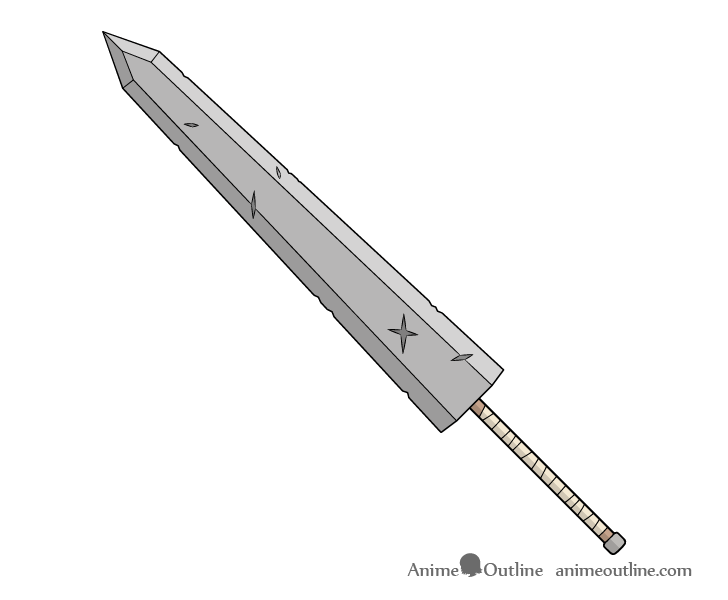
To color the sword make the blade/pommel grey, the grip brown and the wrapping a light yellow.
As in the examples of the other weapons the light will again be coming from the upper right. This means that you will want to make the top edges of the sword the lightest, the middle a medium grey and the bottom edges a darker grey. The little dents and scratches should be the darkest parts of whatever side they are on.
You can also darken the bottom half of the grip as well as the pommel.
How to Draw a Martial Arts Staff (3 Steps)
The martial arts staff as it’s name implies is generally used by characters with that fighting style. Yet again these generally tend to be side/supporting characters.
These types of weapons are often quite plain (sometimes just a shaft) so drawing it is fairly easy.
Step 1 – Draw the Shaft
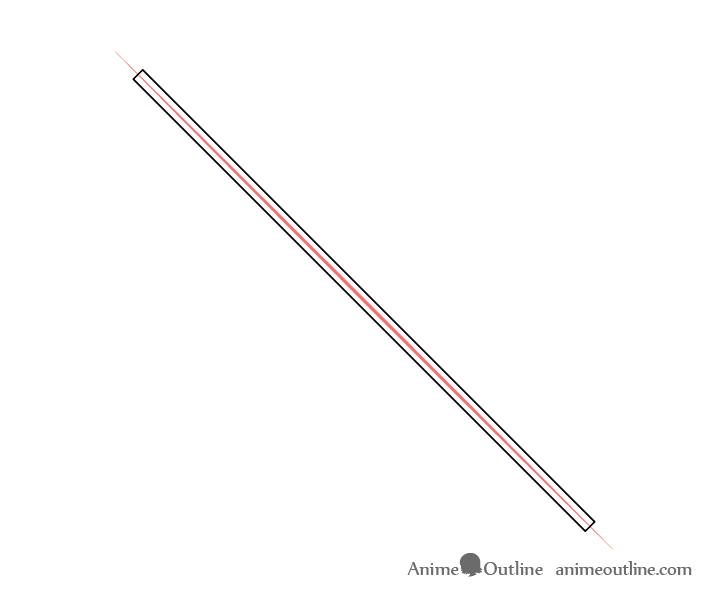
Before drawing the staff you can first make a straight line to act as a guide at whatever angle you wish to have the weapon at. Afterwards draw the shaft.
Step 2 – Draw the Ends
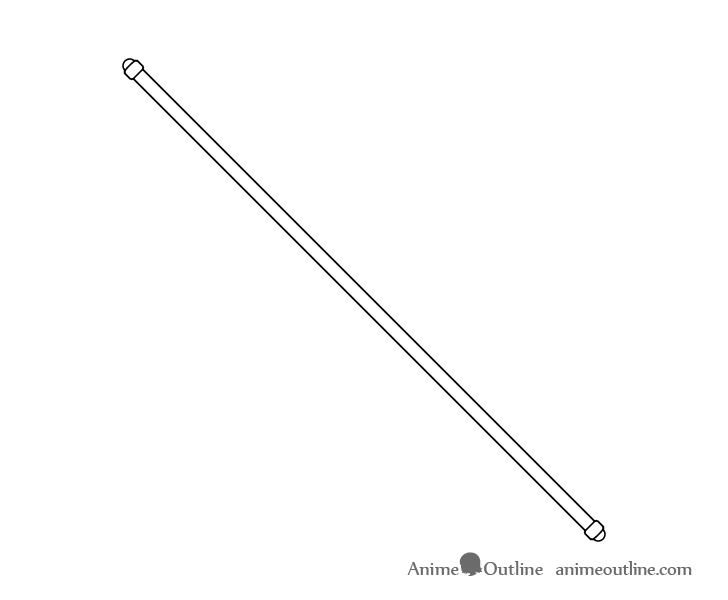
On each end of the shaft add a metallic bit as shown in the example to finish the line drawing.
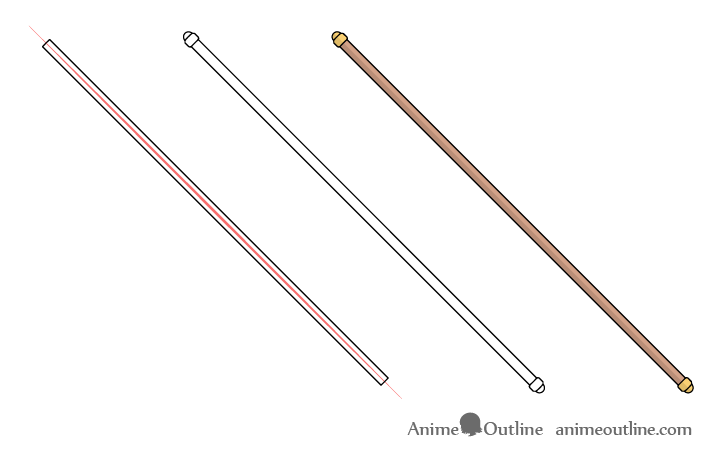
Step 3 – Color the Martial Arts Staff
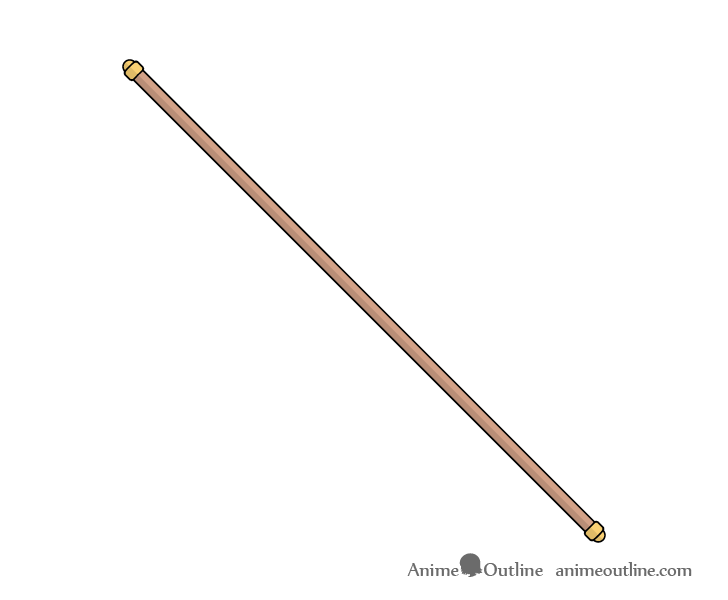
To color the staff make it brown and make the metallic parts on each end a yellow/brown to make them look like gold.
In this example the light will be coming from the upper right so you can shade the entire bottom half of the staff.
How to Draw an Evil Looking Villain’s Sword (10 Steps)
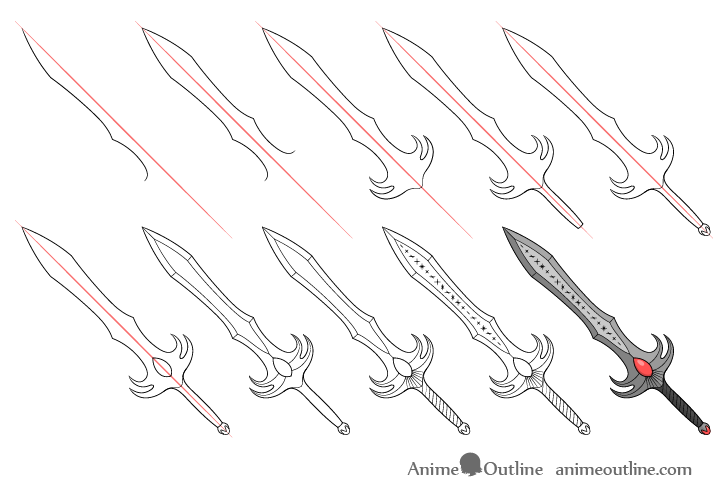
These types of swords are often used by the main villain or the antagonist. The character wielding one may even sometimes be possessed by it.
The “evil swords” tend to have fairly detailed and elaborate designs so this will be the most complex weapon in the tutorial.
Step 1 – Draw the First Half of the Blade
Begin by drawing a straight line at whatever angle you wish to draw the sword at. Next to one side of it draw the first half of the blade. It’s shape will mainly consist of smooth curves (as shown in the example).
Step 2 – Draw the Second Half of the Blade
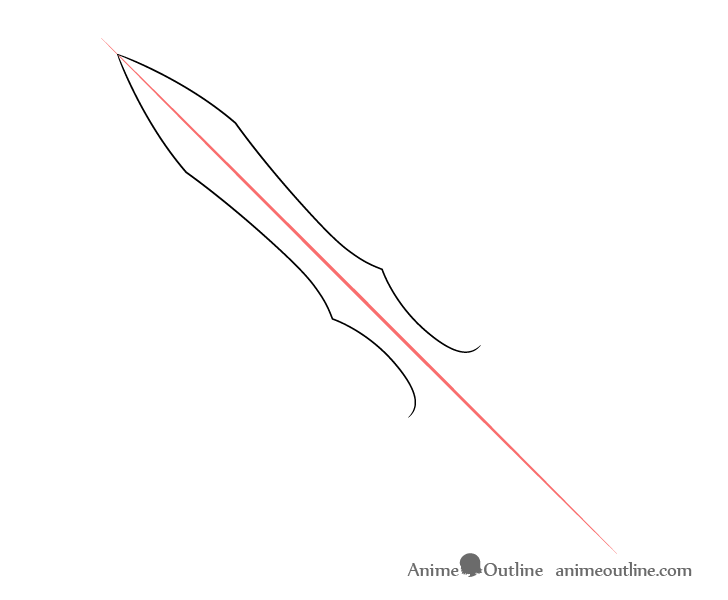
Draw the second half of the blade on the other side of the line mirroring the first half.
Step 3 – Draw the Guard
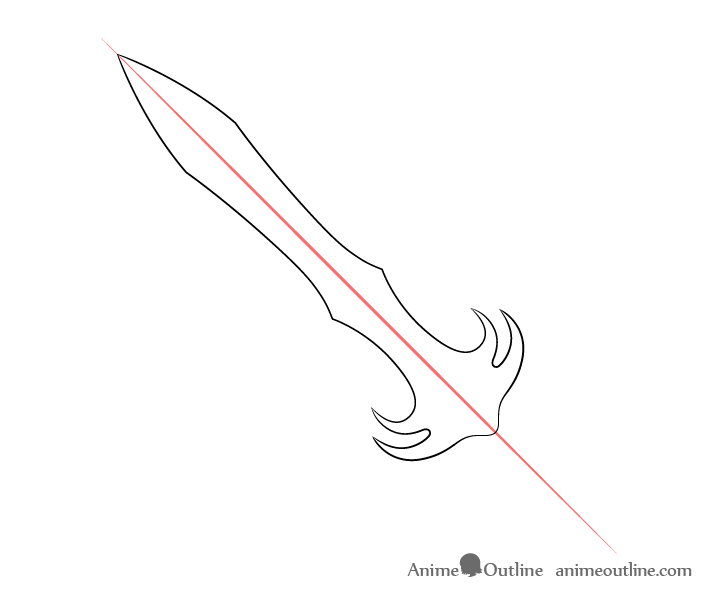
In this case the blade will transition into the guard instead of it being a separate part. The guard will also have a somewhat unusual shape. It will be shaped like a pair of claws to to give the sword a more aggressive look.
Step 4 – Draw the Grip
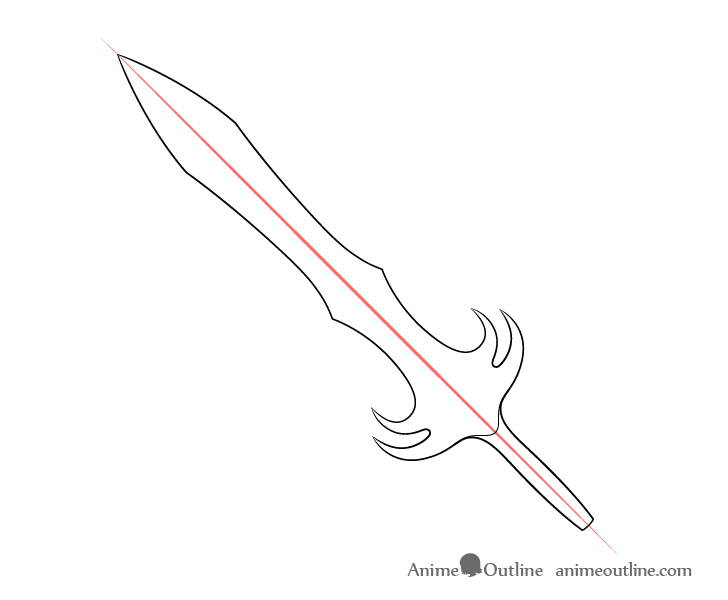
After the guard add the grip. Make it slightly wider in the middle and narrower towards both each end.
Step 5 – Draw the Pommel
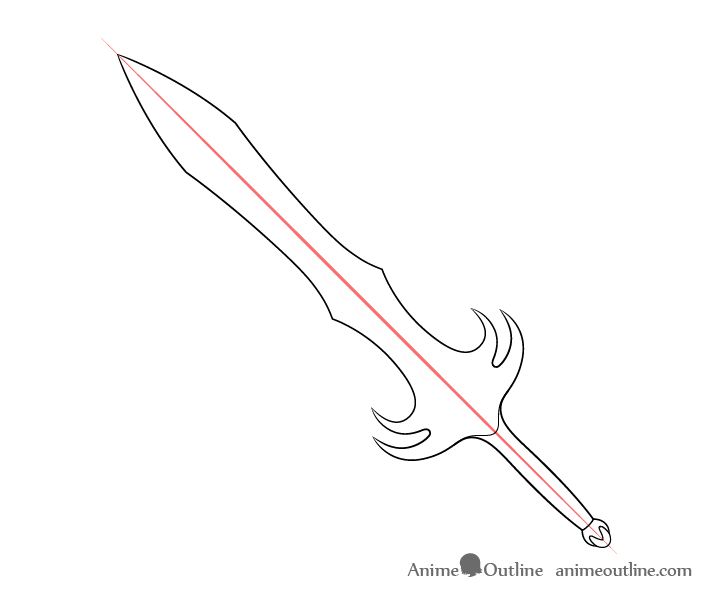
On the end of the grip add the pommel. In this case it will be a jewel inside a setting. You can refer to the example for it’s design.
Step 6 – Draw the Jewel
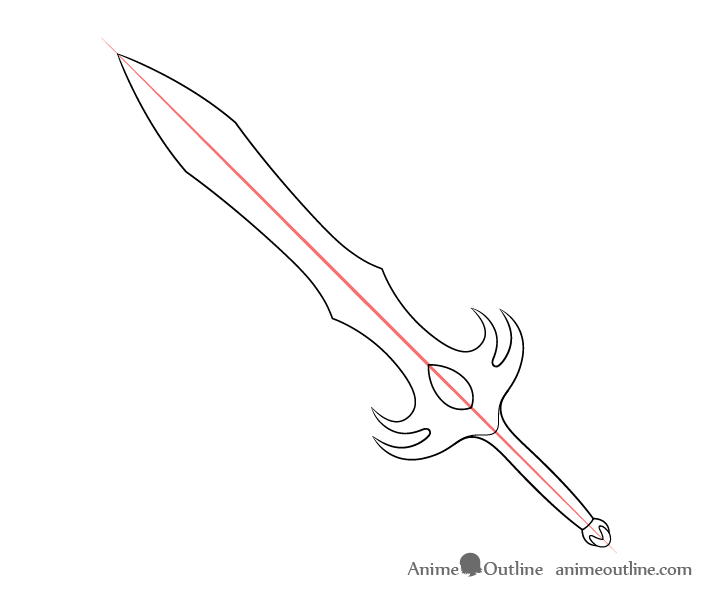
Inside the guard draw a second larger jewel shape a bit like an eye.
In anime and manga these types of swords can sometimes have an actual eye and can basically be alive.
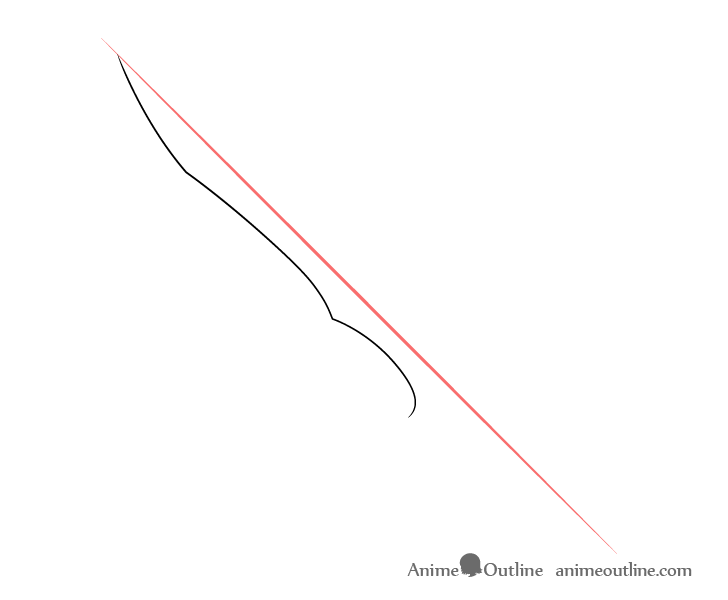
Step 7 – Draw the Edges
Draw the edges along the blade as well as along the guard which will also have sharp ends.
Once you have this part of the sword draw out you can erase most of the center line optionally leaving a little bit of it over the flat part of the blade (to help you place the runes later on).
Step 8 – Draw the Texture of the Grip
To give the grip some texture draw a series of lightly curved angled lines. You can also add another design element where several lines emanate from the “eye” towards the handle (a bit like rays).
Step 9 – Draw the Runes

Finally for the last set of details draw some runes along the blade. You can just make up the look of these. In this case they will simply be a series of intersecting short lines.
Step 10 – Color the Evil Sword
For this type of a weapon you will generally want darker colours. Make most of the blade, the guard and part of the pommel a dark grey. Make the handle an even darker grey (nearly black) and make the part in the center a lighter grey. Finally make the jewels red but leave a little lighter bit inside each one of them for the highlight (light reflecting from their surfaces).
Again, similar to the other weapons in this tutorial the “evil sword” will be shaded as though the light is coming from the upper right of the drawing.
Make the upper edges of the blade a lighter grey and the bottom a darker grey. Make the upper part of the hilt a medium grey. You can also darken the bottom half of the handle and the metallic part of the pommel.
Give the gems just a narrow curved darker strip along their bottoms.
For a video tutorial on drawing this sword see the following:
https://www.youtube.com/watch?v=BysBncvGpew
How to Draw a Shield (6 Steps)

Although the main focus of this tutorial is on weapons a shield is also a very common item seen in fantasy anime and manga. This particular one is designed to match the sword in the first example. Generally anime and manga protagonists tend to not use shields (with some exceptions), however, for a knight (good guy) type supporting character the shield can be a very good fit.
Step 1 – Draw the First Half of the Shield
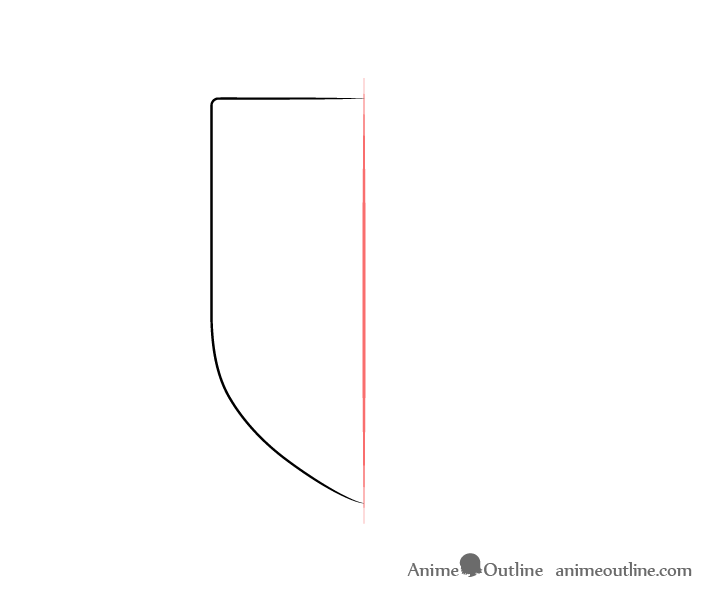
Just as for the weapons first draw a straight line (in this case vertical) to act as a guide. To one half of this line draw the first half of the shield.
Step 2 – Draw the Second Half
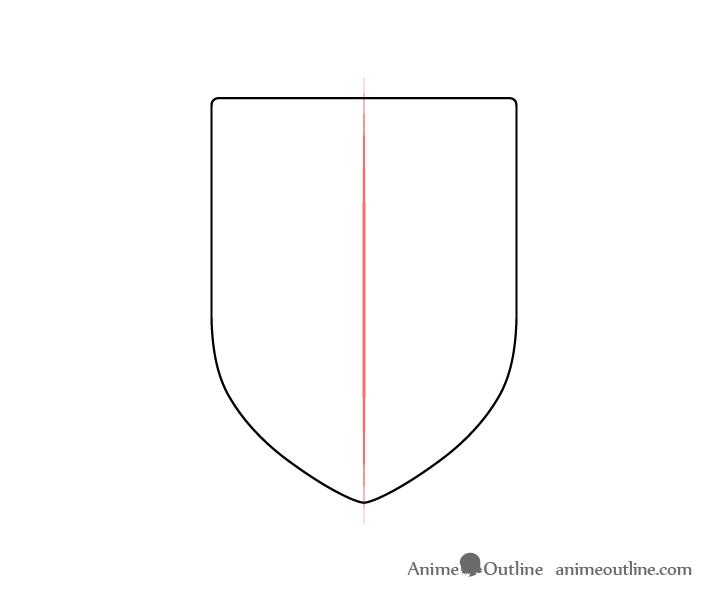
Draw the second half of the shield on the other side of the line so that it mirrors the first half.
Step 3 – Draw the Frame
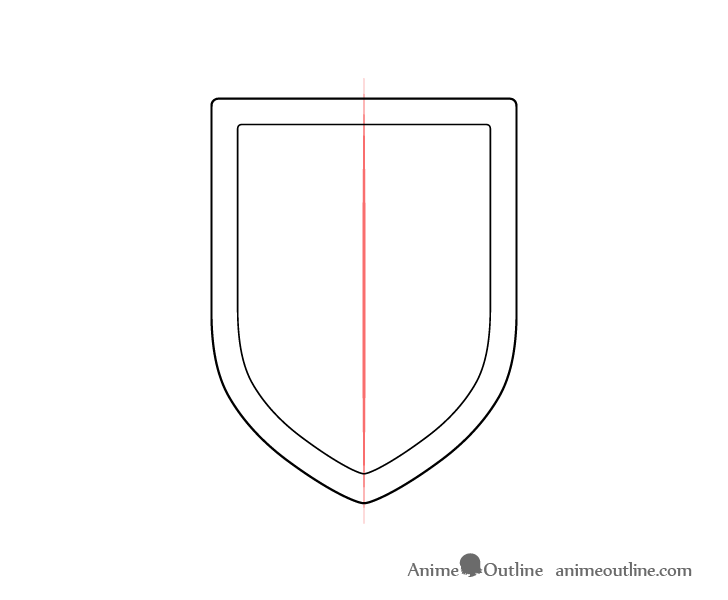
Make second smaller outline inside the main shape of the shield to give it a sort of “frame”.
Step 4 – Draw the Details
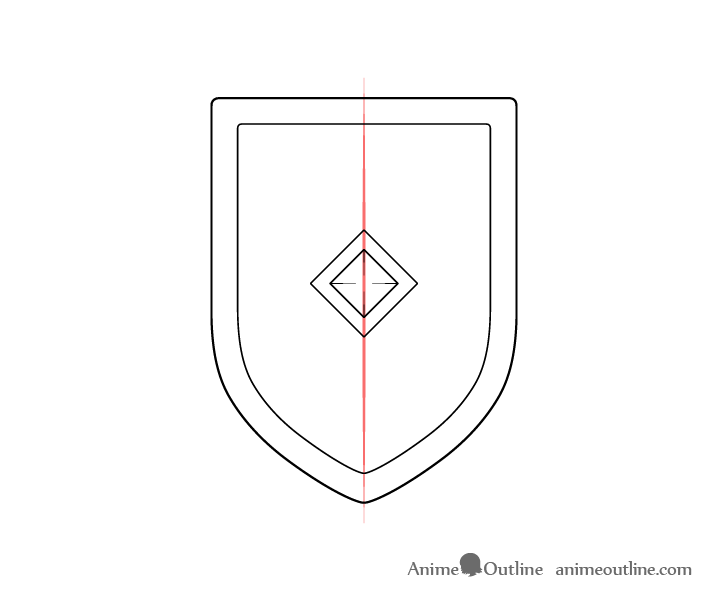
In the middle of the shield draw a jewel with a setting around it. In this example it will be square in shape just like the one one the hammer.
Step 5 – Finish the Line Drawing
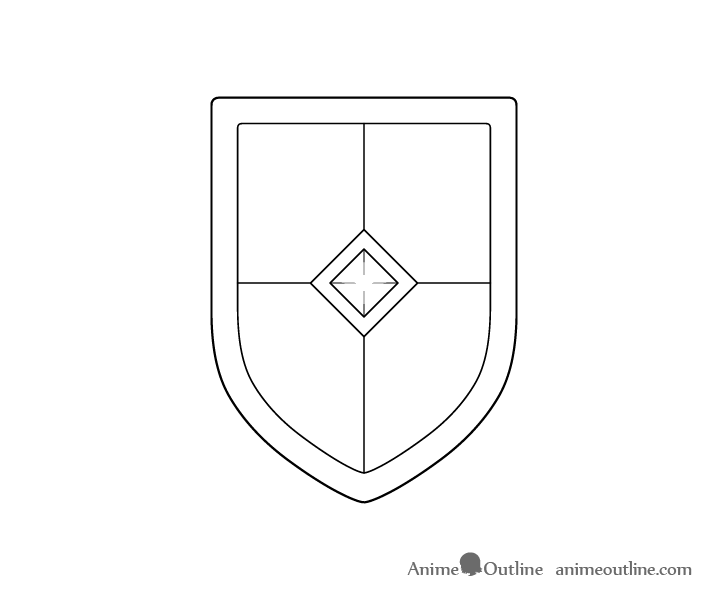
Erase the bits of the center line that run through the frame, setting and parts of jewel but leave the rest to divide the inner part of the shield in half. Afterwards draw a pair of vertical lines (make sure these line up with one another) to split it into four sections.
Step 6 – Color the Shield
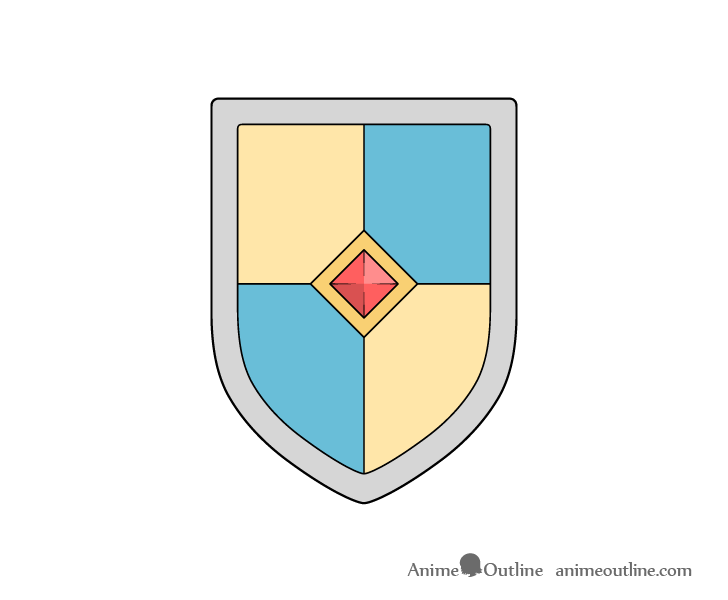
To color the shield make the frame grey (metallic). Make two of it’s sections yellow and two blue. Color the area around the jewel a yellow brown so that it looks like gold and color the jewel itself red.
The only bit of shading you need in this case (with the light coming from the upper right) is some on the bottom left part of the jewel. Simply lightly darken that area.
Conclusion
While there are basically countless variations when it comes to drawing magical weapons this guide focuses on some of their more commonly characteristics to give each one a certain look.
Whatever fantasy weapon you would like to draw it’s always good to think about who will be wielding it. For example a barbarian may use a more rough looking weapon as opposed to a knight, a heroes weapon will generally tend to have lighter and brighter colors than that of a villain, etc… Of course there are exceptions to this but generally certain character archetypes tend to have weapons that they commonly use.
Hopefully you’ve liked the example and found the detailed breakdowns for drawing each of them helpful.
For drawing Japanese style weapons see the following tutorials:
- How to Draw a Katana (Sword) Step by Step
- How to Draw a Kunai (Weapon) Step by Step
- How to Draw a Shuriken (Ninja Star) Step by Step
For more tutorials on anime and manga related things see:
For drawing anime characters check the following: