
How to Draw Explosions, Smoke & Fire Step by Step
This tutorial shows how to draw anime, manga or comic book style explosion, smoke and fire effects with step by step examples for each.
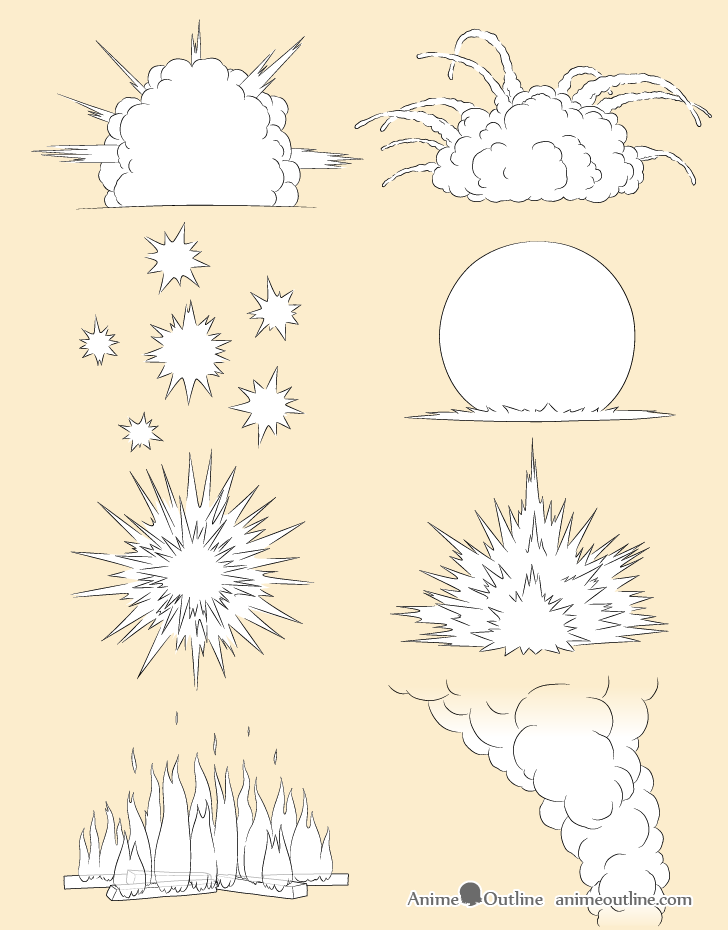
Effects such as explosions, smoke and fire are common to many anime and manga. They can be used in scenes ranging from action filled battles to peaceful camp fires.
This tutorial focuses on providing some basic tips on drawing these.
Please keep in mind that there is no one set way to draw each effect. The examples in this tutorial show a simple and fairly beginner friendly way to do it but some artist may draw in ways that are far more realistic and complex.
If you are going to be following the tutorial using pencil and paper be sure to draw very light lines that you can easily erase in case you make a mistake. You can trace over your drawing with a darker stoke once you feel that everything is in the right place.
The lines in all of the steps are shown darker simply so that they are easier for you to see.
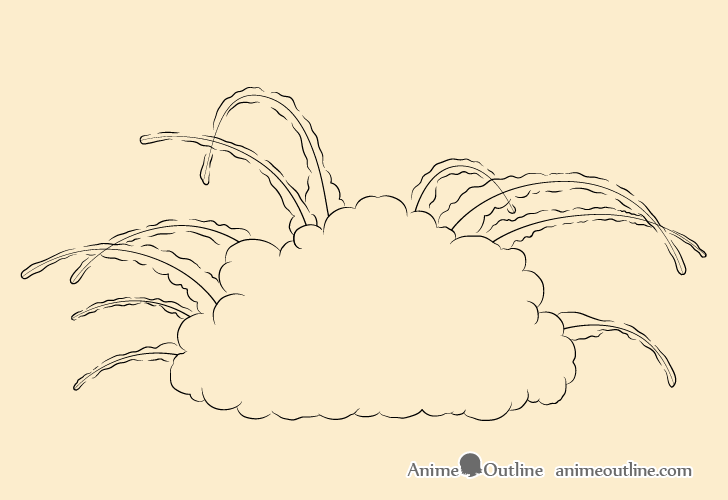
How to Draw an Explosion With Smoke Step by Step
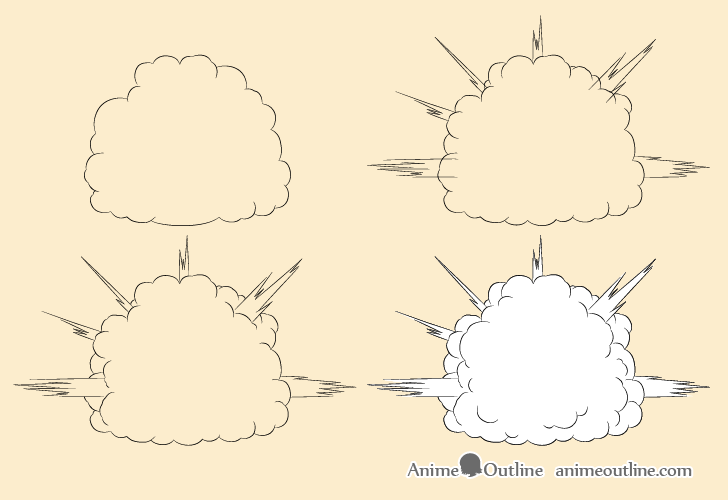
This type of explosion is basically a cloud of smoke with some blasts of fire coming out of it.
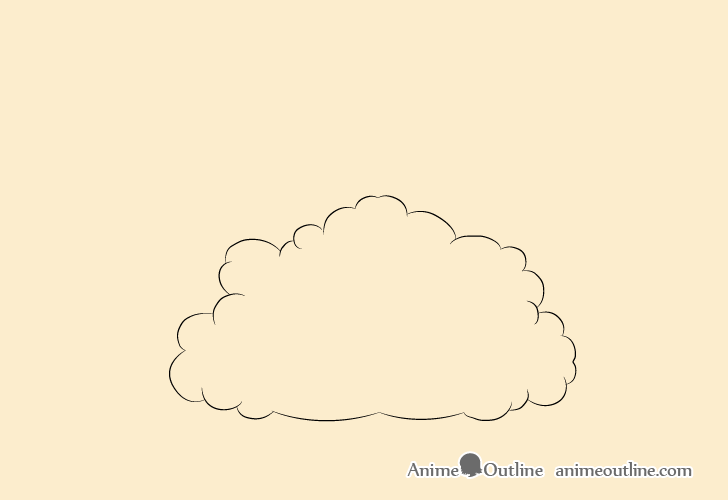
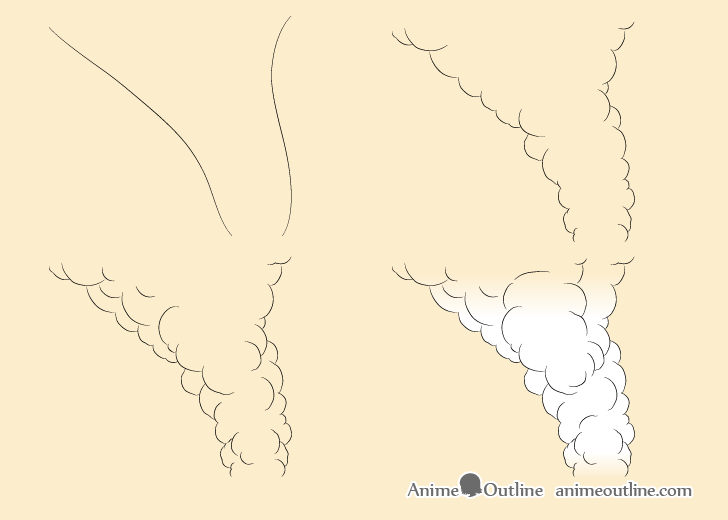
Step 1 – Draw the Outline of the Smoke

Begin the drawing by creating a simplified outline of the smoke. This means that at this stage you can omit some of the smaller bumps and curves and simply draw them as larger combined shapes.
You can especially see this with the large curve on the bottom in the example above.
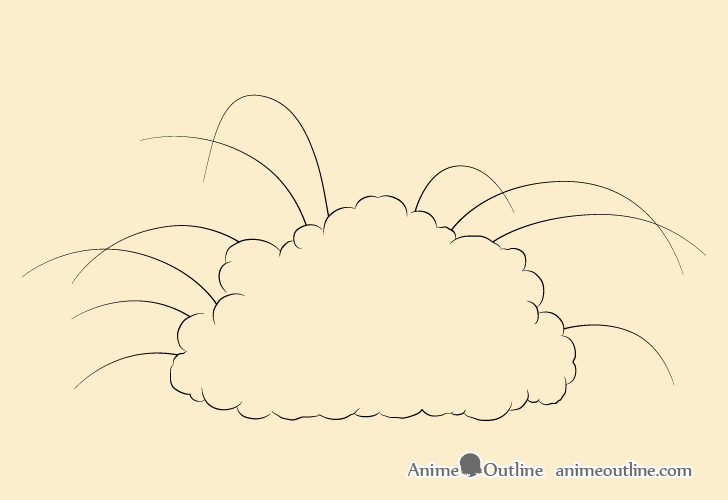
Step 2 – Draw the Blasts
Once you feel that you have the overall shape you want you can split up the larger curves of the outline into smaller ones. Simply erase and redraw the parts where you feel this is needed.
Next draw some fire blasts coming out of the smoke as shown in the example above. Try and make these vary in length and size to make the drawing look more natural. Place a few of them so that they are overlapping the outline of the smoke and sort of “cutting” into it’s shape and draw others as though they are coming out from behind it. This will make the fire blasts look like they are going in different directions.
Step 3 – Draw More Smoke Details
Erase the parts of the smoke overlapped by the blasts that “cut” into the outline. Next around the base of these blasts draw some more smoke curves. This will make it look like they are actually coming out of the smoke.
Step 4 – Finish the Drawing
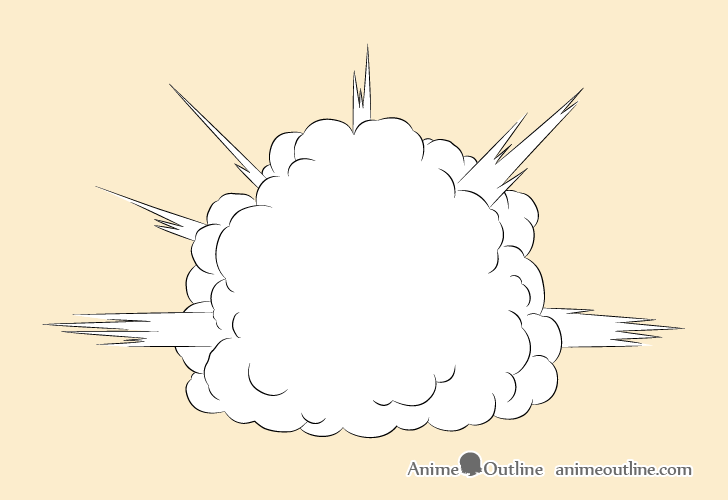
Finally add a few more bumps and curves into the smoke cloud to make it look more three dimensional.
You can go over your drawing with darker lines once done.
How to Draw an Explosion with Debris Flying Step by Step
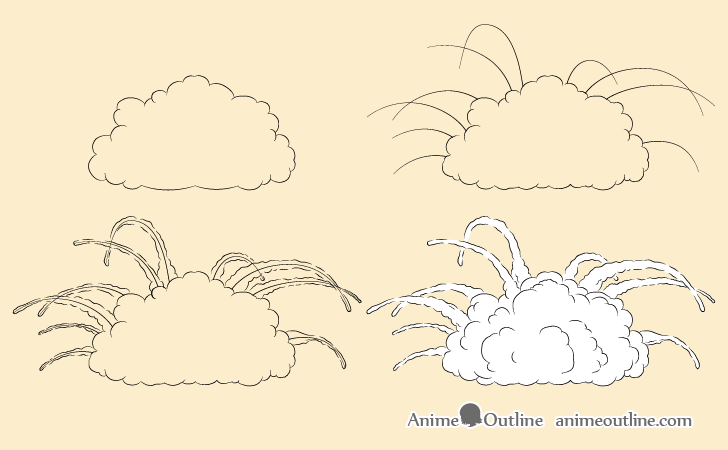
This explosion is similar to the previous example but instead of having blasts coming out of the smoke it will have flying debris.
Step 1 – Draw the Outline of the Smoke
Similar to the previous example start by drawing the outline of the smoke. You can again keep the outline simplified and add the smaller bumps and curves in the next step.
Step 2 – Draw the Paths of the Debris
Break up some of the larger curves of the outline from the previous step into smaller bumps (erasing as needed). Next draw in the paths of the flying debris as shown int the example above.
These should basically be a series of different curves. Try keep the spacing of these fairly random to make them look more natural.
Step 3 – Draw the Flying Debris
In this case the flying debris themselves will not really be visible. Instead what you will see is their smoke trails. Draw these wider and the base and narrower towards the tips with their curves based on the paths from the previous step. Outline each smoke trail with a series of bumps and curves that get smaller and less noticeable towards their tips. You can also add some breaks in the outlines to make the trails look lighter.
Step 4 – Finish the Drawing
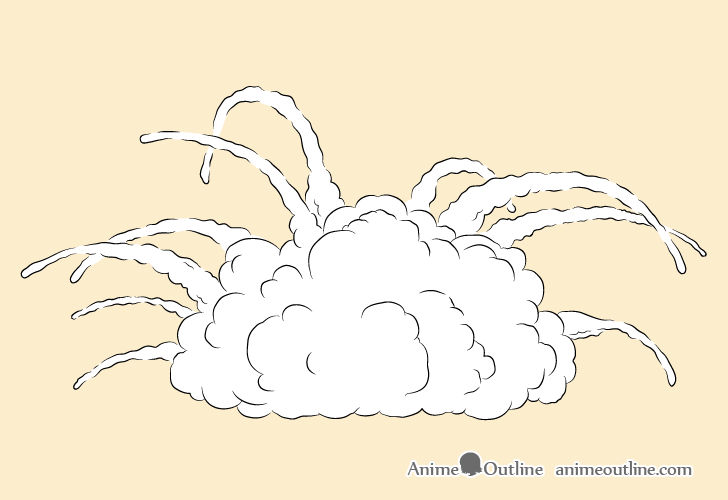
To finalize the drawing first erase the guide lines for the smoke trails. Next erase the outlines of the main smoke cloud around the base of a few of the trails and leave it around the base of others. This will make it look like the debris are flying in different directions with some coming more towards the viewer and others more from behind the smoke cloud.
Add some more smaller smoke patterns (curves and bumps) into the main shape of the smoke. You can also add a few inner curves at the base of some of the smoke trails.
Trace over your drawing with darker lines to finish.
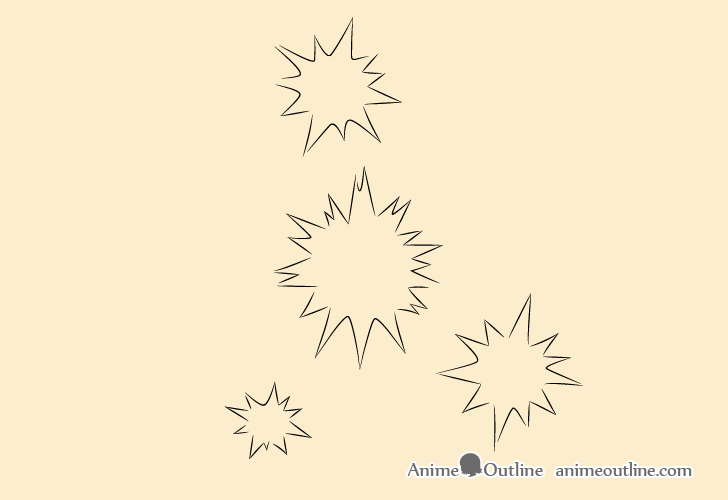
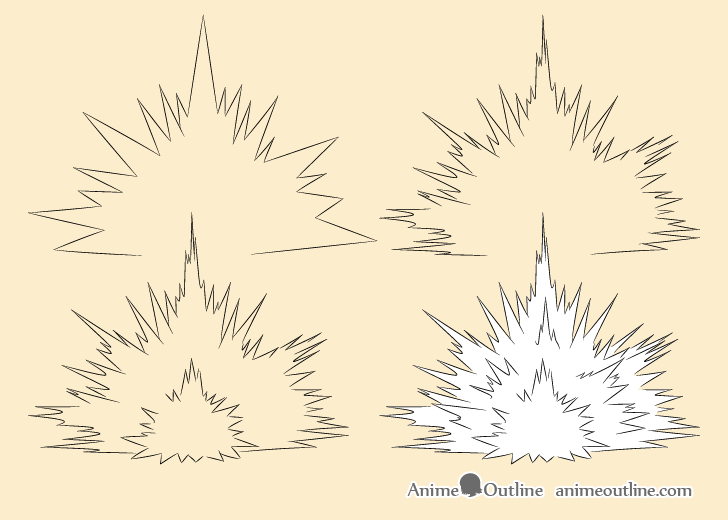
How to Draw Small Explosions Step by Step
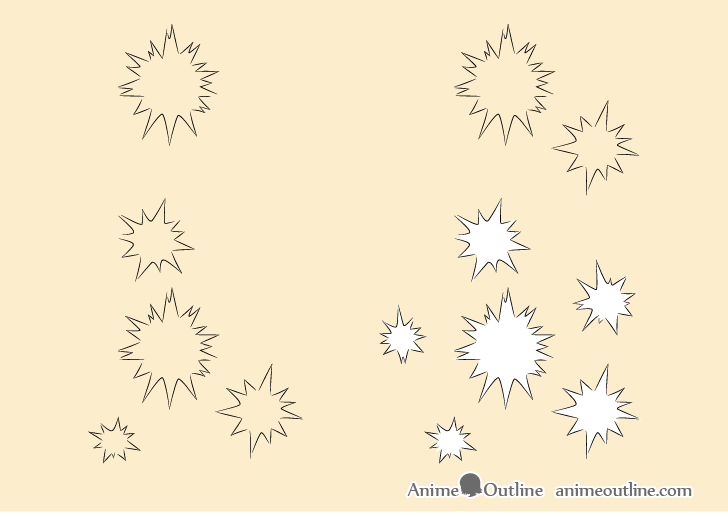
These types of explosions can be used to show sparks or some sort of impact like bullets ricocheting off a wall.
Step 1 – Draw an Explosion
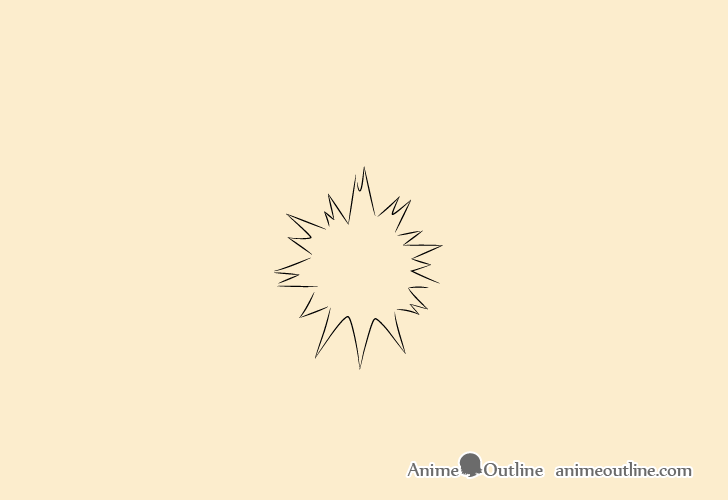
For these types of explosions you can pretty much draw them as you see in the examples in one step.
Step 2 – Add more Explosions (optional)
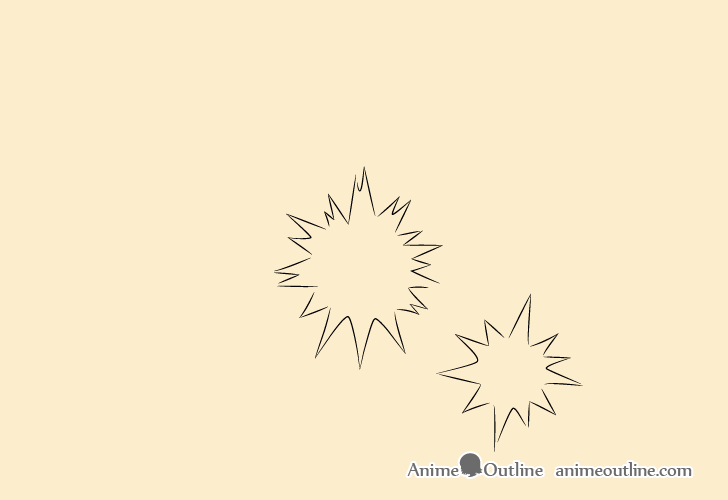
When drawing additional explosions try and make their shapes different from the previous one to make them look more natural.
Step 3 – Create a Pattern (optional)
Depending on what you want these explosions to represent you can give them a particular pattern.
For example to show ricocheting bullets from a machine gun you may want to draw them in more of a line.
Step 4 – Finish the Drawing
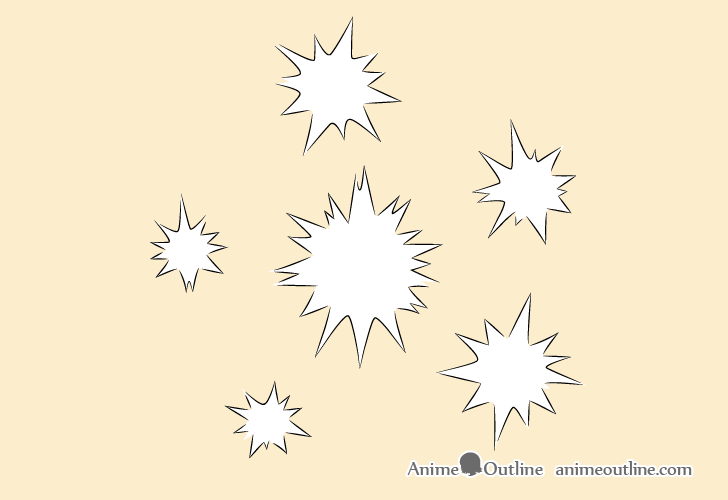
You can pretty much just draw as many of these as you need in whatever pattern you want. Just again be sure to try and draw each one slightly different from the rest.
Once you establish the setup you want trace over your drawing with darker lines.
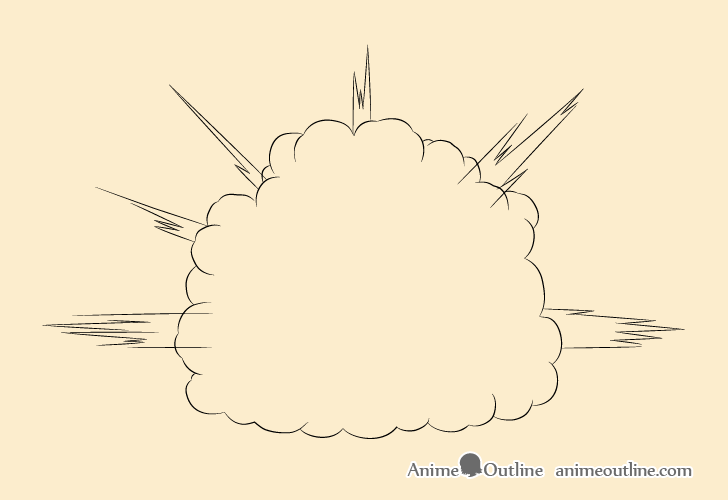
How to Draw a Huge Explosion Step by Step
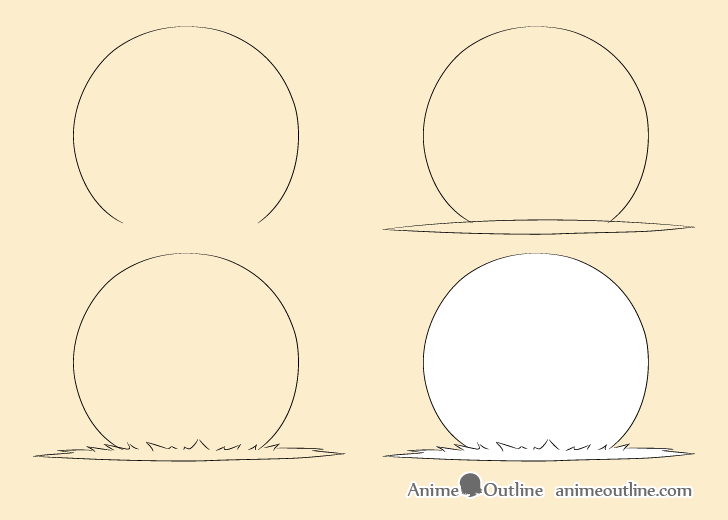
This example is of a huge explosion. It can be used to show something like a super weapon being detonated.
Step 1 – Draw the Outline of the Explosion

Draw the main shape of the explosion as pretty much a circle. You can leave it’s bottom end open as that part will be touching the ground.
Step 2 – Draw the Outline of the Blast Wave
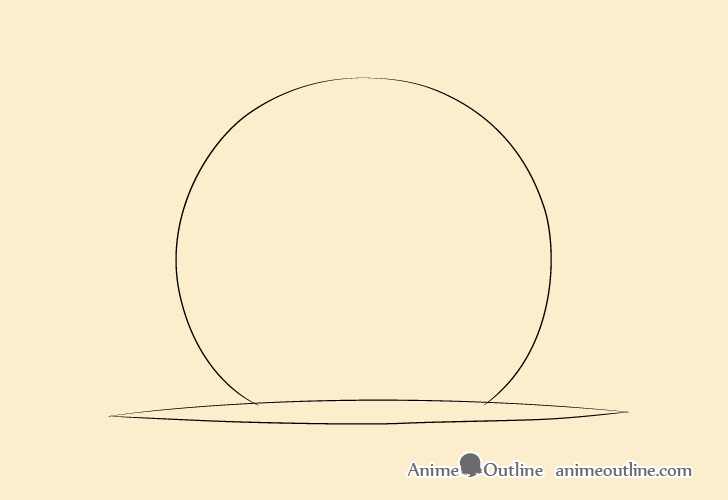
At the bottom/open end of the circle draw the shape of the blast wave as shown in the example above.
Step 3 – Draw the Details of the Blast Wave
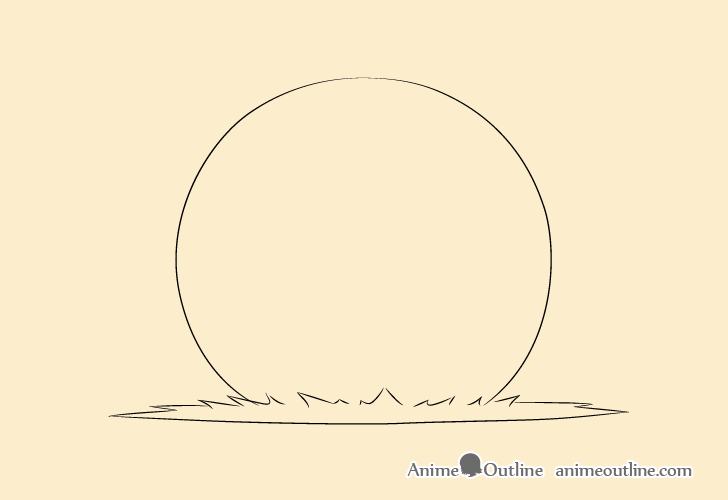
Into the blast wave draw some teeth like shapes to make it look more uneven/natural.
Step 4 – Finish the Drawing
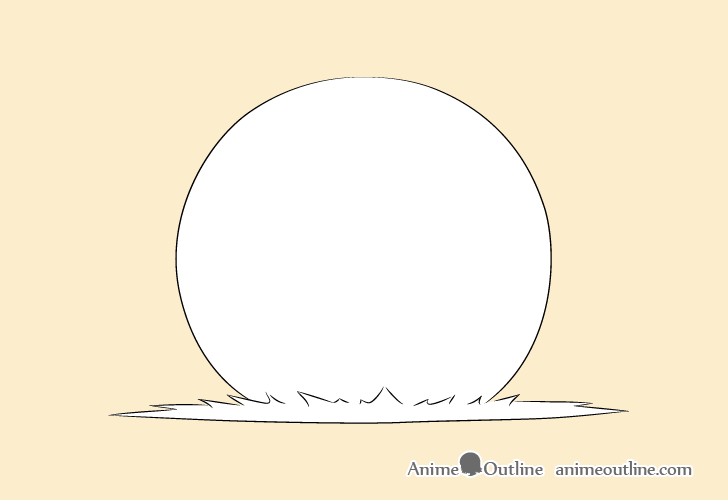
This explosion type is fairly easy to draw so there is not much else to do in this last step. Simply refine and clean up the drawing as needed and go over it with darker lines once done.
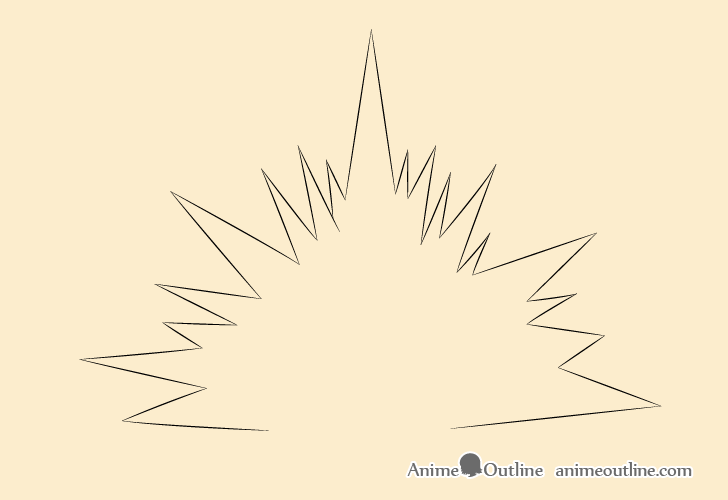
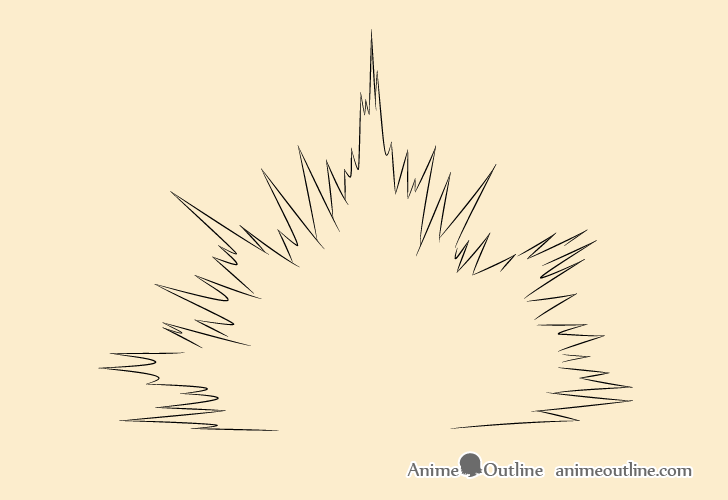
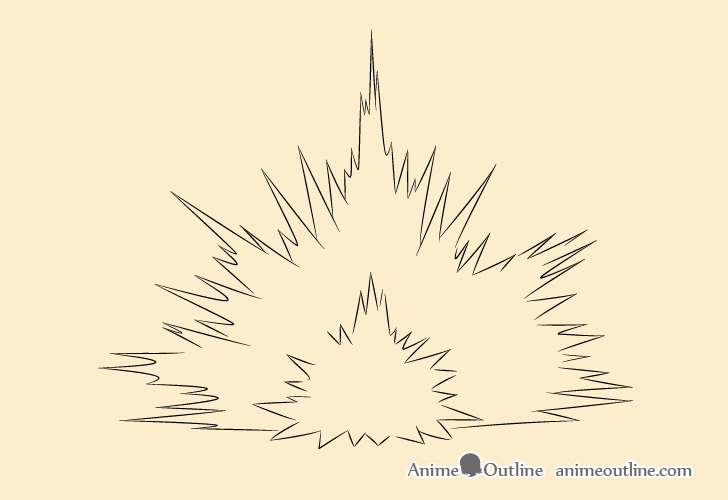
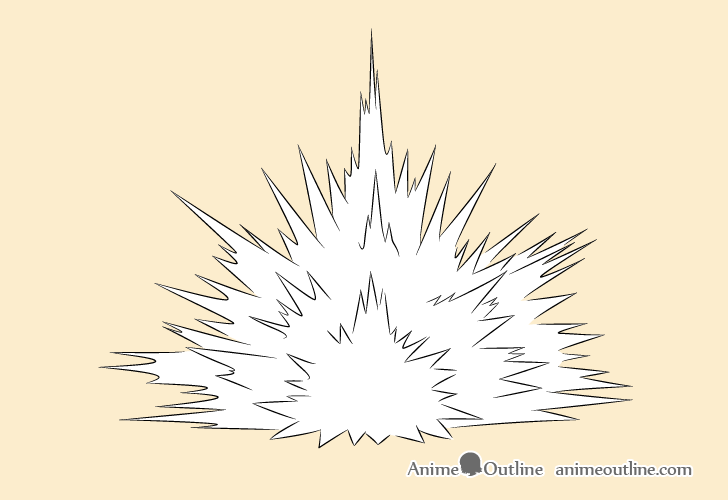
How to Draw an Explosion in the Air Step by Step
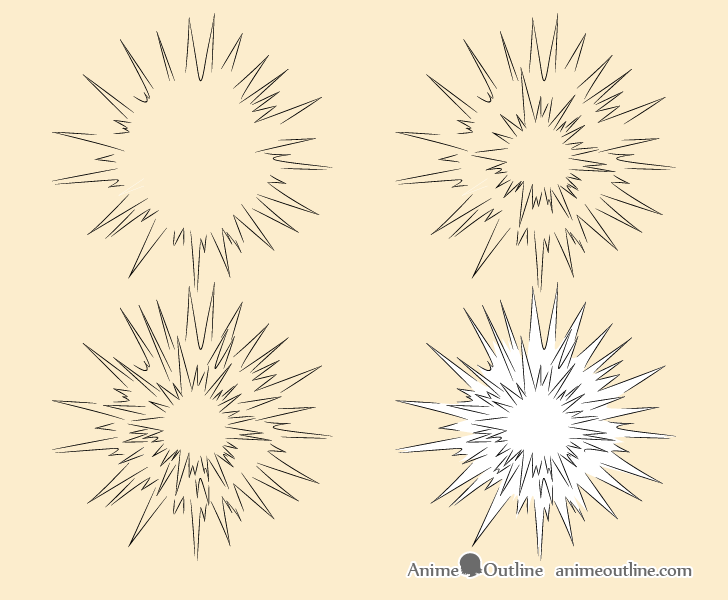
This example is of an explosion in the air (without smoke).
Step 1 – Draw the Outline of the Explosion
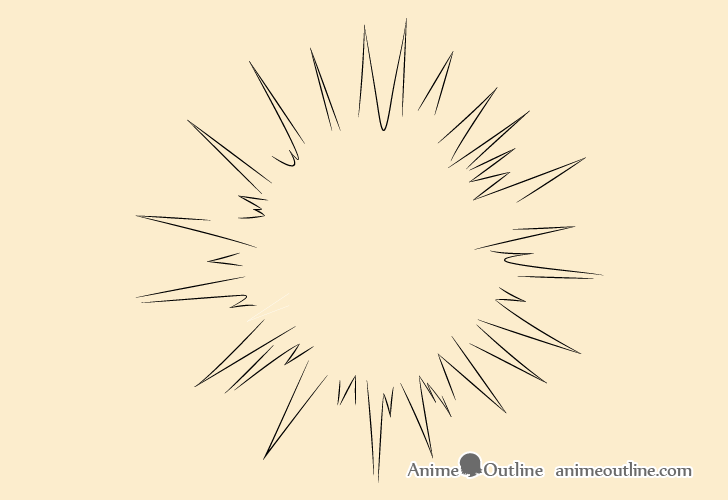
Begin by first drawing the outer shape of the explosion with the various blasts coming out of it. It should look a little bit like the sun.
Try and draw each blast slightly different in width and length. You can also draw a few of them with open ends where the lines defining them are not joined at the tip.
Step 2 – Draw the Inner Shape
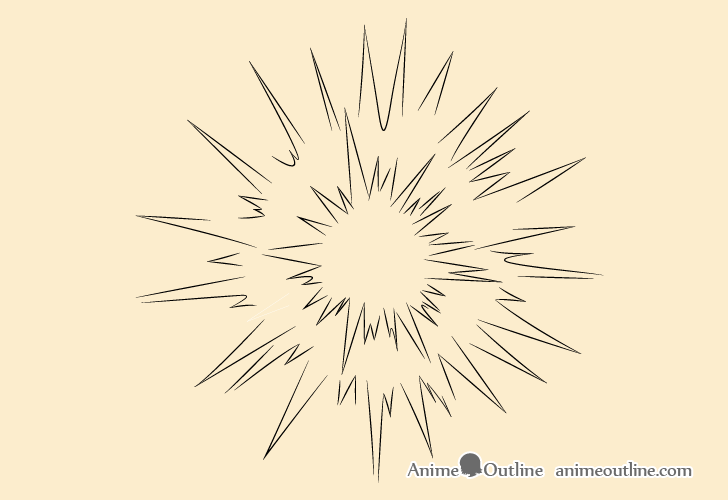
Next draw the inner shape of the explosion similar to the outline but a bit denser and smaller.
Step 3 – Draw the Details
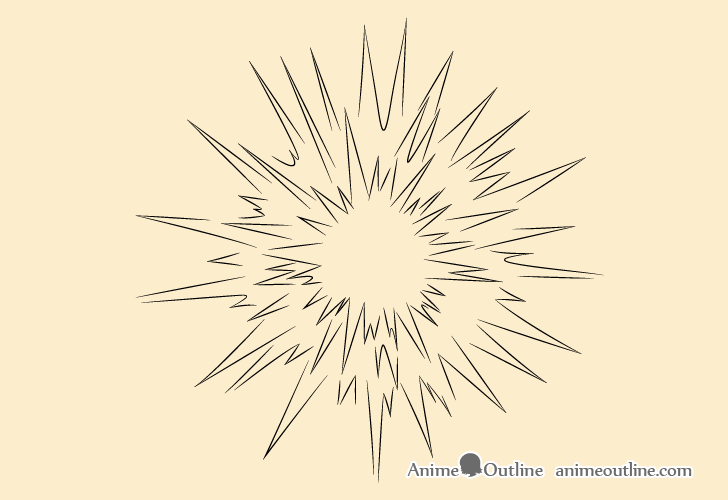
Add various blasts going in different directions between the inner and outer shape of the explosion. This will make the drawing look more three dimensional.
Step 4 – Finish the Drawing
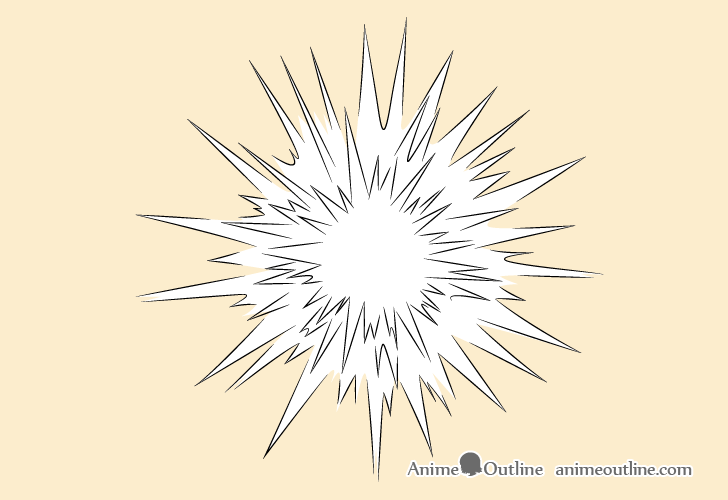
Keep on adding more details until you have something similar to the example above.
Go over your drawing with darker lines to finish.
How to Draw a Blast Explosion Step by Step
This example is similar to the previous one but instead of being in the air the explosion will be going up from the ground.
Explosions like these can be used to show something like an artillery blast.
Step 1 – Draw the Outline of the Explosion
Unlike the previous example that went out fairly evenly in all directions this explosion has a bit more of an irregular shape. You can establish the shape you want by first doing a simplified drawing similar to the example above.
Step 2 – Draw the Details
You can then use the rough outline of the explosion from the previous step to create a more detailed drawing as shown in the example above. Simply erase parts of it as needed and add more details.
Step 3 – Draw the Inner Shape
Inside the outer shape of the explosion draw a somewhat similar smaller shape.
Step 4 – Finish the Drawing
Now add various blasts going in different directions between the inner and outer shape to create a more three dimensional looking explosion.
Once done go over your drawing with darker lines and you should be finished.
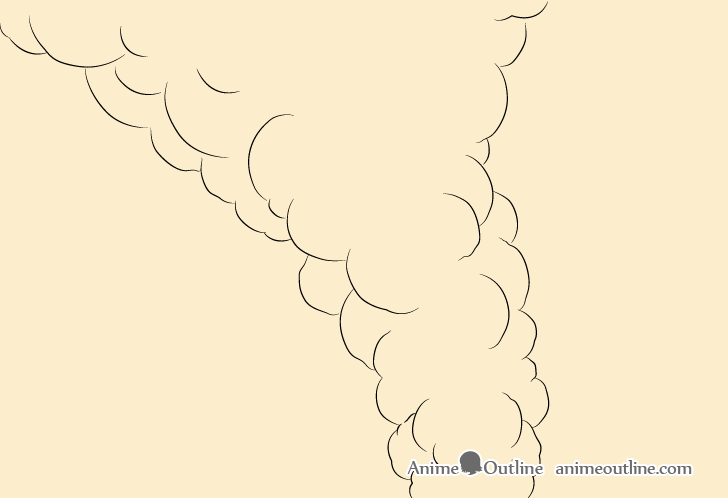
How to Draw Smoke Step by Step
This type of smoke can be drawing coming from a chimney or from a fire.
Step 1 – Draw the Outline of the Main Shape of the Smoke
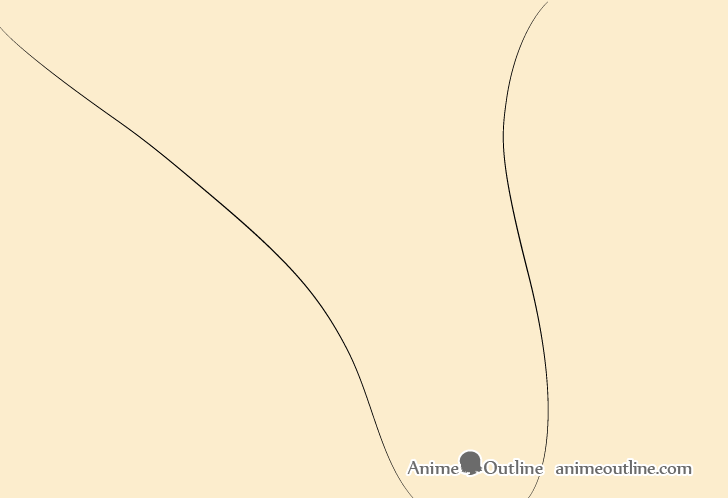
Begin the drawing by defining the overall flow of the smoke. You can do this very quickly with just a pair of lines as shown above.
Step 2 – Draw the Detailed Outline
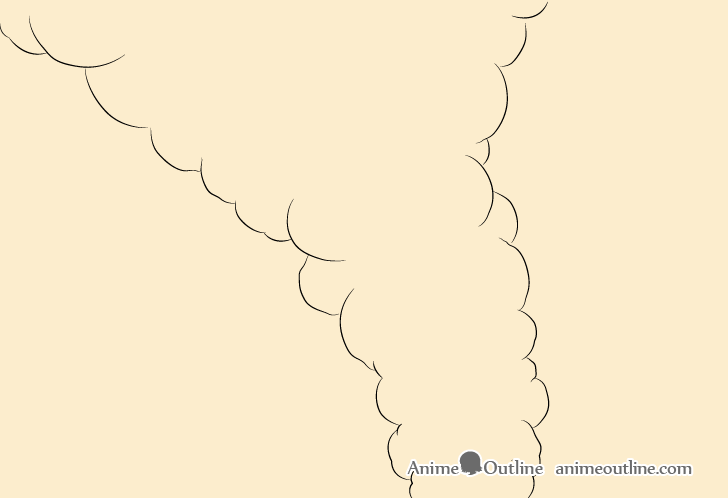
Along each side of the shape from the previous step draw the detailed outline of the smoke.
Step 3 – Draw the Inner Details
Add more inner details such as the various bumps and curves. Try and keep these fairly random in shape, size and placement to make the smoke look natural.
Step 4 – Finish the Drawing
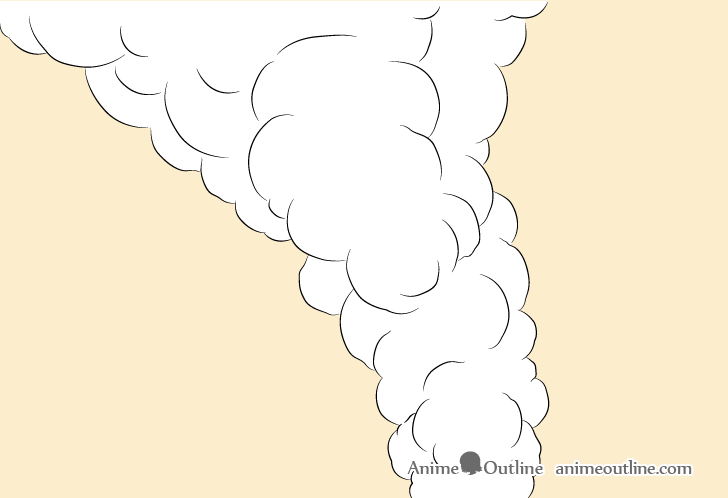
Keep on adding more details until you have something similar to the example above. You don’t want to add too much as it can make your drawing look cluttered but at the same time you don’t want to have too few details as then the smoke will look flat. Try and find a good balance.
Trace over your drawing with darker lines to finish.
How to Draw Fire Step by Step
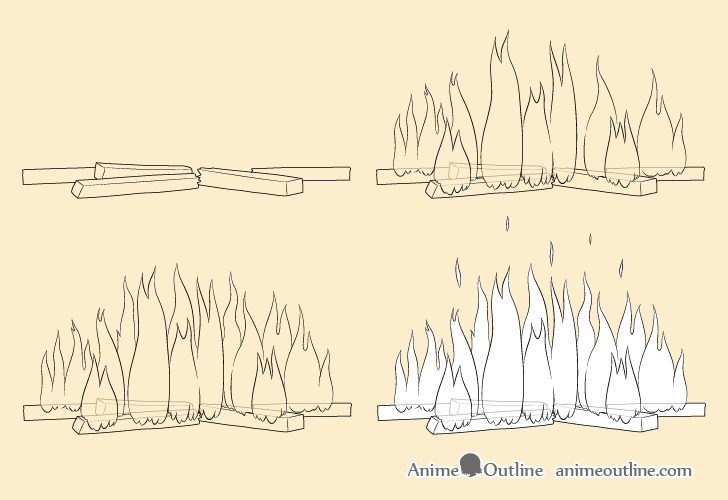
This example can be used for showing a camp fire or just random burning objects such as debris.
Step 1 – Draw the Base of the Fire

First draw the objects that will be burning. In this case it will be some pieces of wooden boards.
Step 2 – Draw the Foreground Flames
Draw fire by first adding the various sets of flames in the foreground (closer to the viewer).
Draw each flame with it’s bottom “hugging” the shape of whatever object it’s coming from. Make the overall shapes of the flames wider towards the bottom and narrower towards the top.
Try and give each shape a bit of a wave and try and draw each of the flames waving in a slightly different direction. Also draw some splitting up towards the top into several pointy tips.
As flames are somewhat transparent do not erase the parts of the burning objects covered by them. Instead you will simply want these defined by lighter lines.
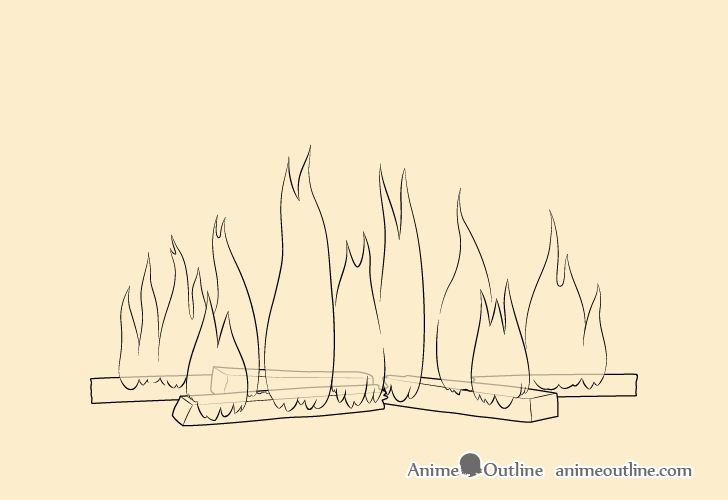
Step 3 – Draw the Background Flames
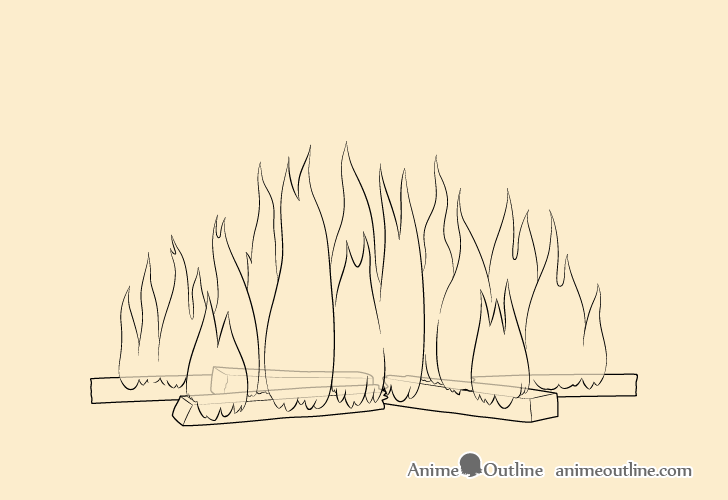
Next draw the flames in the background. Add these in between the foreground flames draw in the previous step.
Step 4 – Finish the Drawing
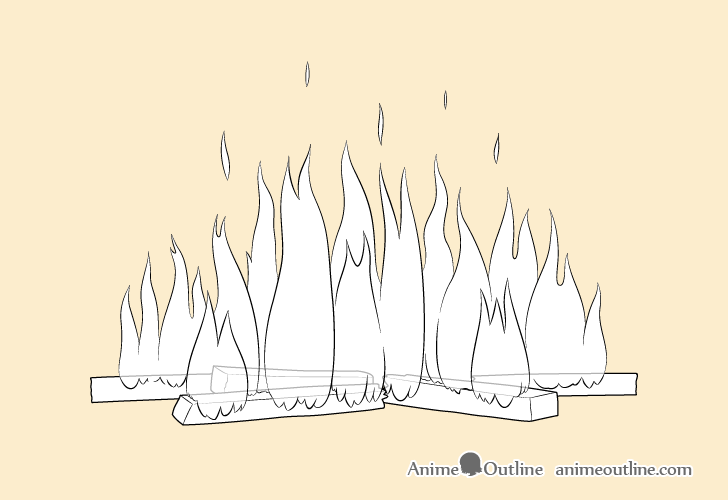
You can also add a few sparks flying up from the fire as shown in the example above.
Once done trace over your drawing with darker lines but do not go over the parts of the burning objects that are covered by the flames. As mentioned earlier you want to show that the flames are semi-transparent by keeping the objects they cover somewhat visible.
Conclusion
Various effects such as explosions, smoke and fire can be very important to showing a particular scene. The complexity of these effects can vary depending on the amount of realism an artists wants to show with their style. The examples in this tutorial are not overly complex but some of them still do have a good amount of details so don’t be surprised it takes you some time to draw them (It certainly took a while to make the tutorial).
For more similar tutorials also see:
- How to Draw Anime Weather (Snow, Rain & Wind) Tutorial
- How to Draw Manga Speech Bubbles Tutorial
- 9 Steps to Make Your Own Manga or Comic Book
- How to Draw a Shuriken (Ninja Star) Step by Step

")


