
How to Draw a Handshake Step by Step
This step by step tutorial explains how to draw a handshake. The provided tips and examples can be used for drawing in the anime, manga, comic book or traditional art styles.
Drawing a handshake can be difficult because parts of both hands are hidden behind one another and because even individual hands are not easy to draw. To help this tutorial offers a detailed breakdown of the drawing process with an explanation for each step.
Also as already mentioned these examples can be applied to drawing hands in just about any style. So if you’ve come here looking to just learn to draw hands and don’t care much for anime all of the drawing tips will still be just as useful for you.
If you do like to draw in the anime and manga style then you are definitely in the right place and should also check out the rest of the tutorials here on AnimeOutline.
Before You Begin Drawing the Handshake
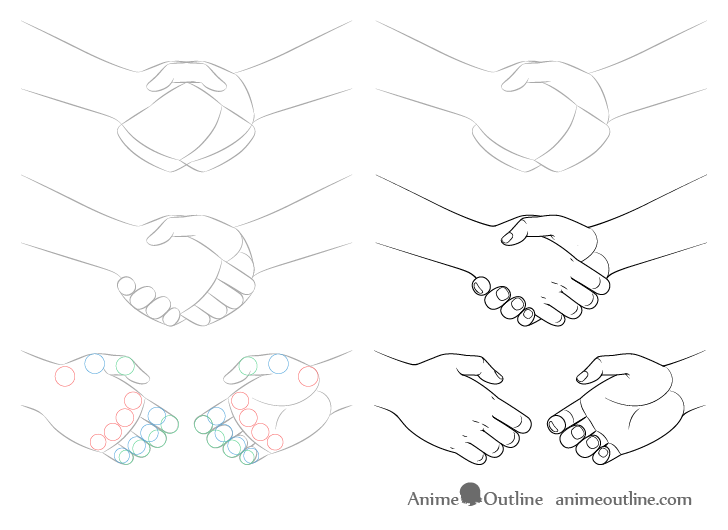
Before you draw a handshake it’s good to have an understanding of the pose each hand takes in a handshake. You can see this in the examples below.

The drawing of the “front hand” of the handshake above is made as though the “back hand” is invisible.
You can also see the rough placement of each of the joints of the foreground hand in this example. Being aware of their positioning can help you estimate the length of each part of the fingers as well as the thumb.
For more tips on drawing hands in various poses also see:
How to Draw Anime and Manga Hands Step by Step
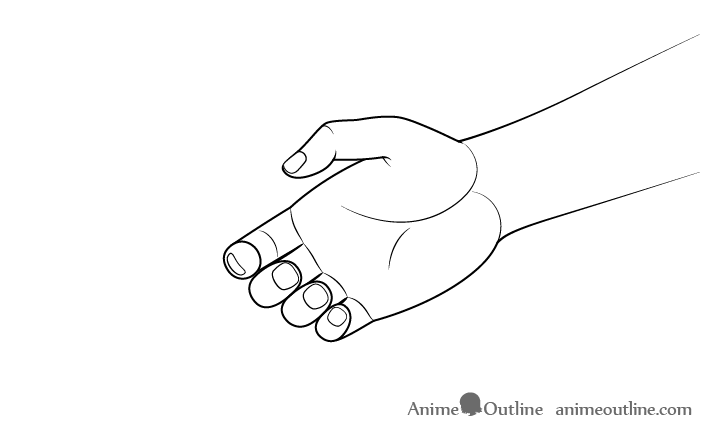
And in this next example you can see the drawing of the second hand as it would look like if the first one was invisible.
Again you can also see the estimated placement of the joints for this hand as well.
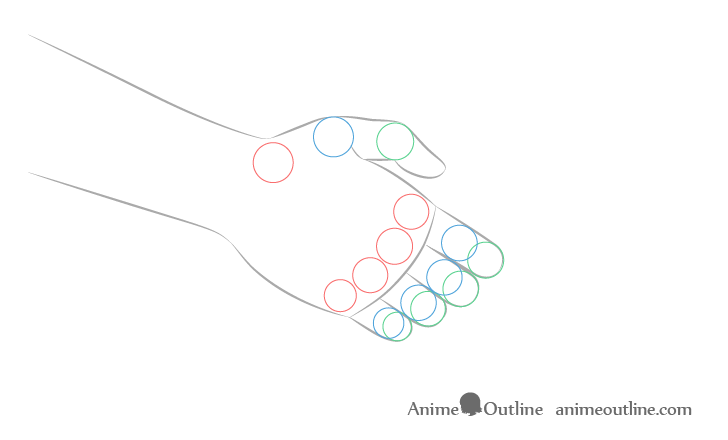
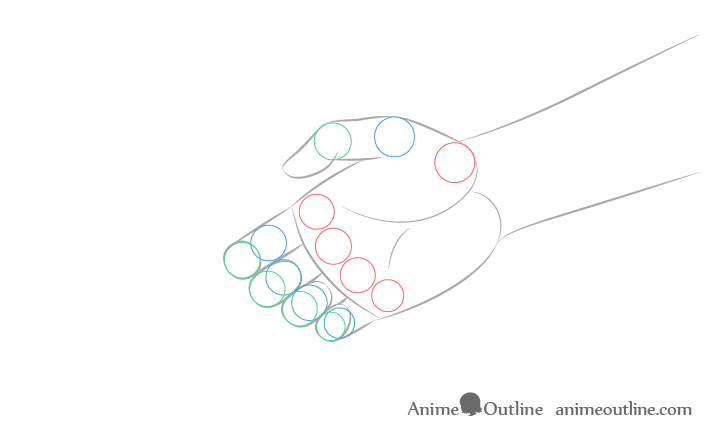
In this tutorial both hands are of equal size so you can somewhat think of each one as the other one flipped over. All of the joints and major parts will be in roughly the same places. All of the proportions should also be pretty much the same.
Step 1 – Make a Construction Drawing of Both Hands
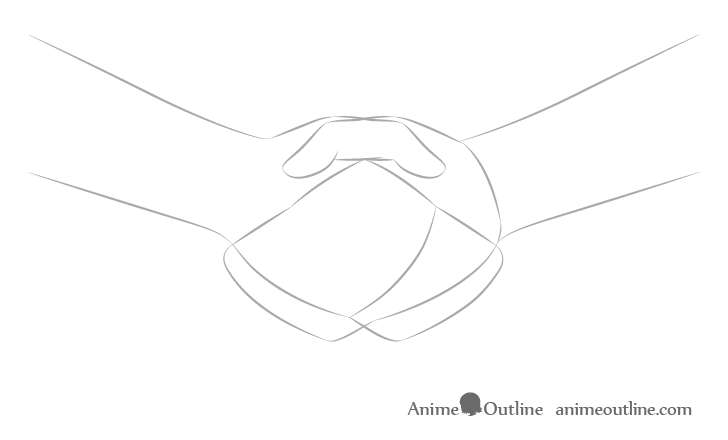
To start the actual drawing process make a sketch of each of the hands as though the other one is transparent. For this step simply draw the fingers as one combined shape and leave out all of the smaller details. Also be sure to draw very light lines that you can easily erase until the last step of the tutorial.
The goal of this step is to make sure you have the correct proportions and placement for each hand. Drawing the hidden sections will also help you insure that the different parts of the hands are properly aligned with one another. You may need to erase and redraw things several times to get everything to look right.
For examples of what can happen if you don’t make a “see through” sketch as well as other common drawing mistakes see:
Common Mistakes When Drawing Anime & Manga
Step 2 – Clean up the See Through Construction Lines
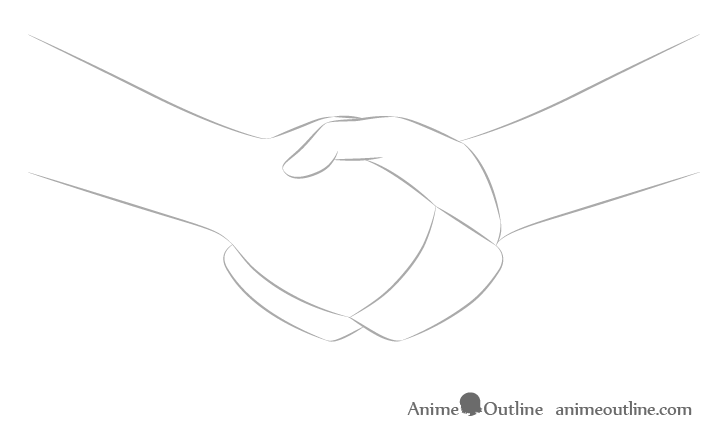
Once you believe you have the correct placement and proportions erase the parts of each hand that should be hidden behind the other hand.
After you are done you should have a fairly clean and simple construction drawing of the handshake.
Step 3 – Draw the Individual Fingers
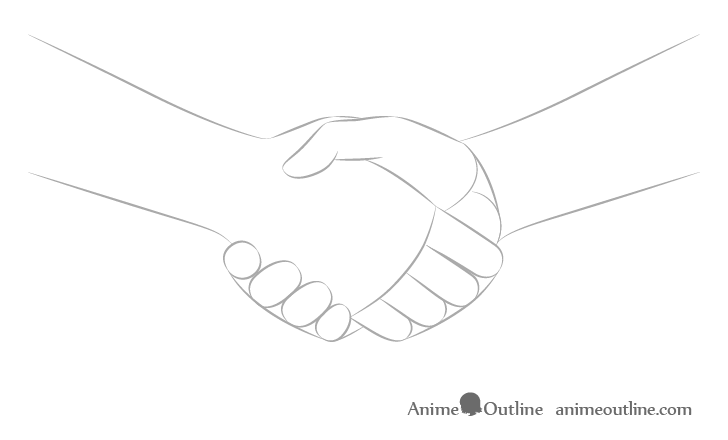
Inside the construction drawing “framework” from the previous step draw the individual finger.
Please note that the examples are made so that the fingers fit almost perfectly into the framework. In your drawing you may find that you need to tweak the length of some of the fingers to go outside the construction lines. This is absolutely fine.
Step 4 – Draw the Smaller Details of Each Hand & Finish the Handshake Drawing
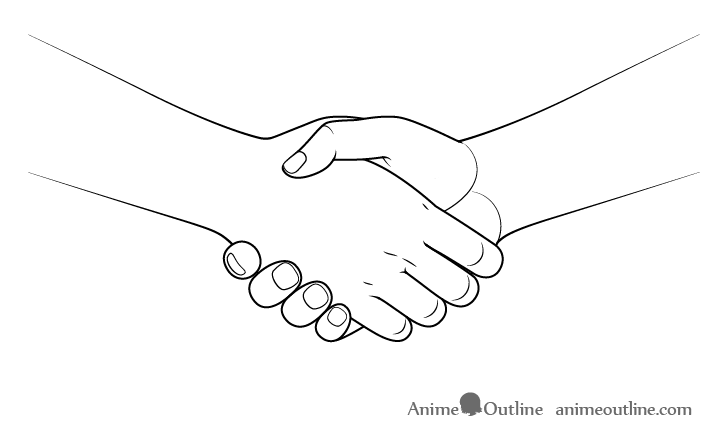
For this step you can add the smaller details of the hands such as the fingernails and wrinkles. Draw some hints of the bones around the base of the fingers on the front hand as well.
You can also add some curves around the finger joints of the foreground hand where they bend to wrap around the background hand. These will help show the bends.
In anime, manga and comic book style hands the fingernails may not be drawn at all. Drawing the fingernails does however make the hand look better and can also help show the angle of the bend of each finger. For example you can see that the fingernail on the index finger is drawn much narrower then the rest. This helps indicate that it’s pointing more towards the viewer instead of more towards the side like the other fingers.
When you finish adding all of the details go over your drawing with darker lines. You can make the lines slightly thicker for the larger parts of the hand and thinner for the smaller details.
For some other general drawing tips also see:
Beginner Guide to Drawing Anime & Manga
Conclusion
A handshake as well as hands in general are quite difficult to draw. If you really want to practice drawing handshakes try and draw each one individually in the handshake position as though the other one is invisible (as shown in earlier examples). Doing so can really help you get a better understanding of the pose of each hand and can help you avoid mistakes when drawing the two hands combined.
For drawing hands holding various objects see:
- 6 Ways to Draw Anime Hands Holding Something
- How to Draw Hand Poses Step by Step
- How to Draw Hands Holding Chopsticks Step by Step
- How to Draw a Thumbs Up (6 Easy Steps)
")


