How to Draw Anime Cat Girl Step by Step (Pictures & Video)
This tutorial shows how to draw an anime cat girl with animal ears. It consists of 15 steps and includes a line by line drawing video.
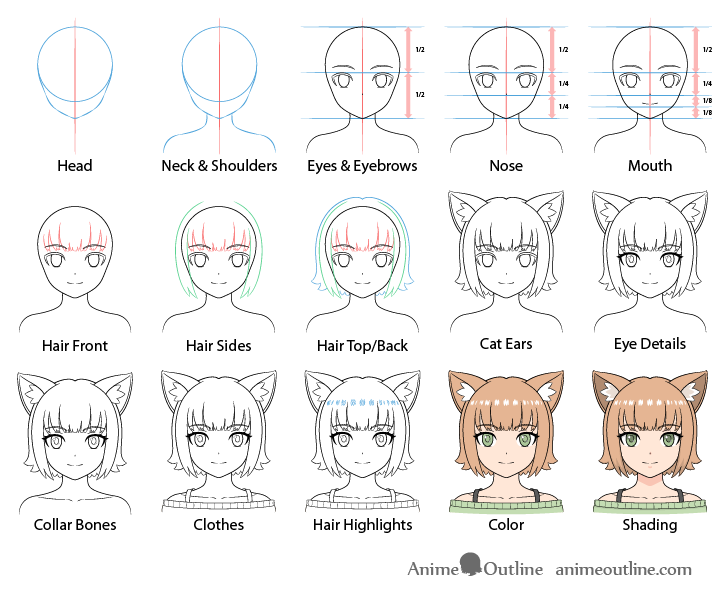
Cat girls are a very common in anime and manga. They are likely the most popular of all the “animal ear” character types. Drawing one is not particularly difficult but it can definitely be helpful to have a guide like the one provided here. The main focus of the tutorial is on the face (and of course the ears) but it also shows how to draw a bit of of the body (neck/shoulders).
This is the most detailed guide featured on AnimeOutline thus far because in addition to the illustrations it also features a video. The video shows a very detailed, line by line breakdown of the drawing process while the written part provides a more in depth explanations of how to draw. Illustrated examples are also provided for each of the steps to make it easier to follow along.
Unless drawing digitally it’s recommended that you start in pencil and make light lines that are easy to erase (you will need to do so in some of the steps).
Its recommended that you both watch the video above and read the more detailed drawing instructions below. Also please be sure to give the video a like (this helps the site A LOT).
Step 1 – Draw the Top of the Head
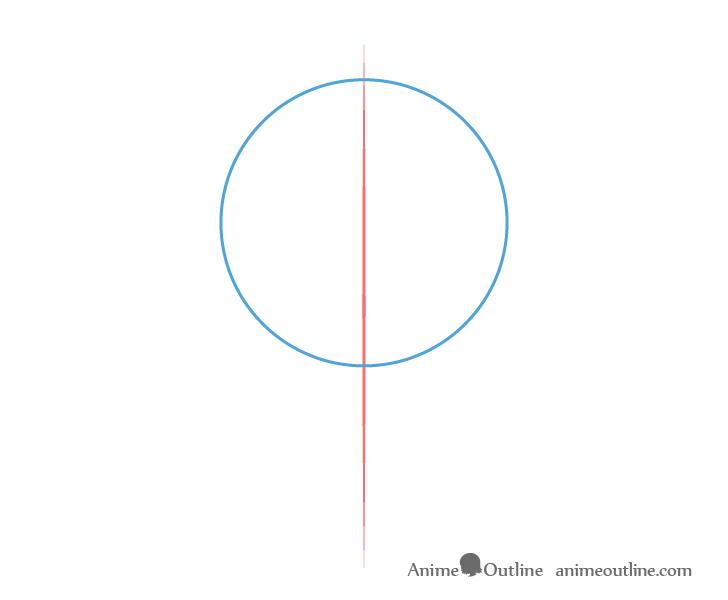
You will want to begin the drawing with an outline of the head. First make a straight line through the middle of your page or drawing area. This will act as a guide that can make it easier to see if both halves of the head (and later neck and shoulders) are relatively even in width. It can also help prevent the drawing from getting skewed to one side.
At the upper part of this line draw a circle to define the top of the head.
Be sure to leave plenty of room above the circle for the ears that will be added later on.
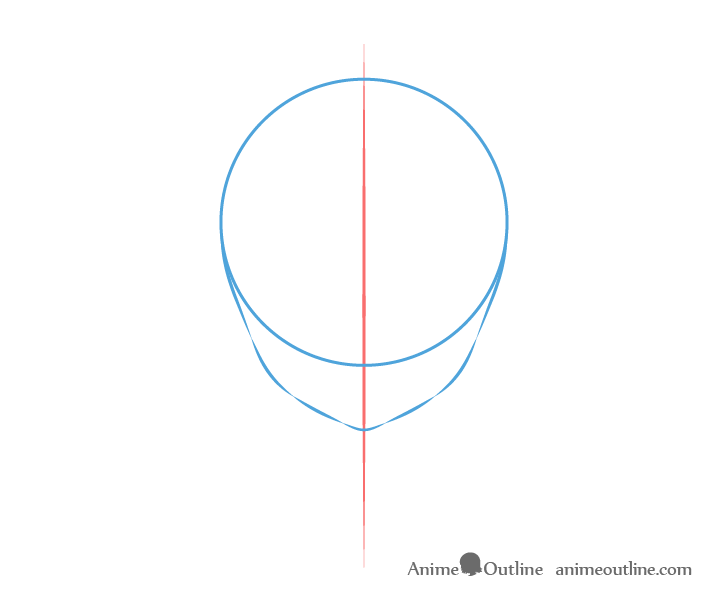
Going down from the the circle draw the lower part of the head.
In this case the cat girl will have a fairly typical anime/manga style face (fairly round with a small chin). This means that you will want to make the lower portion fairly small in comparison to the circle.
You can see it’s shape as defined by the line segments in the example. First there will be two angled sections that go down from the top of the head, these are then followed by a pair of curves. The curves than transition into two more angled lines that are then joined by a small curve at the bottom of the head.
You of course don’t need to actually have breaks in between the segments as in the example but depending on your artistic skill you can still draw them one at a time (as shown in the video). If you are confident in making longer lines you can try and outline the face in two halves (one to each side of the guide line)
Step 2 – Draw the Neck & Shoulders
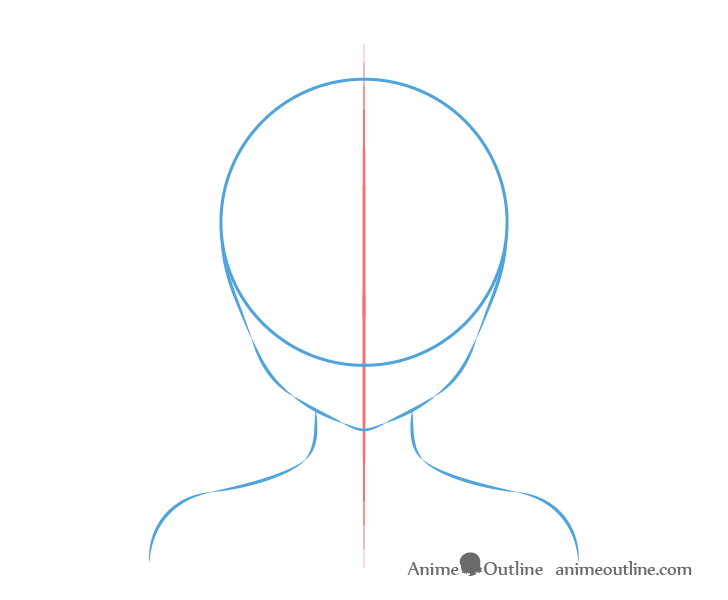
Whenever making drawing such as this one you generally want to show at least the neck and often a bit of the shoulders. Draw just the head will simply look odd.
As this is an anime character be sure to make the neck and shoulders fairly narrow in relation the head. You can again see the shapes of these defined by the broken up line segments shown in the example above.
First draw the neck with a pair of lines that curve outwards (away from the middle of the head) as they go down. These should then be followed by the light curves of the shoulders muscles and then the curves of the shoulders.
Step 3 – Draw the Eyes & Eyebrows
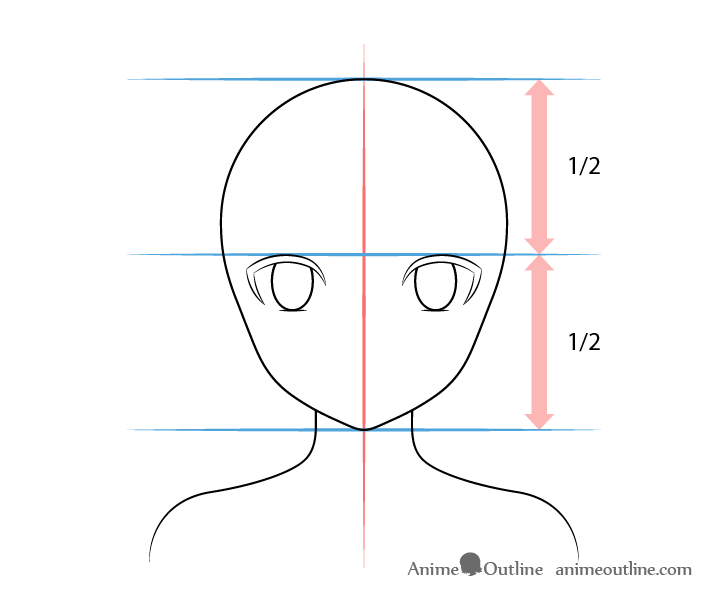
To begin adding the facial features you can draw a straight horizontal line through the middle of the head and place the eyes directly below it. As these are anime eyes you will want them to be fairly big and tall, you can also make the irises oval in shape. Draw the eyelashes with a downward curve at their inner ends to give the eyes a more cat-like look.
Leave the smaller details of each eye for a later step.
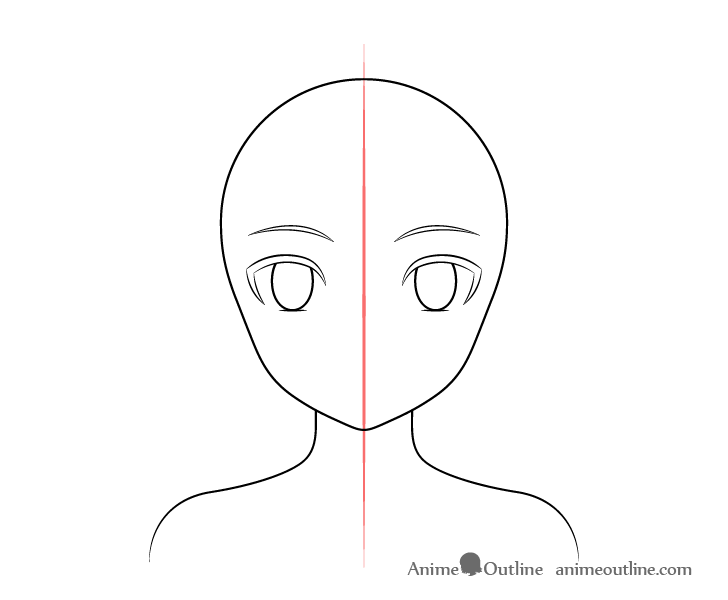
A little bit above the eyes draw the eyebrows. You can define each one with just two curved lines. Make them a bit thicker towards their inner ends and narrower as they go out to the sides of the head.
For this particular drawing they will pretty much be in their normal/relaxed state (with their inner ends angled slightly downwards).
The natural position of the eyebrows can change depending on the type of personality you want to give to the character you are drawing. Generally eyebrows angled more inwards (toward the nose) create a more aggressive look while eyebrows angled outwards (up and away from the nose) create a more shy/innocent look.
For more on drawing different character types see:
How to Draw Anime Characters Tutorial
For different kinds of eyebrows see:
How to Draw Anime & Manga Eyebrows
Step 4 – Draw the Nose
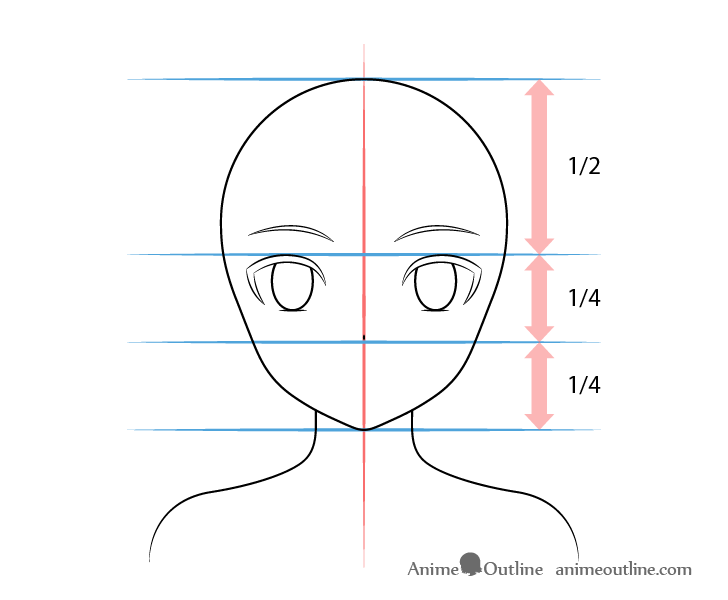
Position the nose in the center of the head halfway between the top of the eyes and the bottom of the chin. In this case it will just be a tiny vertical dash (as is so common for anime and manga characters)
For more on drawing noses see:
How to Draw Anime and Manga Noses
Step 5 – Draw the Mouth
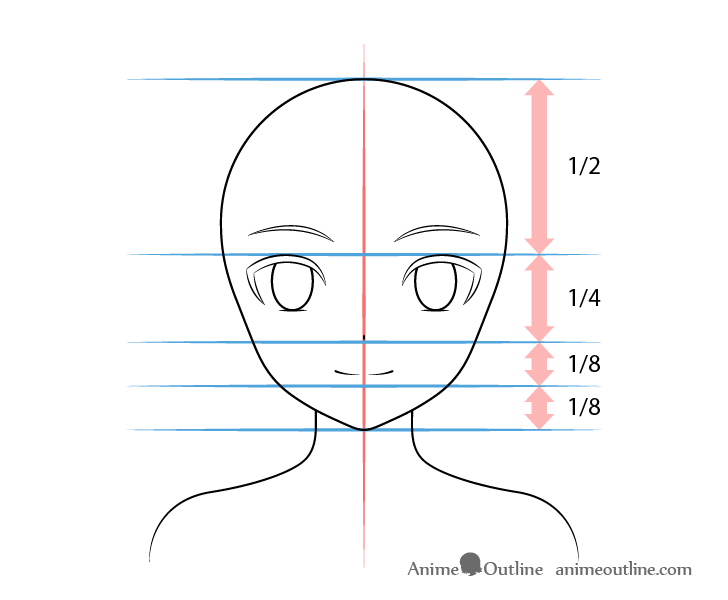
To position the mouth draw it a little bit up from the halfway point between the bottom of the nose and the bottom of the chin. This halfway point is actually the location of the bottom lip. However, as this is an anime character the bottom lip is not actually draw, as is very common in the style.
In this case the cat girl will have a light smile so you can draw the mouth with a bit of a curve that has a small break in the middle (again common in anime and manga).
For more on drawing anime mouth see:
How to Draw Anime & Manga Mouths Tutorial
Step 6 – Draw the Front Hair
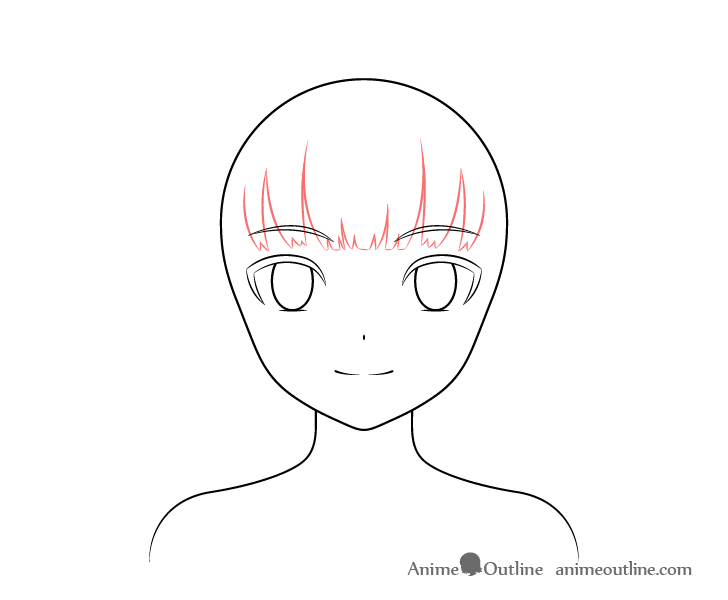
As the hair of anime characters can be fairly complex drawing it will be split into three parts. These will consist of:
- Front section (hair along the forehead) – shown in red.
- Side sections (hair along the sides of the face) – shown in green
- Top/Background section (hair along the top and in the back of the head) – shown in blue
For more on this approach and more on drawing anime hair in general see the following tutorial:
- How to Draw Anime and Manga Hair – Female
- How to Draw Anime Hair in 3/4 View Step by Step
- How to Draw Anime Hair Blowing in the Wind
For this first step draw the hair along the forehead.
First draw the larger splits/clumps (as shown in the video) and then draw the smaller splits and clumps on their ends.
In this case the hair will be trimmed. You can show this by giving a few of the clumps flat ends.
Step 7 – Draw the Sides Hair
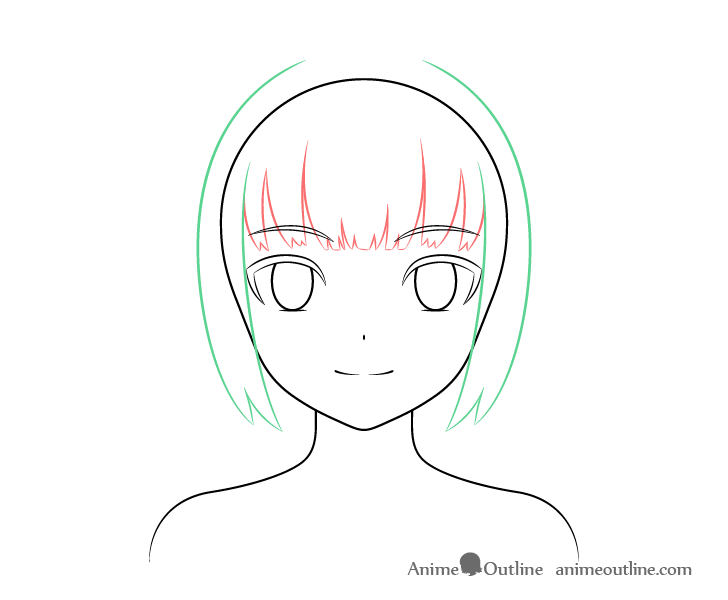
Draw the hair on the sides as show large sections that lightly curve around the face as they go down. You can then give each one a split on the end.
Step 8 – Draw the Top/Background Hair
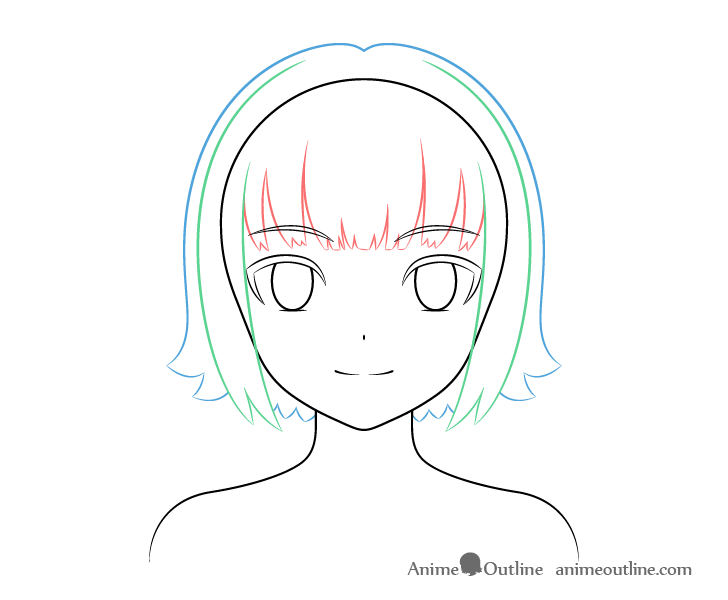
Finally draw the top/back section of the hair. Start with the split at the top o the head and draw each side as a smooth curve that somewhat follows the shape of the head. Be sure to leave a good amount of distance between it and the head to give the hair a good amount of volume. Again, add a pair of splits on the ends that this time curve outwards (away from the head).
Next draw the hair i the back (between the neck and side sections) as a series of little clumps.
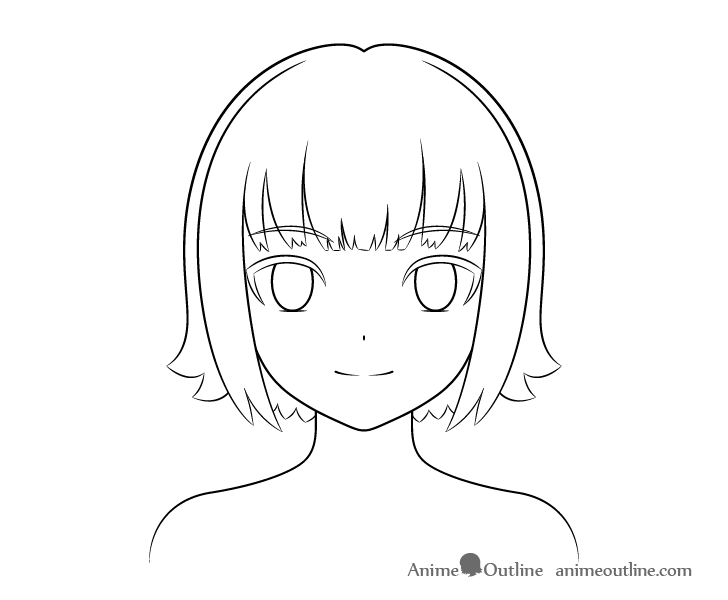
Once all sections of the hair are outlined you can erase the part of the head that is covered by it. However, leave the outlines of the eyebrows overlapping the outlines of the hair. This fairly common in both anime and manga.
Doing so can make the hair clumps in that particular area look lighter and less dense.
Step 9 – Draw the Ears
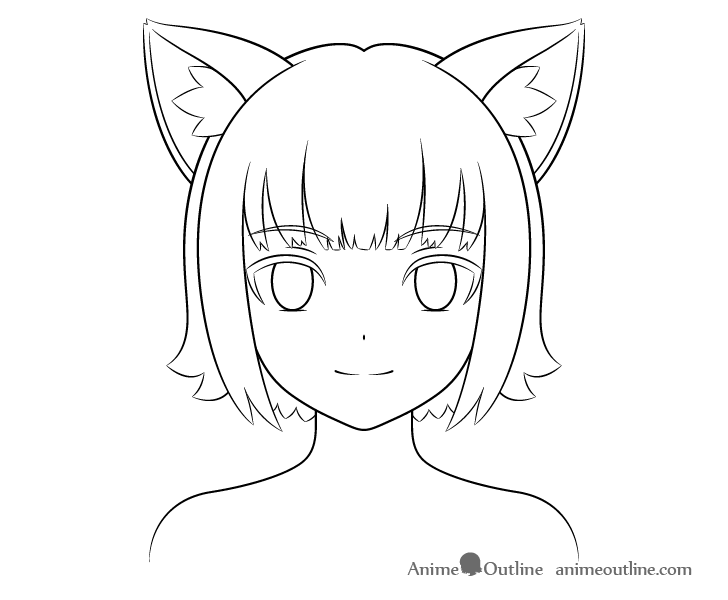
Finally for the most defining part of the cat girl draw the animal ears.
First outline the main shape of each ear and give them tiny splits on their ends to create a hint of fur. Next draw the “ear fluff” (fur coming out of the ears) that animals tend to have.
You can show this a bunch of clumps sticking out of each ear.
When drawing out the various parts of the cat ears they will overlap parts of the hair. Similar to the head you can clean up the lines that define the parts that are hidden as you draw.
For drawing regular ears see:
How to Draw Anime and Manga Ears
Step 10 – Draw the Details of the Eyes
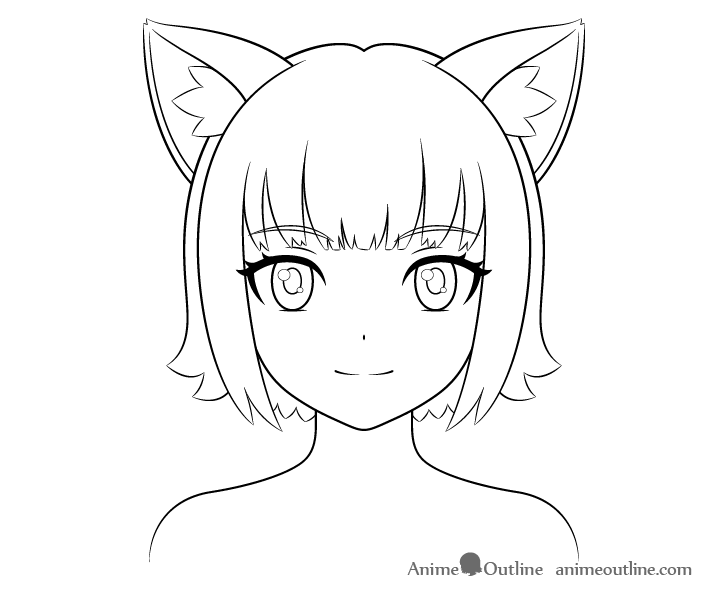
With the main parts of the cat girl outlined you can add the smaller details of the eyes. These will be the:
- Eyelids – hints of each one as a small curve above each eye
- Lashes – hints of individual lashes at the outer upper corner of each eye
- Pupils – smaller ovals inside the irises
- Highlights – Light spots overlapping the pupils that show light reflecting from the smooth/wet surface of the eyes
You can also fill in the eyelashes with black or pencil shading once done with this step. Just be sure that you are happy with the way things are placed in your drawing before doing so.
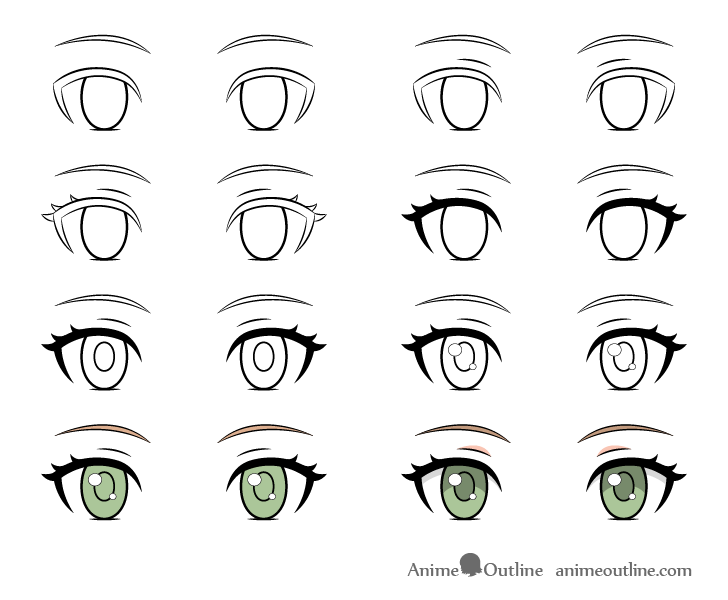
You can see the full step by step breakdown of drawing the cat girl’s eye above. You should however save the coloring and shading portions for when you get to the corresponding steps in the tutorial.
For more on drawing female anime eyes see:
How to Draw Female Anime Eyes Tutorial
Step 11 – Draw the Collar Bones
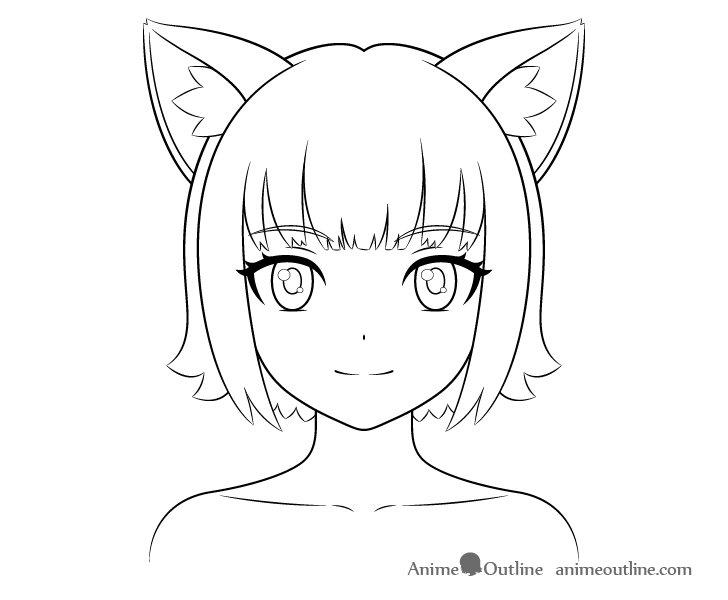
Going from the upper curves of the shoulders towards the middle of the chest add the collar bones. You can then add a little break in the line that defines each of these followed by a light curve.
For more on drawing the collar bones see:
How to Draw Anime Neck & Shoulders
Step 12 – Draw the Clothes
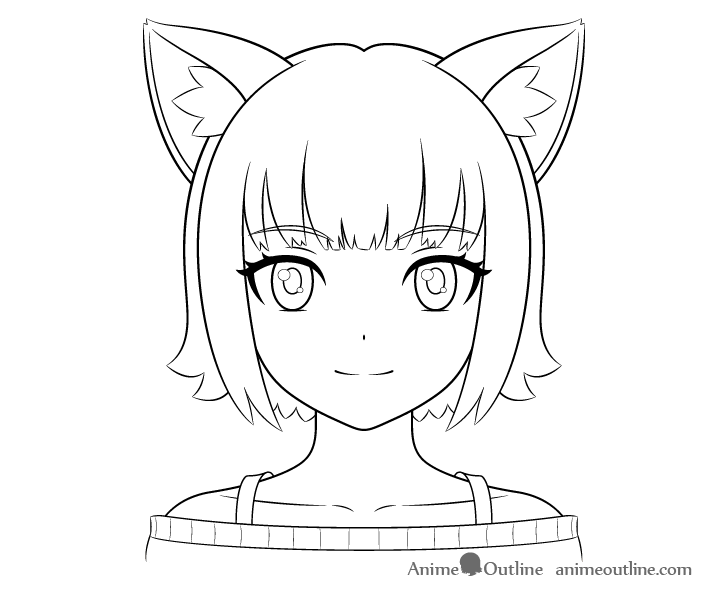
Similar to drawing the hair over top of the head draw the clothes over top of the body and erase the parts that are covered by them afterwards.
In this case the cat girl will be wearing a sweater with open shoulders. You can simply refer to the example for its design and to the video for the line by line process of drawing it.
Once this step is done you can trace over your lines to darken them (if you feel everything looks good).
Step 13 – Outline the Hair Highlights
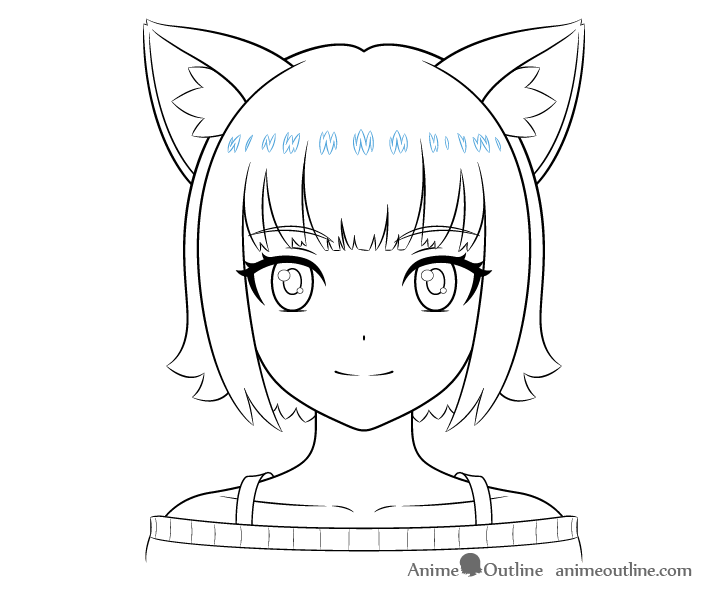
Before coloring the drawing you can outline a series of little hair highlights (little light reflections in the hair).
Alternatively create these as you color or draw them over top of the color (digitally or using a white correction pen).
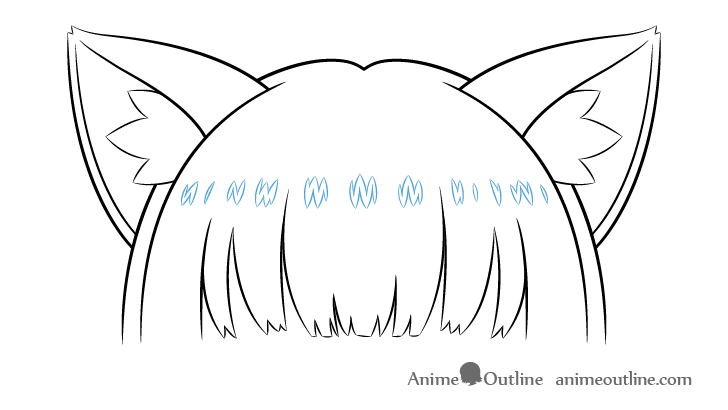
You can see a larger drawing of the highlights above. You can also refer to the video at the start of the tutorial.
For more on drawing anime style hair highlights see the following:
Different Ways to Draw Anime Hair Highlights
Step 14 – Add Shading
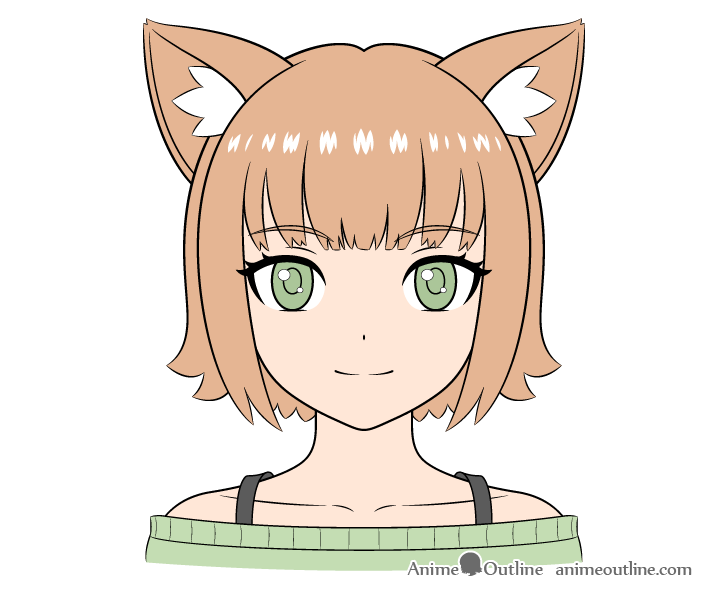
For the last step of the tutorial you will want to first color the drawing. Do this by filling in each area as follows:
- Ears/Hair/Eyebrows – brown (optionally with some orange in it)
- Eyes/Clothes Green – green (you can make the green of the eyes slightly darker)
- Shoulder Straps – dark grey or black
Be sure to leave the highlights in the hair/eyes white.
To learn more about selecting colors for an anime or manga style character see:
Beginner Guide to Picking Colors When Drawing Anime & Manga
Step 15 – Add Shading
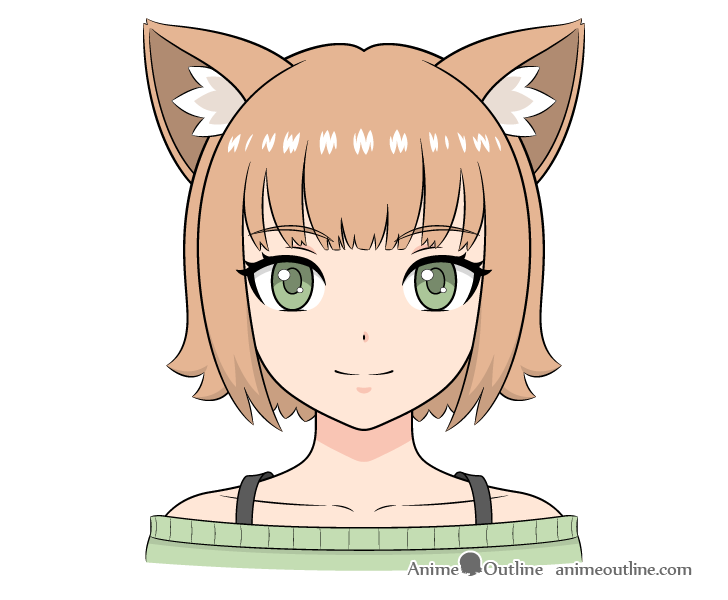
Once you have each area filled in with the corresponding color you can add some basic shading. In this case it will be done using a technique called “Cel Shading” that you might be familiar with if you’ve done other similar tutorials here on AnimeOutline. This refers to coloring/shading where there are no smooth transitions (gradients) between the light and dark areas.
First outline the shadows on the ear fluff. Do this very lightly as you want this outline to blend into the shading. You can darken these areas afterwards. Next darken the pupils and and the upper parts of the irises as shown in the example.
The rest of the shading will be applied based on the lighting. For this particular drawing the character will be shaded as though she is either outside during the day or indoors in a well lit room (with most of the light coming from above).
In the above setup the shadow will generally be distributed as follows:
- Ears – on the inner part of each ear
- Eyebrows – on the parts in between the hair clumps
- Eyelids – right above each of them
- Eyes – along the upper white
- Nose – to one side of it
- Mouth – below the bottom lip (lip itself is not drawn)
- Hair – the back sections (and other listed later)
- Neck – right below the head in the shape of the chin
- Clothing – on the back inner ends of the straps and below the strip running along the shoulders
More hair shadows can be added along the bottom of the side and top/back clumps as shown in the video and example above.
Once done with this step you should have a finished drawing of an anime cat girl.
For more on shading in anime and manga style see:
Conclusion
Cat girls are quite popular in both anime and manga. Drawing them is not much different than drawing regular female anime characters, with the one major exception being the animal ears. As a detailed guide was provided on both getting the anime look and drawing the ears, hopefully you’ve not had much trouble following along.
As already mentioned, this tutorial is the first one on the site to have a video combined with written instructions and illustrated examples. If you like this new format leave some feedback in the video’s comment section. Also be sure to leave a like and to subscribe to the AnimeOutline channel. All of these are VERY important in insuring that the videos are seen by more people. If you’re a fan of AnimeOutline this is your chance to really help out.
Finally you can also share the tutorial with others if you know anyone with similar interests.
For more on drawing fantasy or animal anime style characters also see:
- How to Draw an Anime Fox Girl Step by Step
- How to Draw Anime Dog Girl Step by Step
- How to Draw an Anime Elf Girl Step by Step
- How to Draw Anime Wolf Girl Step by Step
- How to Draw an Anime Vampire Girl Step by Step
- How to Draw an Anime Panda Girl Step by Step
- How to Draw a Princess in 12 Step (Anime or Manga)

